Lightning is to Visualforce what .NET was to Visual Basic

When I began my programming career, Visual Basic (version 3.0) was just emerging as a popular alternative for creating Windows-based applications. Ironically, it was a component-based approach to development that brought forth an army of programmers developing third-party components. Programmers could quickly spin up applications by simply dragging and dropping components onto a form design surface and then wiring everything together with events.

Visual Basic grew in popularity and for a few wonderful years, it was the hot new kid on the block. It brought about a sort of programming renaissance and lowered the barrier to entry for many up and coming developers.

Of course, the reign of Visual Basic was not meant to last. No programming language (or platform for that matter) stays golden forever. In 2002, Microsoft launched the object-oriented successor to Visual Basic called VB.NET. I can remember being so excited when it was released and I dove head first into learning all about the new Framework.

I have a confession to make. In all my excitement over the introduction of the .NET Framework, I hurriedly convinced one of my clients to let me rewrite one of his VB applications using VB.NET. Unfortunately, I made a mistake that many developers at that time did. I assumed that rewriting an application like this would be a simple conversion process. That I would just go in and simply swap one set of code for another and magically everything would work wonderfully.

That did not happen. In fact, the application I rewrote started to fall down in production almost immediately. It experienced huge performance problems. In short, it was a disaster. I had actually taken something that was working quite well and turned it into soup.

The problem was that VB and VB.NET were so fundamentally different. Design patterns that worked well in VB, failed miserably in VB.NET.

What I should have done was to start slowly.  Rather than try to convert an existing VB application to using the new .NET Framework, I should have looked at what I needed to do to make the .NET application perform well from the very beginning. I should have learned about best practices and really understood how different the new object-oriented approach to application design would be.

Eventually, I did do all those things, and also switched to using C# (which is much better imho), but only after I messed up my poor clients original VB application. Live and learn, I say. No one is perfect and we all make mistakes. The trick is to learn from them.

I feel like I have learned from mine. But the funny thing is that I can see a familiar pattern emerging now in the world of Salesforce development. I can see how the introduction of the Lightning framework will bring about some of the same challenges for Salesforce developers transitioning from Visualforce as there was for Microsoft developers transitioning from VB to .NET.

VBToLightningSmaller

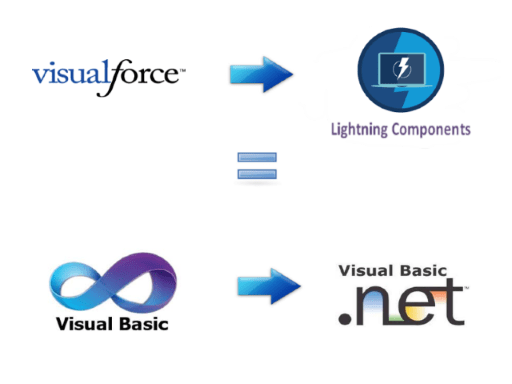
Some VB developers transitioning to .NET were never able to make the transition successfully and their careers suffered as a result. I imagine this might happen in the Salesforce world too and there will be Visualforce developers that stay Visualforce developers.

Of course, Visualforce is not going away anytime soon. But, anyone that believes it will not go away eventually is just kidding themselves. Salesforce is firmly committed to Lightning and it is no doubt the future of Salesforce development.

So, what should you do if you are a Salesforce developer that knows a lot about Visualforce?

You should embrace the new Lightning development framework and seek to understand how it differs from traditional Visualforce development. It really is like comparing apples and oranges. Begin by checking out this excellent Trail called Applying Visualforce Skills to Lightning. It helps to warn you about some of potential pitfalls you may encounter.

Just like with VB and .NET, design patterns that worked well in Visualforce, will fail in the world of Lightning. You could easily make an application perform worse if you just attempt to swap one set of code for another.

And so this is a good time for me to tell you about a new course I just started to design for Pluralsight. It will be titled Lightning Component Development Best Practices and I hope to release it before the end of the year.

In the meantime, you can also check out my latest course on Pluralsight titled,  Customizing Salesforce with Lightning Components. I have an entire module dedicated to Working with Lightning Data Service and using Base Lightning Components, which are definitely best practices Lightning developers should be using now.

And stay tuned because I will be covering many best practice topics (such as this one about Conditional Rendering in Lightning) on this blog in the months to come.


Apply .NET Skills to Salesforce

NETTrailReleased yesterday is a new trail titled, “Apply .NET Skills to Salesforce” and it is all about wooing more .NET developers to the Salesforce platform, which I am of course, all for.

This FREE and most excellent resource is written by a .NET developer for .NET developers. It does not sugar coat anything about the platform, but instead tells .NET developers honestly and directly what the platform offers and how their existing .NET skills can allow them to transition easily to Force.com. It also points out a lot of the common pitfalls they will want to avoid to be successful on the platform.

It consists of two modules. The first is all about SOQL and database basics and it has the following 4 units:

  • Moving from SQL to SOQL
  • Writing SOSL queries
  • Writing Efficient Queries
  • Manipulating Records with DML

The second module (which is my absolute favorite), it all about Apex and the Force.com platform and it has the following units:

  • Mapping .NET concepts to Force.com
  • Understanding Execution Context
  • Using Asynchronous Apex
  • Debugging and Running Diagnostics

I hope you check them out, as well as the Salesforce platform, which is growing more impressive by the day. And please let me know what you think.

Updates to the Force.com Toolkit for .NET

Almost two years ago, DeveloperForce released a REST-based toolkit that offered an easy way for .NET developers to connect with the Force.com & Chatter REST API’s.

Since then, the toolkits creator has unfortunately left Salesforce, but lucky for us all, that has not stopped development. Thankfully, the newly formed alliance between Salesforce and Microsoft (along with some great pull requests made by the open source community) has allowed the update of this fantastic toolkit to continue.

There have been several big changes made to the toolkit in the past few months.

You should know that all these changes are part of the latest NuGet package, which you can update by going into Package Manager and clicking the Update button for the DeveloperForce.Force package. As you can see from the image below, the last publish was on 11/12/2015.

UpdateToolkit

One of my favorite new features is:

  • Ability to execute SOSL queries – This capability was provided by a pull request from Jerad Clingerman in August, in which he added the SearchAsync method. So now, you can do a search using code such as this:
var test = await client.SearchAsync<Contact>("FIND {617*} in Phone FIELDS RETURNING Contact(Id, FirstName, Lastname, Email, Phone, MobilePhone)");

Unfortunately, there is still no substantial documentation for how to use the toolkit. If you have a question about usage then your best resource is to look at the functional tests which are available here:

You can also check out a series of articles I wrote for DeveloperForce that was called Nothin but.NET. In this 6 part series, I go as deep as I could into how to use the Toolkit. It should be enough to get you started.

Enjoy!

Step Three: Publish Web Application to Windows Azure (3 of 4)

This post will be part 3 of a 4 part series in which I will step you through what is necessary to expose and access a multi-table SQL Server Azure database with built-in relationships. These steps were covered at a high-level in my talk , but in this series, I will go through each step in greater detail. The steps will consist of the following:

1.) Create a SQL Server Azure Database

2.) Create ASP.NET application to expose data as OData

3.) Publish Web Application to Windows Azure (covered in this post)

4.) Create External Data Source and Define Relationships in Salesforce

TIP: Click here to access the code for this post, along with the Powerpoint slides from my talk at Dreamforce 2015 (which is what this post series is based on). But, if you follow along with tutorial in this post, you will not need it since you will be generating the code for yourself.

Step 3: Publish Web Application to Windows Azure

In Step 2, I walked you through creating an ASP.NET web application that exposed SQL Server Azure data as OData through a web service. As it is now, that web service will run only on your local machine. In order for Salesforce to be able to access the data exposed by the web service, it must be published to an external website.

Create Web App in Windows Azure

You can publish the web application easily to Windows Azure, but you will first need to create a website/ web app in the Windows Azure Management Portal. To do so, log in to Windows Azure and click on the Web Apps icon in the left menu bar. Click New (next to a big plus sign) in the bottom right corner of the web apps page. From the new menu, click Quick Create and enter a unique name that will be used in the URL for this website (see below) and click Create Web App.

AzureWebAppsIt should take a few minutes for the web app to be created. When it is done, it should show a status as Running. Click on the web app to go to the quick start page and from there, select the Download the publish profile link under Publish your app. Save the file it generates to you local machine.

Use the Publish Web Wizard

Visual Studio has a nice wizard that you can use for publishing applications to external sites. You can access it by right-clicking the project in Solution Explorer and selecting Publish. On the first page of the wizard, click Import and the browse to the location on your machine where you saved the publish profile.

The next page of the wizard should have all the settings entered for you as it got this information from the publish profile. Make sure you click the Validate Connection button (see image below) to verify that your connection is good.

PublishWizardOnce validated, click Publish and wait for the publish to complete. When it is done, you will see a message in the status bar of Visual Studio indicating it is finished.

TIP: Be prepared for the initial publish to take several minutes to complete. If you try to access the web app before it has finished, you will get errors telling you that the resource cannot be found.

You can then access the web service using a web browser. The URL should be something like the following:

http://<your website name>.azurewebsites.net/<your service name>

If successful, you should see the same XML results that were displayed when you browsed to the service on your local machine.

Query your OData in the Web Browser

Because your data has been published to the web as OData, you, or anyone else can access the data directly using any web browser. For example, if you wanted to see all the data in the customers table, you could add the entity name Customers (note that it is case sensitive) to the end of the URL and hit enter. If you are using a browser such as Google Chrome, this will display for you ALL the customer data in XML format.

Great, but what if you just wanted to see data for a certain customer?

To accomplish this, you can add query string parameters to the end of the URL, such as the following:

Customers?$filter=Addr1 eq ‘123 Main St’

The query string above can be used to return all data from the Customers entity where the Addr1 field is equal to ‘123 Main St’. For the PetSupplies data, this should return a result such as what you see below.

CustomersQueryResultOk, but what if you wanted to see the data in a nicer format than XML?

Well, luckily there is a wonderful free online tool called XOData, that can be used to explore publicly exposed OData. The tool is made by a company called PragmatiQa and to access xodata, go to the following URL:

http://pragmatiqa.com/xodata/

From there, click Choose Access Option and select Metadata URL. You can then enter the URL of your service, including the /$metadata at the end of the URL. So for the PetSupplies database, the URL would be:

http://petsuppliesrelational.azurewebsites.net/petsuppliesrelationaldata.svc/$metadata

Once entered, click Get Details and you should see results similar to the following:

pragmatiquaYou can then select the Data Explorer tab and be able to easily select, filter and order data from any of the exposed entities. The results will be displayed in a nice table format that is much easier to read than the XML you saw earlier (see image below).

CustomerQueryInXOData

Isn’t that beautiful? I really think the guys at PragmatiQa did a GREAT job with that tool.

And finally, stay tuned for the final post (in about a week), where I will show you how to access the oData in Salesforce by creating an External Data Source.

Step Two: Create ASP.NET Application to Expose Data as oData (2 of 4)

This post will be part 2 of a 4 part series in which I will step you through what is necessary to expose and access a multi-table SQL Server Azure database with built-in relationships. These steps were covered at a high-level in my talk , but in this series, I will go through each step in greater detail. The steps will consist of the following:

1.) Create a SQL Server Azure Database

2.) Create ASP.NET application to expose data as OData (covered in this post)

3.) Publish Web Application to Windows Azure

4.) Create External Data Source and Define Relationships in Salesforce

TIP: Click here to access the code for this post, along with the Powerpoint slides from my talk at Dreamforce 2015 (which is what this post series is based on). But, if you follow along with tutorial in this post, you will not need it since you will be generating the code for yourself.

Step Two: Create ASP.NET application to expose data as OData

I will be walking you through creating an ASP.NET application that utilizes a WCF (Windows Communication Foundation) data service, along with the WCF Data Services Entity Framework Provider to render the data created in Step One as an OData endpoint.

You will need a copy of Visual Studio to complete this next step. In this tutorial, I will be using Visual Studio 2015 Community version, which you can download for free by going to this link and clicking the Download button under Visual Studio Community.

Once you have, open it up and create an ASP.NET Web Application using the Visual C# empty template. Name the project PetSuppliesRelationalSvc and save it somewhere on your local drive (see image below).

VSCreateProject

Add the Entity Data Model

The first thing you will need to do is to add the Entity Data Model to your project by right-clicking the project in Solution Explorer and selecting Add | New Item. Select the Data Node in the left pane and from there select ADO.NET Entity Data Model. You can name the model PetSuppliesRelationalModel and click Add to continue (see image below).

VSAddADONET

A wizard will start and first ask you to choose the model contents. Since we are working with an existing database, you will want to select the default option of EF Designer from Database and click Next to continue. On the Choose Your Data Connection page, click New Connection. This is where you will enter the server name for your SQL Server Azure Database server, which should have been assigned when you created the database back in Step One.

If you do not know the name of the server, you will need to log back in to your Microsoft Azure account and go to the Databases quick start page. It should be listed at the bottom of this page and will look something like the following:

holla9999m.database.windows.net,1433

This entire string (including the comma and 1433 port assignment) should be copied into the server name textbox. You should also select the Use SQL Server Authentication radio button and enter the credentials you used to create the SQL Server Azure database. If the credentials are correct and your local IP Address has been configured to have access to the Azure firewall, you should be able to select PetSupplies as the Database (see image below) and when you click Test Connection, you should be get back a Connection successful message.

VSNewConnection

Once the credentials are entered, click OK to return back to the Choose Your Data Connection Wizard page. Since this is just a tutorial, you can go ahead and click “Yes, include the sensitive data in the connection string“, but if this was a real-world application, you may want to consider something more secure.

Click Next to continue and on the page where you choose your version of Entity Framework, leave the default selection as Entity Framework 6.x and click Next. On the Choose Your Database Objects and Settings page, select the checkbox next to Tables and enter PetSuppliesModel as the Model Namespace. Click Finish to complete the wizard.

VSChooseDatabaseObjects

You might see a Security Warning, but you can go ahead and click OK to run the template. It may take a few seconds for the wizard to build out all your code, but when it is done, you should see a schema diagram of the PetSupplies database. All the code that is needed to access the database has been generated for you. Wasn’t that easy?

Add the WCF Data Services Entity Framework Provider

To get your SQL Server data into the OData format, you will need to install the WCF Data Services Entity Framework Provider (which as of this posting is still in beta). This is done by going to Tools | NuGet Package Manager | Manage NuGet Packages for Solution and clicking the Include Prerelease dropdownbox. You can then search for “WCF Data Services EntityFramework Provider” and once you find an entry for Microsoft.OData.EntityFrameworkProvider, click the Install button next to it (see image below).

VSInstallWCFEntityFramework

You should get a preview box that lists all the changes that will be made to your project. Click OK and also click I Accept to accept the license agreement.

Add the WCF Data Service

You are now ready to add the WCF Data Service that will be used to expose your OData. To do this, right-click the project and click Add | New Item. This time, select the Web node in the left pane and select WCF Data Service 5.6.4 as the Item template. Name the service PetSuppliesRelationalData.svc and click Add (see image below).

VSAddDataService

The code that is added to your project should contain TODO comments. The first change you will need to make is to add the data source class name where indicated in the class declaration. If you followed the naming I suggested in the tutorial, this should be PetSuppliesEntities.

You will also need to change the type declaration from DataService to EntityFrameworkDataService. When you do this, you should get a red squiggly line under the code, indicating that the type could not be found. To correct this error, you will need to hover over the line of code (see image below) and click Show Potential Fixes. You can then select the line that says, “Using System.Data.Service.Providers” to add the reference and correct the problem.

VSCorrectError

I suggest that you add a line of code above the public class declaration that will apply the ServiceBehaviorAttribute and set the IncludeExceptionDetailInFaults property to a Boolean value of true. This will instruct the service to return unhandled exceptions as SOAP faults and will be helpful for debugging purposes. When you are done, the code should look like the following:

[System.ServiceModel.ServiceBehavior(IncludeExceptionDetailInFaults = true)]
public class PetSuppliesRelationalData : EntityFrameworkDataService

TIP: Make sure to set the value of the IncludeExceptionDetailInFaults property back to the default of false before deploying your solution to production.

The next TODO involves setting the rules to indicate which entity sets and service operations are visible or updatable. Since Lightning Connect only allows for read-only connections at this time (although I will be covering writable connections in later posts so stay tuned for that) the changes we will make will only involve un-commenting the line of code that sets the entity set access rule. We will then replace the word “MyEntityset” with “*” and leave the rights as AllRead. This tells the service that we want to expose all the entities as read-only.

After all the code changes are made, the PetSuppliesRelationalData.svc.cs file should look like the following:

using System;
using System.Collections.Generic;
using System.Data.Services;
using System.Data.Services.Common;
using System.Data.Services.Providers;
using System.Linq;
using System.ServiceModel.Web;
using System.Web;namespace PetSuppliesRelationalSvc
{
    [System.ServiceModel.ServiceBehavior(IncludeExceptionDetailInFaults = true)]
    public class PetSuppliesRelationalData : EntityFrameworkDataService {
         // This method is called only once to initialize service-wide policies.
         public static void InitializeService(DataServiceConfiguration config)
         {
            // TODO: set rules to indicate which entity sets and service operations...
            // Examples:
            config.SetEntitySetAccessRule("*", EntitySetRights.AllRead);
            // config.SetServiceOperationAccessRule("MyServiceOperation",
                     ServiceOperationRights.All);
            config.DataServiceBehavior.MaxProtocolVersion = 
                     DataServiceProtocolVersion.V3;
          }
     }
}

And that is about it. The only thing left to do is to test that everything is working right. But before you do that, be sure and save all your changes.

You can then right-click the PetSuppliesRelationalData.svc file in Solution Explorer and select View in Browser. When you do this, a browser window will open and load up your data service, listing all the entities exposed in XML format. The result should look similar to the image below. If you do not see this or see an error, then go back to see where you might have made a mistake and try again.

WebServiceLocalXML

Final Words

I know this post may seem long and the steps complicated, but it really is a pretty straightforward process with 99.9% of the code being built for you. The longest part of this should be downloading and installing the latest version of Visual Studio.

Click here to see the third post in this four part series.

Step One: Create a SQL Server Azure Database (Post 1 of a 4 part series)

At this years annual Dreamforce conference, I had the honor of speaking about SQL Server Azure Database MeSpeaking2
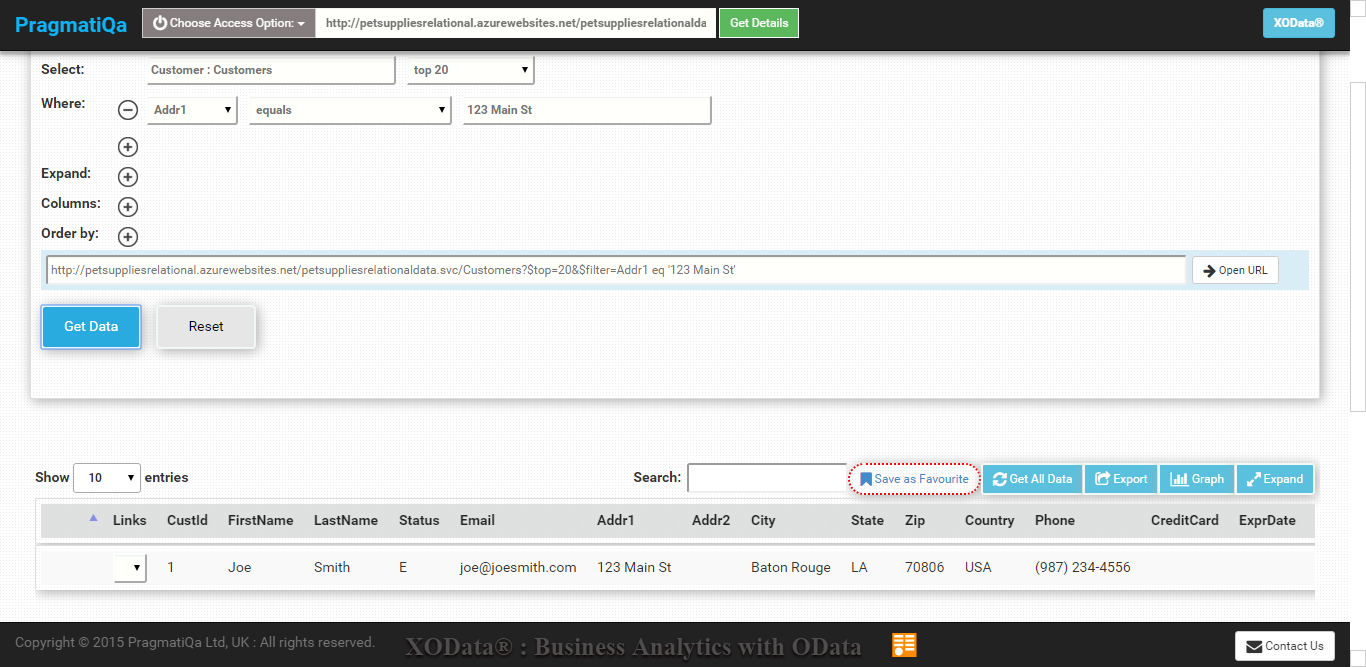
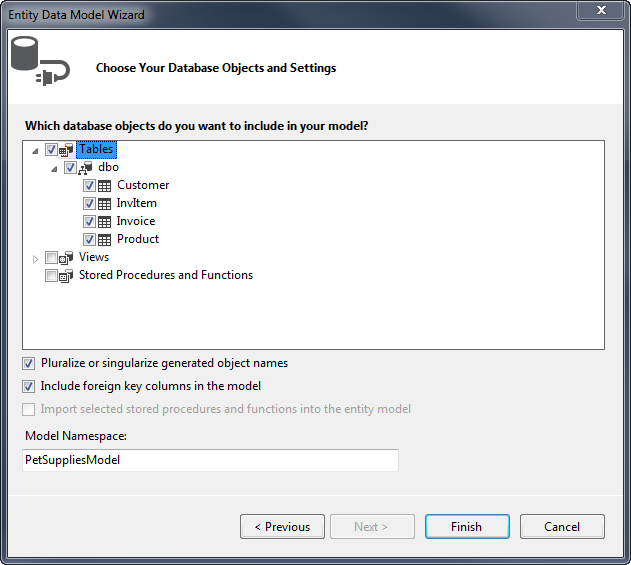
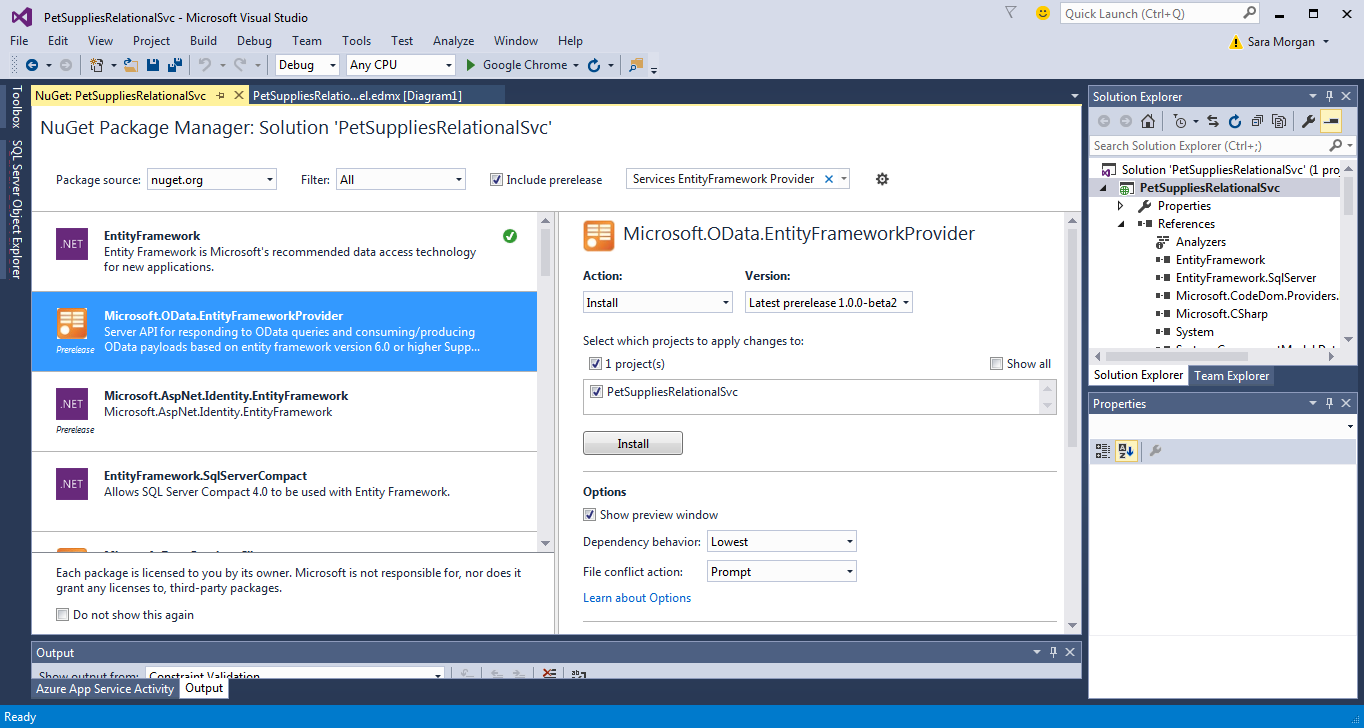
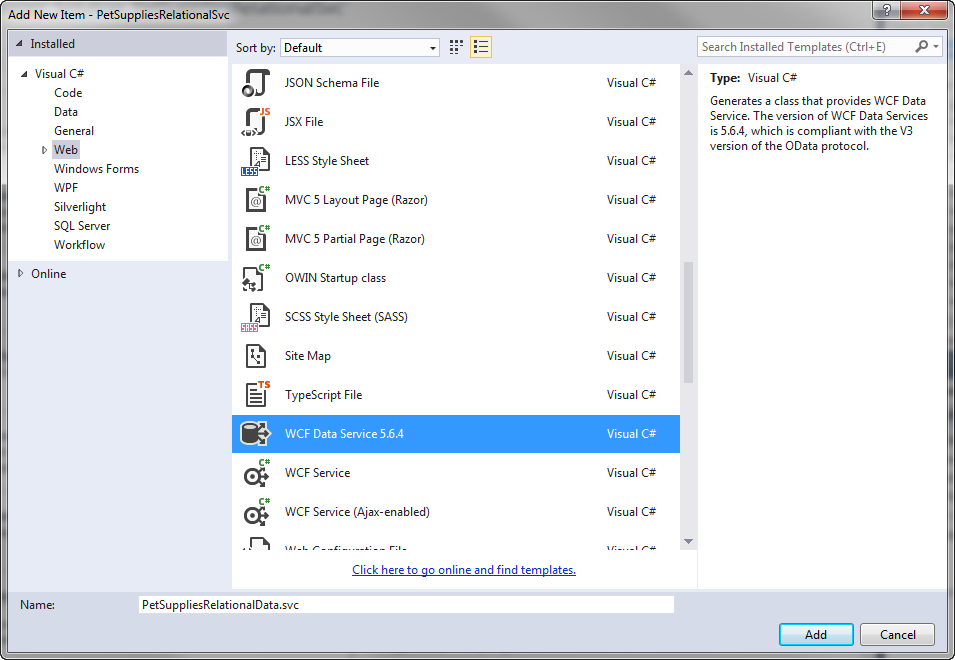
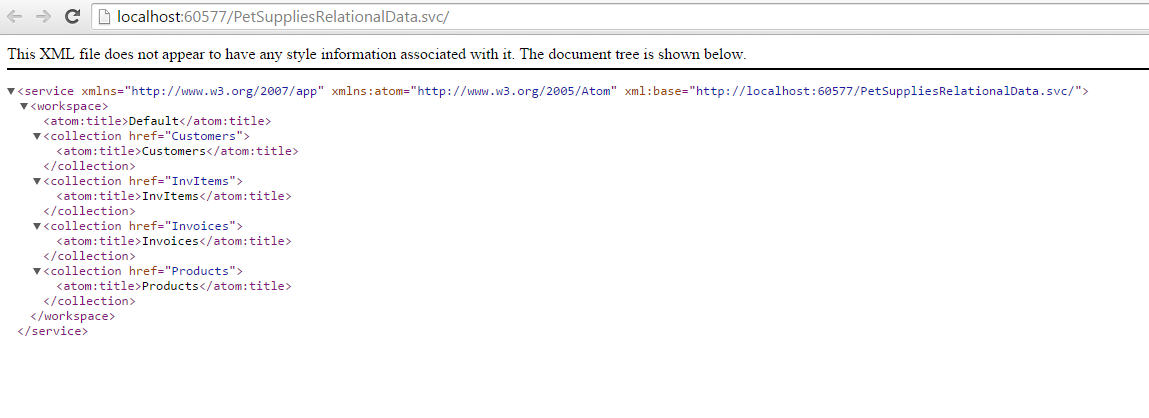
relationships using Lightning Connect. The talk was based on an article I wrote for DeveloperForce earlier this year titled, “Accessing a SQL Server Azure Database using Lightning Connect“. The original DeveloperForce article detailed the steps for creating a WCF Data service that exposed a single table SQL Server Azure database as OData.

This post will be the beginning of a 4 part series in which I will step you through what is necessary to expose and access a multi-table SQL Server Azure database with built-in relationships. These steps were covered at a high-level in my talk , but in this series, I will go through each step in greater detail. The steps will consist of the following:

1.) Create a SQL Server Azure Database (covered in this post)

2.) Create ASP.NET application to expose data as OData

3.) Publish Web Application to Windows Azure

4.) Create External Data Source and Define Relationships in Salesforce

TIP: Click here to access the code from this post, along with the Powerpoint slides from my talk at Dreamforce.

Step One: Create a SQL Server Azure Database

You will need a Microsoft Azure account to create a SQL Server Azure database, but you can sign-up for a free one-month trial through the following link. You will also need a way to build the database. If you do not have access to Microsoft SQL Server Management Studio, then you can use the built-in SQL Server tools that come with the free Community version of Visual Studio.

But the first step is just to create the database and the simplest way to do that is to go to the SQL Databases tab in Windows Azure Portal and click the big plus sign next the word New in the bottom right-hand corner of the Portal. Click Custom Create and enter a Database name along with a secure login name and password.

After the database server has been allocated, you can click here to download the latest version of Visual Studio, 2015. Keep in mind that it will take quite a long time to download and install. If you don’t want to wait, you can use an earlier version of Visual Studio, such as Visual Studio 2012 or 2013 (with latest update), but just NOT Visual Studio 2010.

Once installed, you can access it from the Windows Azure Portal by clicking the Open in Visual Studio link at the bottom of the database quick start page (see image below).

PetSuppliesPortal

When you click this link, you should be prompted to add your local IP address to the Windows Azure firewall rules. Go ahead and click “Yes”.

One thing to be aware of here is that unless you have a static IP address, you will need to do this every time the address changes (which for some DHCP environments could be daily). This is done by returning to the quick start page and clicking the Set up Windows Azure firewall rules for this IP address link under Design your SQL Database.

TIP: If you know the allowable range of IP addresses you might be assigned, you can configure a range of IP addresses in the Azure Management Portal by going to SQL Databases and selecting the link for the server that your database resides on. From there, select the Configure tab to enter a new rule with starting and ending IP address.

If you are using a browser such as Chrome, you may also be prompted with an external protocol request asking whether you want to launch the application. Go ahead and click Launch Application. Doing so will launch the Visual Studio application and open up SQL Server Object Explorer. The first time you connect, you should be prompted to enter the login name and password you specified when creating the database in Windows Azure Portal.

Once connected, you can use the SQL Server Object Explorer to add tables and data to your new SQL Azure database. If you prefer the point and click approach, you could create a new table for your database by expanding the Databases node, followed by your specific database and then right-clicking Tables and clicking Add New Table (see image below).

SQLObjectExplorerNewTable

If you are more comfortable working with SQL script, you could right-click on your database node and select New Query to bring up a window where you can type or paste in SQL script directly. Once entered, the script can be executed against your SQL Server Azure instance by clicking SQL | Execute.

Click here to see the second post in this four part series.

Check out Node.js Tools For Visual Studio

There is no question that Node.js is here to stay and thankfully, Microsoft recognizes this too. They recently released Node.js Tools for Visual Studio which addresses many of the pain points that exist with working with Node.js. The tools are entirely open source and available here on GitHubnodejs

Since Microsoft graciously released Visual Studio Community Version last year as a FREE and fully versioned copy of Visual Studio, you can install the Node.js tools for FREE and get started building cool Node.js solutions right away. If you are already doing Node.js development or even thinking about getting started, you really need to check out these tools.

The Tools offer templates to get you started (see Image below), but the really cool thing about the new tools is the fact that you can do debugging by setting breakpoints in your code and stop execution on the fly. Anyone that has struggled with trying to debug a Node.js application will immediately see how valuable this can be. They also have a neat profiling tool and remarkably intellisense for code completion. Basically all the nice features that have spoiled Visual Studio developers for years.

NodejsToolsForVS

There is a GREAT video on Channel 9, in which one of the Node.js tools programmers was interviewed and did a walk through of all the cool new features of the Node.js Tools. I strongly suggest that you check it out before diving in.

Have fun and let me know what you think about it.

How to Set the API Version using the Force.com Toolkit for .NET

toolkitIf you are doing Salesforce Integration work and working with the REST API, then you have probably already heard about the Force.com Toolkit for .NET. But, because the toolkit is unfortunately not very well documented, you probably had no idea that it defaults to using version 32 of the REST API. You also probably had no idea that you can change the api version (like to the latest version, which is currently 34) using the Toolkit.

Don’t worry, I had no idea either and I have worked with the Toolkit quite extensively. In fact, when I discovered that it was using version 32, I actually reported it as an issue (since the Toolkit is Open Source). However, as the projects owner (Wade Wegner) graciously pointed out to me, this is a purposeful feature of the Toolkit. As he states, “The SDK is designed to make it easy for you to change the API version yourself programmatically but defaults to the last known working API version. That’s not to say it won’t work with v34, only we haven’t tested it.”

So, now you may be asking, “Ok, so how do I change it?”

Glad you asked, since that is what this post is about. Turns out to be pretty easy (since the Toolkit is pretty slick like that).

The ApiVersion property can be set or retrieved after authenticating using either the UsernamePasswordAsync or WebServerAsync methods. For example, if I were to place a line of code like this in a console application after authentication, I would expect to get “v32.0” printed out to the console:

await auth.UsernamePasswordAsync(consumerKey, consumerSecret,
        username, password + token, url);
Console.WriteLine("Sucessfully Logged in. You're default API Version is: " 
        + auth.ApiVersion);

Now if I want to set it to the latest version (which is 34), I can pass that in when I get an instance of the ForceClient, which is needed to perform any operation using the Toolkit. The code to set the ApiVersion to 34 would simply look like this:

var client = new ForceClient(auth.InstanceUrl, auth.AccessToken, "v34.0");

That’s it. Just remember that the ApiVersion is a string and that it must be formatted like this: “v34.0”. Passing in “34”  or 34 will not work and will get you errors, in fact. Not sure I like that part so much, but just glad I can set it to what I want.

BTW, I tested that this would work using the Sample Console app and setting the version to 34 and it worked splendidly.

Hope that helps someone out there.

Gotchas encountered when working with Lightning Connect and SQL Server Azure Databases

ILightning recently published my first article for DeveloperForce about Accessing a SQL Server Azure Database with Lightning Connect. I had a lot of fun creating the database and application, but I did encounter several gotchas as I was working with this fairly new technology. This posting lists some of the issues I uncovered while working with SQL Server Azure and what you can do to avoid the problems I encountered.

  • Adding firewall rules
    • DSL will likely change your IP address, so you will have to set this everyday most likely (unless you are fortunate enough to have a static IP address). You do this through the Set up Windows Azure firewall rules for this IP address link on the Quick Start page.
    • Connection may get lost occasionally, even though your IP address has not changed. If you start getting weird problems trying to publish, you can go back to Azure portal and click the Setup Windows Azure Firewall link again. Even though it is already added, doing this somehow refreshes the connection and will resolve your problems.
  • Connection String user needs to use an unrestricted DB user that has access to the Master DB. Refer to this article for more information http://www.odata.org/blog/got-sql-azure-then-youve-got-odata/. Real-world applications exposing their sensitive data via oData will need to take this into consideration and try to use a more restricted user.
  • If you try to use the latest version of the Entity Framework with web services, you will have to install some additional NuGet packages as outlined in the article. See article for more about specifics on that.
  • Depending on your internet connection, the initial publish may take a long time to complete and if you try to access the hosted website before then, you will get errors (probably that the resource cannot be found). Make sure the output in Visual Studio shows that the publish was complete and with no errors (such as a timeout error, which happened to me several times) before attempting to see the results online. If successful, a browser window should be spawned and you will be directed to the home page of your new hosted website.
  • Unfortunatley, Lightning Connect does not yet (and notice the hopeful word yet) automatically create relationships when you create your external data source. You will have to manually create these yourselves. It gets even more complicated in that you MUST edit the existing synced fields to create these relationships and DO NOT create new fields instead. If you do create new fields then you will encounter errors such as the ones I got and reported about here.  The error had to do with how I defined the external lookup relationship. I went to the external object definition page and clicked New to create a new field and then define the relationship. In order to avoid the error, you will need to instead edit one of the existing SYNCED fields and specifically Change the Field Type so that it is of the External Lookup Relationship type and that it points to the correct external table object. Then, you can perform your SOQL query and get no errors.

Let me know about your experiences with Lightning Connect. Despite all the above issues, I think it is a FANTASTIC new development for integration and I am excited to see it develop even further.

Check out the Free and Unrestricted Version of Visual Studio – Community 2013

VSI am an independent developer, so I am responsible for purchasing my own software. Hence one of the big reasons I have been so turned off by Microsoft in recent years. But, I am happy to say that Microsoft may finally be learning their lesson and truly turning a different cheek.

In November of 2014, Microsoft announced a free and unrestricted version of Visual Studio 2013. The new version is named Visual Studio Community 2013 and it is a full featured IDE for free – no kidding, it’s free.

There is a slight catch. You can not use it in an Enterprise setting, but come one, that is fair. If you are working in an enterprise, you do not need a free version. But for all of us that work outside Corporate America, a free and unrestricted version is like a god send.

So, thank you Microsoft. I may have judged you too harshly in the past. I consider this version of Visual Studio a peace offering. And, I look forward to seeing the free Community version of Visual Studio 2015 when it is released.