Five Ways to Safeguard Sensitive Salesforce Data

Salesforce contains a wealth of customer data that need proper security. Companies have to worry about common cyber attacks, along with laws and regulations that demand compliance. You may have heard of HIPAA, but what about the GDPR, PII, PCI, COPPA, or CPPA?

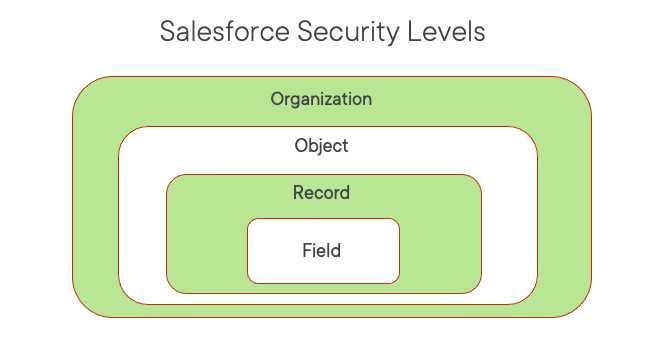
Protecting sensitive Salesforce data is an ongoing and multifaceted task. The level of protection varies by company. The first line of defense is always field and object-level permissions, along with the Salesforce Sharing Model. You can learn more about those in my Security Series.

Here are 5 additional methods to specifically help protect sensitive information in Salesforce

Encryption

Data encryption is a vital technique to protect sensitive data at rest or when it is stored. Salesforce offers two primary encryption methods: Classic Encryption and Shield Platform Encryption. Both use keys to scramble and unscramble sensitive data. Neither replace field-level security, which should always be looked at first.

Neither replace field-level security, which should always be looked at first.

Classic Encryption

Classic or Field-level encryption encrypts individual sensitive fields like SSNs. An unauthorized user will see data in the encrypted form and only users with the “View Encrypted Data” permission can view actual data.

Pros:

  • Strong encryption of text fields, along with data masking
  • Prevents exposure of sensitive data with a permission.
  • Included with the base user license.

Cons:

  • Does not encrypt existing fields or files and attachments.
  • Only used for new fields using a custom field type called ‘Text (Encrypted)’
  • Limited to 175 characters, along with many other restrictions.

Shield Platform Encryption

Enabling Shield Platform Encryption allows you to encrypt sensitive fields, files, attachments and more. It encrypts data at rest and in transit for strong protection. Provides the strongest and broadest level of protection for Salesforce data. But, careful consideration is needed before enabling.

Pros:

  • Allows organizations to comply with regulatory and business requirements.
  • Robust defense of data using a 256-bit AES key.
  • Allows you to encrypt existing fields and data found in other sources.

Cons:

  • Requires additional fees through an add-on license.
  • Requires setup and ongoing key management.
  • Does not support all Salesforce apps and some features may not work as expected.
  • Only encrypts fields created or updated after encryption is enabled.

Personal Information Management

Available after the Winter 22 release, Enhanced Personal Information Management hides personal information fields on user records for external users (community or site users). Fields like SSN’s and credit card numbers are replaced with asterisks or custom masks.

Pros:

  • Limits exposure of sensitive data without additional permissions.
  • Simple to configure field-level settings.
  • Can secure up to 20 fields you select.

Cons:

  • Only partially hides data and is not the same as data masking.
  • Less flexible and secure than full encryption.

Data Masking

Data masking fully obscures sensitive data by replacing it with fictional but realistically formatted data. For example, allows testing sandboxes with masked copies of real data. Installed with a managed package.

Pros:

  • Fully hides actual sensitive data with fictional data.
  • Great protection for hiding data when working with outside contractors and sandboxes.

Cons:

  • Disables custom workflow rules and triggers
  • Complex to set up and manage.

Data Classification Fields

Create standard data classification fields, such as Compliance Categorization, Data Owner, Data Sensitivity Level and Field Usage. Allows you to classify sensitive data and understand how it is being used. Works great with Shield Platform Encryption to encrypt fields only when necessary.

Pros:

  • Simple classification system indicating sensitive info.
  • Can run SOQL queries and create reports on classification data.

Cons:

  • Does not secure data, just provides visual labels for awareness.

Monitoring

Protecting your sensitive data does not mean it is always secure. It is necessary to monitor user activity to look for suspicious activity and take action, if necessary. Tracks up to fifty event types, such as logins, API calls, report exports and Apex executions. Salesforce offers two ways to tracks events: traditional Event Monitoring and Real-time Event Monitoring.

Event Monitoring

Traditional Event Monitoring works with the Event Monitoring Analytics App to monitor event log files and draw insights from the data. It can not only monitor suspicious activity, but help to optimize performance by examining slow page performance.

Pros:

  • Includes pre-built reports and dashboards to monitor different event types.
  • Use the Event Monitoring Analytics App to share and monitor key performance indicators (KPI’s)
  • Works with Transaction security to block certain user actions and send notifications when certain events occur.

Cons:

  • Only monitors data within a 24 hour time period and must be done manually.
  • Works with API and complex alert configuration required.

Real-time Event Monitoring

Real-time Event Monitoring is used to monitor user activity in your Salesforce organization in near real-time. Does this though the use of a application monitoring service. Working with Transaction Security, policies can be created to send notifications and perform certain actions.

Pros:

  • Able to take action sooner that traditional event monitoring
  • Works with Platform Events, so you can subscribe to events published by Salesforce.
  • Query events stored in a big object with SOQL and batch Apex.

Cons:

  • Requires purchase of an add-on license.
  • Complex alert configuration required.

Each method for protecting sensitive Salesforce data has its own strengths and weaknesses. The best approach often involves a combination of these techniques to create a robust security framework. The key is to strike a balance between security and usability, ensuring that sensitive data remains protected while enabling users to work efficiently. Keep in mind that security is not a one-time effort but an ongoing process that should evolve alongside your organization’s changing needs and the ever-evolving threat landscape.

Beware: Sensitive Salesforce Data Exposed on Experience Sites

The Problem

This week, Krebs Security posted how sensitive customer data was exposed on several Community sites. This included a Bank and even a Washington DC Health Community. Ouch!

How did this happen?

One can only guess. But, it was likely due to ignorance on the part of the people setting up the Community. Salesforce security is multi-layered and can be used to tightly secure data.

But, it can also be configured incorrectly. This is especially true when it comes to public facing websites such as Salesforce Communities. Or, Experience sites as they are now called.

You see, Experience/Community sites use a thing called the Guest User. This allows unauthenticated users access to the site. This is necessary when you have a public site. Think customer websites or government sites used to assist veterans, the elderly or the unemployed.

How about in disasters like epidemics or hurricanes? These kinds of sites need to be built fast and they need to allow access to the a lot of people. There are also a limited number of people with Salesforce experience. Unfortunately, that is a recipe for another type of disaster.

The Solution

If you have been asked to setup a Salesforce Experience site, first take the time to review official Salesforce docs on how to do this. This doc is a good start. There is also a great website about Learning Salesforce Experience Cloud.

But, if you are working with Salesforce on a regular basis and you are a Salesforce Developer or Architect, you need to take it a step further. As I said in the beginning, Salesforce security is multi-layered and complex. It also covers a lot more than just access to Experience Sites. In other words, there is a lot to understand.

You might want to check out some of these resources:

Happy Learning.

    Salesforce Security Tip: Easily Determine User Record Access

    If you have to support a Salesforce org, you will undoubtedly be faced with this question eventually. Why can’t a Salesforce user delete a certain record?

    Most people will understandably think of permissions. These are not the only things to consider. There is also Record Sharing. If you want to learn more about that, I suggest you check out this post about Record Sharing.

    Salesforce security is multi-layered and rarely enforced by only one of those levels. They work together to restrict and then open up access. You might want to check out the Salesforce Certified Sharing and Visibility Designer Skill Path on Pluralsight that covers all the layers.

    Salesforce Internal Sharing Model

    Now, back to how to determine user record access. A simple SOQL query can tell you the answer. You can run this query in VS Code’s SOQL Builder or the Query Editor in Developer Console.

    SELECT RecordId, HasEditAccess, HasDeleteAccess FROM UserRecordAccess
    WHERE UserId = [18 digit User ID]
    AND RecordId = [Record ID user trying to delete]

    This query will tell you right away whether a user can edit and/or delete a certain record. NOTE: Edit and Delete access are not the same thing. As far as how to get the Id’s and run the query, use the following three steps.

    Step 1: Get the UserId

    To get the UserID, just go to Setup and Users. Click on the User record you are interested in. Select a portion of the ID that happens right after the address=%2F portion of the URL. It should start with 005. This is the UserID you can use in the query.

    How to get UserId in Salesforce

    Step 2: Get the RecordId

    The next thing you need is the RecordId, which in this case is for a Contact record. We can do that by accessing the Contact record in Salesforce and then selecting the portion of the ID in the URL that starts with 003. Go here to learn more about locating ID’s in the URL for Salesforce.

    Step 3: Run the Query

    You can access Developer Console by clicking the Gear icon in Salesforce and clicking Developer Console. This brings up a new window. From the Query tab, you can type in your query using the ID’s gathered in the first two steps. Click Execute to run the query.

    This is what the final query will look like, which returns false for both edit and delete access.

    SELECT RecordId, HasEditAccess, HasDeleteAccess FROM UserRecordAccess
    WHERE UserId = '005d0000002rqaS'
    AND RecordId = '003d000002ScEwPAAV'

    Since this user is not the record owner, by default Salesforce does not allow other users to access the record.

    Hope this Tip helps you. If you like this and want to learn more about Record Access in particular, check out this course about Record Sharing.

    Take care…

    Security, Security, Security

    If you are a software developer or architect then the word security should be of prime importance in everything you do. Forrestor just published 2023 predictions for software development. At the top of the list is a prediction that the recent wide spread adoption of low-code solutions will cause headline security breaches in 2023.

    Luckily, Salesforce provides a robust and layered security approach, but if not used properly, it could open up several security vulnerabilities. If you are not familiar with how Salesforce security works, this is the time to beef up your knowledge.

    If you are not familiar with how Salesforce security works, this is the time to beef up your knowledge.

    Last year, I published a series for Pluralsight that I reference here on my blog. If you are a Pluralsight subscriber, I strongly urge you to check it out.

    If you are not a Pluralsight subscriber, you can check out my series about it here on my blog. You can also signup for a free 10-day trial here. And, for a limited time, Pluralsight is running a Black Friday, Cyber Monday sale where they are offering 50% off their annual subscriptions.

    Workaround for Issue Debugging LWC in Chrome Dev Tools After Winter 2023

     🤯 This weekend, I discovered an issue trying to debug a Lightning Web Component in the Chrome debugger tools.

    UPDATE on 11/13/2022: Salesforce includes a way to automatically disable LWS for your scratch orgs through the security settings in your config/project-scratch-def.json file. You will simply need to add a sessionSetting for lockerServiceNext set to false. Instructions below show you how to do this through Setup. Thanks to Grzegorz Skaruz for pointing this out.

    Sharing this, in case anyone becomes as baffled and frustrated as I was. The issue involves the fact that Lightning Web Security (LWS) was installed by default in all orgs with Winter 23. I am not bashing LWS, because I think it is cool and very much needed.

    But, for scratch orgs? Not so much.

    If you try to debug JavaScript in a scratch org using the Chrome Debugger, you will no longer see the components listed in the page hierarchy under the Sources tab (like you may be used to doing).

    To still debug your LWC’s, you will need to first disable this feature in your scratch org. You can do this in:

    Session Settings -> Uncheck “Use Lightning Web Security for Lightning Web Components”. Click Save.

    Unfortunately, it is still hard to see where to go in Chrome Debugger. But, you expand the c subfolder under components (see image below).

    Chrome Debugger After LWC Disabled in Scratch Org

    Good luck and if you find a better way to do this, please leave a comment below to help others.

    Salesforce Security – Build a Record Sharing Model – Post 3

    This post extends on Prepare for the Salesforce Sharing and Visibility Exam – Understand the Salesforce Sharing Model – Post 2, in which I introduced you to the Salesforce Record Sharing model for internal users. In this post, I will walk you through what to do to create a record sharing model in your own Salesforce org.

    In this series, I will be sharing highlights from courses that are part of the Salesforce Certified Sharing and Visibility Designer Skill Path on Pluralsight. The skill path is designed to help anyone trying to pursue the Salesforce Sharing and Visibility Designer certification.

    Setting Org-wide Defaults

    Org-wide defaults (OWD) provide a default level of access for records owned by users. More importantly, they can be used to limit data access for each standard or custom object. You can set different levels for internal versus external users.

    Default levels:

    • Private is the most restrictive and means that only the record owner and users above them in the role hierarchy can view or edit records.
    • Public read only allows all users to view records, but not edit them.
    • Public read/write is the least restrictive level and means full access for all users.
    • Public read/write/transfer is used only for case and lead records, since these types of records can be transferred to another owner.

    For each object there is a “Controlled by parent” checkbox. As you might guess, this affects objects that are children. They will inherit the access level of the parent.

    Every time that user attempts to access a record from a particular object, Salesforce will first check the OWD. If it is set as private or read/only, the system will look at the object’s sharing table and join the group membership table based on the ID of the user trying to access the record.

    Depending on what is found, the least restrictive access will be granted. The access grant, or sharing row cause will be stored as a record in the sharing tables that I told you about in the last post. This is the record access calculation process.

    Designing a Role Hierarchy

    Role hierarchies provide data access for a group of users. It allows managers access to records owned by their employees. Essentially, record access is opened up vertically to users higher up in the hierarchy. By default, peers or other members assigned to the role will not have access to these records.

    …role hierarchy should NOT be a duplicate of your company org chart.

    The role hierarchy is just one tool included in the Salesforce Sharing Model. The role hierarchy sits right in the middle. This means that baseline access, implicit sharing or org-wide defaults will override access provided by the role hierarchy.

    Salesforce Internal Sharing Model
    Salesforce Internal Sharing Model

    When designing a role hierarchy, the following things should always be kept in mind:

    • Your role hierarchy should NOT be a duplicate of your company org chart.
    • Users should be grouped into access levels. Only users assigned to roles above them will have the same access as the record owner.
    • Roles should only be created for permanent groups of users and not a group that is considered temporary because changes cause expensive sharing recalculations to take place.
    • Orgs created prior to the Spring 21 release are limited to 500 roles.

    Sharing Rules and Manual Sharing

    It is important to realize that the entire Salesforce sharing model is model is built around record ownership. When a user creates a new record, they automatically become the record owner. Records can also be assigned to queues.

    …the entire Salesforce sharing model is model is built around record ownership

    Sharing rules are created for objects, but you only do this if the OWD for that object is set to private or read-only. Otherwise, there is no need to create a sharing rule since everyone has access to that object. They open up object access for a select group of users.

    When thinking about selecting a group of users, they can be assigned to a public group, which is not the same things as a queue. A public group consists of one or more users. These users can be individual users, or they can belong to a role or territory. Users that are part of a group cannot own a record, but they can be part of a sharing rule.

    Queues on the other hand are generally used to manage ownership of objects such as leads, cases, and even custom objects. The record is owned by the queue and not any of the users assigned to the queue. However, queues are not used in sharing rules. Sharing rules are configured with public groups or roles.

    Manual sharing happens when one user wants to share a record with another user. They can do this by clicking a button in the user interface. But keep in mind that manual sharing is only available for Accounts, Contacts, Cases, opportunities, leads and custom objects.

    Only certain users can grant this kind of access. This includes, the:

    • Record owner
    • Users above the record owner in the role hierarchy
    • Any user that has been granted full record access
    • Administrators

    Manual sharing is primarily used for special exceptions. That is why it sits above sharing rules in that upside down triangle you saw earlier.

    Stay tuned for upcoming posts in this series and you may want to checkout the Salesforce Certified Sharing and Visibility Designer Skill Path on Pluralsight.

    Prepare for the Salesforce Sharing and Visibility Exam – Understand the Salesforce Sharing Model – Post 2

    Welcome back to the second post for this series. In this post you will be introduced to the Salesforce Record Sharing Model for internal users. This will involve sharing Salesforce data across users, groups and roles.

    In this series, I will be sharing highlights from courses that are part of the Salesforce Certified Sharing and Visibility Designer Skill Path on Pluralsight. The skill path is designed to help anyone trying to pursue the Salesforce Sharing and Visibility Designer certification.

    Diagnosing User Access Issues

    Most Salesforce Administrators will eventually be asked why some user cannot access certain data. In situations such as these, it is helpful to refer to a diagram such as the one below.

    Salesforce Sharing Model for Internal Users
    Salesforce Sharing Model for Internal Users

    The Salesforce sharing model can be imagined as an upside down triangle. Tools at the top of the triangle provide the widest level of access to the greatest number of users. Tools located at the bottom can be used more precisely to grant certain kinds of access to the least number of users.

    When trying to figure out user access problems, you would start at the bottom. In other words, baseline access should be the first thing you look at, followed by implicit sharing and so on. Keep going up the triangle until you determine what the problem is.

    Sharing ToolDescription
    Baseline AccessInvolves a combination of a profile permissions along with permission sets.
    Implicit SharingSalesforce’s built-in sharing behavior between account and child records (contacts, cases and opportunities)
    Org-wide Defaults (OWD’s) Determines an objects’ default access level and is the only way to limit record level access.
    Role HierarchyExpands data access vertically. Allows managers to access records owned by the users they manage.
    Sharing RulesDefine criteria for sharing access with specific users or users in public groups/roles
    Manual SharingTypically used for special circumstances, users can intentionally grant record access to a user that would not normally have access.
    Team AccessUsed to grant access to teams, which are groups of users that work together on objects like accounts, opportunities or cases.
    Territory Hierarchy AccessUsed to manage and grant account access to users assigned to sales territories.
    Salesforce Record Sharing Tools

    I am not going to lie to you, the Salesforce record sharing model is complex. But don’t be overwhelmed because throughout this series, I will be introducing you to all of these tools.

    Working with Access Grants

    Access grants are what Salesforce uses to determine who sees what data. The process of determining this all starts with an object sharing table. Object Sharing tables are completely separate from the object table itself where all the Salesforce data lives, such as the information about an account lives.

    Sharing tables will store information about the grant (or sharing type) such as whether it is explicit or implicit. Implicit grants happen when there are children records associated with a parent.

    For instance, accounts and contacts are designed with this kind of relationship. Contacts are considered children of a parent account and understandably users that can access a contact can also access the account.

    Implicit grants will override explicit grants, which happen when a record is shared with manual sharing or sharing rules. So it is important to always keep implicit grants, or implicit sharing in the back of your mind. If you ever have a situation where you cannot figure out why a user is accessing a record, consider implicit sharing.

    If you ever have a situation where a user is accessing a record you think they should not have access to, consider implicit sharing.

    Object sharing tables are created automatically and follow a very specific naming pattern. For example, when the object record table is named Account, the sharing table will be named AccountShare. And the thing that ties these two tables together is the owner of the record. When dealing with a custom object such as one named myCustomObject, the sharing table will have the object name followed by two underscores and the word Share.

    Determining what values go into a sharing table occurs when record access is calculated. This is a separate process from when a user attempts to access the actual record in the user interface or with an API. This process only happens during a configuration change, such as creating a new custom object. And you should know that It is a very complicated resource intensive process known as sharing recalculation.

    Things are done this way in order to improve record access performance. If all this checking was done in real time, the system would not perform well at all and users would be very unhappy.

    Record access calculations can happen when changes are made to:

    • Group membership
    • Role hierarchies
    • Territory hierarchies
    • Kicked off manually by an Administrator

    It is important to realize that record access calculations can act like a ripple effect in a Salesforce org. For this reason, large orgs should be especially careful when kicking this off or making any changes that might trigger it. The process could negatively impact the orgs performance.

    Since this is such a HUGE topic, I will not be covering everything in this one post. Stay tuned for the next post where I will be covering more.

    Prepare for the Salesforce Certified Sharing and Visibility exam – Getting Started – Post 1

    In this series, I will be sharing highlights from courses that are part of the Salesforce Certified Sharing and Visibility Designer Skill Path on Pluralsight. The skill path is designed to help anyone trying to pursue the Salesforce Sharing and Visibility Designer certification.

    The first course in the series, Salesforce Security: Getting Started, will use complex customer scenarios for a global robotics provider named Globomantics. You will learn how to evaluate the use of object, field-level, role and security settings to secure the Salesforce org.

    Salesforce Security Levels

    From a high level, Salesforce enforces security through multiple layers or levels. At the outermost layer there is Organization access. This is controlled by login tools that allow you to control when and how a user logs in.

    High-level overview of the different Salesforce security layers
    High-level overview of the different Salesforce security layers

    Once logged in, access to objects and fields is controlled through a combination of profiles and permission sets. Profiles must be assigned to each user and permission sets are assigned to specific users.

    Record level sharing sits between the object and field level. Once a user is granted access to an object, then specific data records can be shared with them. But access can be restricted on a field level basis, providing even more granular access.

    At the record level, access is controlled through data sharing. For each object, this access can be restricted through Org-wide defaults (OWD’s), which apply to all users. Roles and sharing can then be used to open this access back up to certain users.

    Controlling Access to a Salesforce Organization

    Controlling access to a Salesforce organization (or org) is the first line of defense. Authentication is the process of verifying that a user is who they say they are.

    Salesforce authentication covers a broad spectrum of available tools where tools on the left are the least complex, such as passwords associated with a username, and tools on the right are the most complex and offer tighter security.

    Salesforce login tools on the left-side are the least complex
    Salesforce login tools on the left-side are the least complex

    Multi-factor authentication (MFA), which you may know as 2-factor authentication involves verifying a user’s identity with two or more pieces of info. Starting in 2022, Salesforce will require customers to use MFA for internal users.

    Network-based security deals with limiting where and when a user can login to Salesforce. Device activation (or identity confirmation) involves tracking information about the device used to verify a user’s identity.

    Every computer or device that is connected to a public network is assigned a unique IP (Internet Protocol) address, such as 172.16.254.1. When a user logs in to Salesforce for the first time they are sent an activation email that is associated with that address.

    When the Salesforce user clicks a link in that email using the same device they logged in with they will be directed back to Salesforce and the device used will be activated and considered secure. Salesforce Admins can allow users logging in from an internal network access without having to activate a device by setting a trusted IP range. This is done at the org-level and applies to all internal users.

    Besides setting a trusted IP range, Administrators can restrict a user’s login IP range, along with specific login hours through permissions assigned to user’s at the profile level. By setting a login IP range, all user’s assigned to that profile, will not be able to login from an IP address outside of that range.

    So remember, adding a Trusted IP ranges at the org level will only remove computer activation requirements for users logging in from a device within that range. Login IP ranges, which are applied at the profile level will instead prevent a user from logging in from a device outside the range.

    Controlling Access to Object and Fields

    Salesforce launched their CRM product back in 2000 and at that time the only way to grant user permissions to objects and fields was through the profile, which had a one to one relationship with the user object. As the platform grew, along with the number of permissions, things got much harder to manage.

    Salesforce eventually introduced permission sets as a way to alleviate the pain points that were associated with profiles. Permission sets can be assigned to more than one user and for a while they were easier to manage.

    Over time, as some orgs got bigger and had to manage lots of permission sets, even these became hard to keep up with. And so, Salesforce introduced the concept of permission set groups.

    As a best practice, Administrators should use permissions or permission set groups to grant permissions and not the profile. In a nutshell, profiles should be used to restrict access and permission sets or groups should be used to grant access to specific users.

    As a best practice, Administrators should use permissions or permission set groups to grant permissions and not the profile.

    When thinking about granting permissions to a user, a best practice involves the principle of least privilege. This means that users should only be given the minimum permissions necessary to do their job. By keeping this in mind when approaching permissions you can be ensured that users are able to do their jobs, while also protecting the integrity of the entire org.

    Access to objects are granted through CRUD permissions. CRUD stands for Create, Read, Update and Delete. Salesforce allows you to assign two other permissions to objects (View All and Modify All) that you might like to think of as super power permissions. For this reason, these permissions should be given sparingly and typically only to Administrators.

    Fields access is handled with Field-level security or FLS, as it is better known. Where objects can be granted CRUD permissions, fields can only be granted read or edit access. Fields also do not have access to the super power permissions of “view all” or “modify all”.

    It is important to realize that object-level access overrides FLS. For example, you cannot remove read permission for an object and then enable it for all that object’s fields. If the user does not have read access to an object, then the user can not see any of the object’s fields.

    Controlling Access to Salesforce Records

    Access to Salesforce records resolves around the concept of record ownership. Each record or row of data as you might like to think of it can be owned by an individual user or a group of users assigned to a queue.

    Org-wide defaults (OWD’s) are the only way you have of limiting record access. All the other tools open up access to users through sharing tools or the role hierarchy.

    OWD’s set the default level of access users have to each others records. Each object will be assigned a level (private, public read only or public read/write) and these can be different for internal versus external users. Public read/write transfer is a special level that is only available to lead and case objects since those are the only kinds of records that allow for a transfer.

    The role hierarchy opens up access to data records vertically. Access moves from the top of the hierarchy down to the bottom. This allows managers to have access to the records of employees they manage. But peers on the same level, do not have access to each others records.

    The role hierarchy opens up access to data records vertically.

    Besides the role hierarchy, there are other sharing tools that open up access restricted by OWD’s. Record sharing is a huge topic and for that reason it was given an entire course for this series. I only mention it briefly here so you know where it fits with other Salesforce security access levels.

    For more detail about sharing records, you will need to check out my upcoming post about the next course in this series, Share Salesforce Data Across Users, Groups and Roles. Hope you stay with me.