The post I wrote once about Receiving and Sending Emails through Apex two years ago has continued to be the most popular post on this blog. So, for all of you that are obviously very interested in this subject, here are some more tips about working with Inbound Emails. In a follow-up post to this one, I will write more about what to consider when sending Outbound Emails.
Creating the Inbound Email Service Handler Class
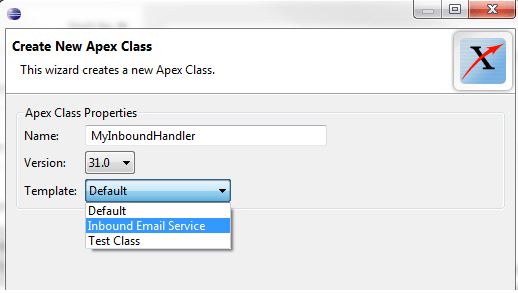
For starters, the Force.com IDE provides a neat little template for creating an inbound email service handler class. This gives you a head start on creating your inbound email service. To use it just create a new Apex class and select the template drop down box (see image below).
Using the template will get you a class file that looks like the following. This is a good starting point.
/**
* Email services are automated processes that use Apex classes
* to process the contents, headers, and attachments of inbound
* email.
*/
global class MyInboundHandler implements Messaging.InboundEmailHandler {

    global Messaging.InboundEmailResult handleInboundEmail(Messaging.InboundEmail email,
       Messaging.InboundEnvelope envelope) {
          Messaging.InboundEmailResult result = new Messaging.InboundEmailresult();

          return result;
    }
}
|
As you are filling in the code for this template, you may want to keep the following things in mind:
- Be careful about creating new records in the database. Many simple code samples I have seen out there automatically create new contact or lead records when an email is received, but if you set something like this up you will quickly end up with a messy database and a lot of redundant records. A better alternative to just blindly creating a new record for each email is to have the logic in the email handler try to match the incoming email sender to an existing record. For example, you could try matching on the name and email address. But be careful here too, because the name on the email header may not exactly match what you have in your database. Probably the best way to ensure that duplication does not occur is to consider creating a task for a user in your org that sends them the email sender info so they can decide whether a new record should be created. Just something that should be discussed with your orgs decision makers before you start blindly creating an automated code solution.
- The email body can be either HTML or plain text and the results are stored as different properties, so your code should account for this. For example, the following code extracts the email body, no matter which type it is:
String emailBody;
if (email.plainTextBody != null){
    emailBody = email.plainTextBody;
} else {
    emailBody = email.htmlBody;
}
|
- You may want to parse the body of the email and try to extract meaningful information from it, but just keep in mind that this can be very tricky if you are not 100% sure where and how the email is being originated. Obviously HTML content will be more difficult to parse than plain text, but you also do not know if the email client used to submit the email has embedded additional information or special formatting. The solution will depend on your exact circumstances and I only bring this up to make you realize that it might not be as straightforward as you think. Be sure to think this through carefully when designing your solution and try to do testing with all potential email clients.
- Email attachments could be text or binary and each is handled differently, so you want your code to be able to accept both. For example, you might want to include code similar to the following, which inserts attachments to the Salesforce record, in this case a contact record. Now, of course, this assumes that you do not configure your email service to only accept one form or to always convert Text attachments to Binary (which is an option we will show later on). Also note that the body of a text attachment must be converted into a blob before it can be assigned to the Attachments body field.
if (email.binaryAttachments != null && email.binaryAttachments.size() > 0)
{
    for (integer i = 0 ; i < email.binaryAttachments.size() ; i++) {
        Attachment attachment = new Attachment();
        attachment.ParentId = contact.Id;
        attachment.Name = email.binaryAttachments[i].filename;Attach
        attachment.Body = email.binaryAttachments[i].body;
        insert attachment;
    }
}
if (email.textAttachments != null && email.textAttachments.size() > 0) {
    for (integer i = 0 ; i < email.textAttachments.size() ; i++) {
        Attachment attachment = new Attachment();
        attachment.ParentId = contact.Id;
        attachment.Name = blob.valueOf(email.textAttachments[i].filename);
        attachment.Body = email.textAttachments[i].body;
        insert attachment;
     }
}
|
Configuring the Email Service
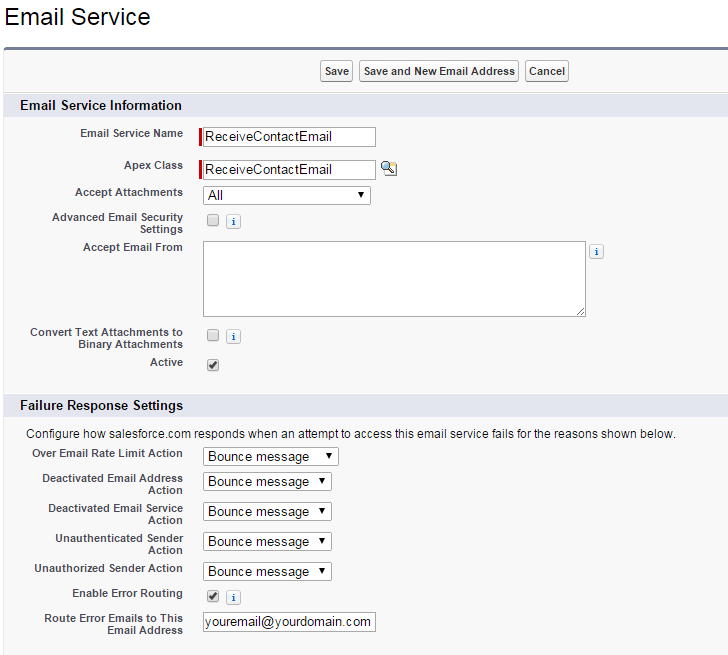
Once you have the code for your email handler, you will need to define the Email Service in your Salesforce Setup. You do this by going to Setup | Develop | Email Services and clicking New Email Service.
At this point, you will need to configure how your email receives incoming messages (see image below).

You will of course specify the class handler you just created, but you will also need to keep in mind the following:
- Most services are configured to accept all attachments, but you can specifically have it accept no attachments or only binary or only text attachments.
- The Advanced security settings will restrict what emails are accepted by your service according to whether the sender uses certain protocols (specifically SPF, SenderId and DomainKeys). If you do not know for sure what protocol the sender will be using, you do not want to check this.
- You likely do not want to specify that you accept email from a certain email address, unless your solution is so specific that you know in advance what email address will be sending incoming emails. Leave this blank to accept emails from any address.
- Don’t forget to check the Active switch for your service.
- While testing, you will likely want to use Bounce Message as the setting for the failure response settings, but don’t forget to go back and possibly change this after moving to production.
- I suggest you enable error routing and specify an email address to receive error emails (certainly while testing and maybe even after moving to production).
The next step is to configure the email address that will accept incoming emails (although you can specify more than one). This is the email address that outside users will send email to. Unfortunately, you have no control over the domain name part of this address. You only get to control what the part before the @ sign looks like. A typical generated email address will look something like the following (where I only got to specify the recievecontactemail part):
receivecontactemail@2fiwoie9n02fazrqxzvaars35bdrih1hxlzg6ij79u66vorcd8.d-dxwdeae.na14.apex.salesforce.com
Ugly, right?
Yeah, I know. If you just can’t see yourself giving this address to people or posting it somewhere, you might want to consider creating a forwarding address (with a much prettier and easier to remember name, like receivecontactemail@yourdomain.com) and then have that email address just forward all emails to the ugly looking one that Salesforce creates for you.
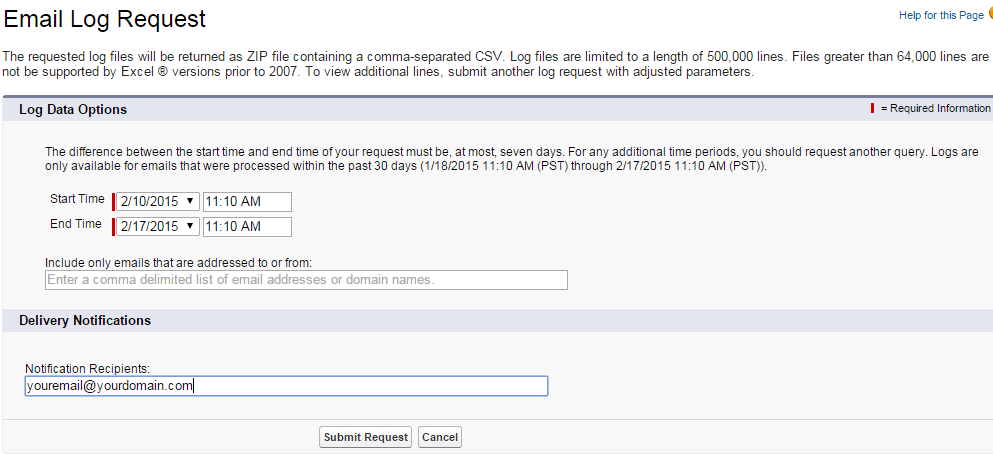
Testing your Email Service
As of Spring 09, Salesforce provides access to Email Logs, which contain info about email sent and received over the last 30 days. You access them through Setup | Monitor | Logs | Email Log Files. You will need to go in and specifically request a new log before it is generated (see image below).

You will have to specify a start and end time and the period can be no longer than 7 days. Doing so will generate a CSV file that tells you information such as the email address of each sender and recipient, along with the date and time and any error codes encountered.
You may want to also consider creating a custom error log object. This can be used to store any exceptions or debug statements. For example, you could create a custom object named ErrorLog with text fields used to store the message and other info you may want to capture. Then, in your email handler class, you add try..catch statements that write to the log when an exception is captured.
That’s it for now. More about Outbound Messaging in a later post.