
At this years annual Dreamforce conference, I had the honor of speaking about SQL Server Azure Database  relationships using Lightning Connect. The talk was based on an article I wrote for DeveloperForce earlier this year titled, “Accessing a SQL Server Azure Database using Lightning Connect“. The original DeveloperForce article detailed the steps for creating a WCF Data service that exposed a single table SQL Server Azure database as OData.
This post will be the beginning of a 4 part series in which I will step you through what is necessary to expose and access a multi-table SQL Server Azure database with built-in relationships. These steps were covered at a high-level in my talk , but in this series, I will go through each step in greater detail. The steps will consist of the following:
1.) Create a SQL Server Azure Database (covered in this post)
2.) Create ASP.NET application to expose data as OData
3.) Publish Web Application to Windows Azure
4.) Create External Data Source and Define Relationships in Salesforce
TIP: Click here to access the code from this post, along with the Powerpoint slides from my talk at Dreamforce.
Step One: Create a SQL Server Azure Database
You will need a Microsoft Azure account to create a SQL Server Azure database, but you can sign-up for a free one-month trial through the following link. You will also need a way to build the database. If you do not have access to Microsoft SQL Server Management Studio, then you can use the built-in SQL Server tools that come with the free Community version of Visual Studio.
But the first step is just to create the database and the simplest way to do that is to go to the SQL Databases tab in Windows Azure Portal and click the big plus sign next the word New in the bottom right-hand corner of the Portal. Click Custom Create and enter a Database name along with a secure login name and password.
After the database server has been allocated, you can click here to download the latest version of Visual Studio, 2015. Keep in mind that it will take quite a long time to download and install. If you don’t want to wait, you can use an earlier version of Visual Studio, such as Visual Studio 2012 or 2013 (with latest update), but just NOT Visual Studio 2010.
Once installed, you can access it from the Windows Azure Portal by clicking the Open in Visual Studio link at the bottom of the database quick start page (see image below).
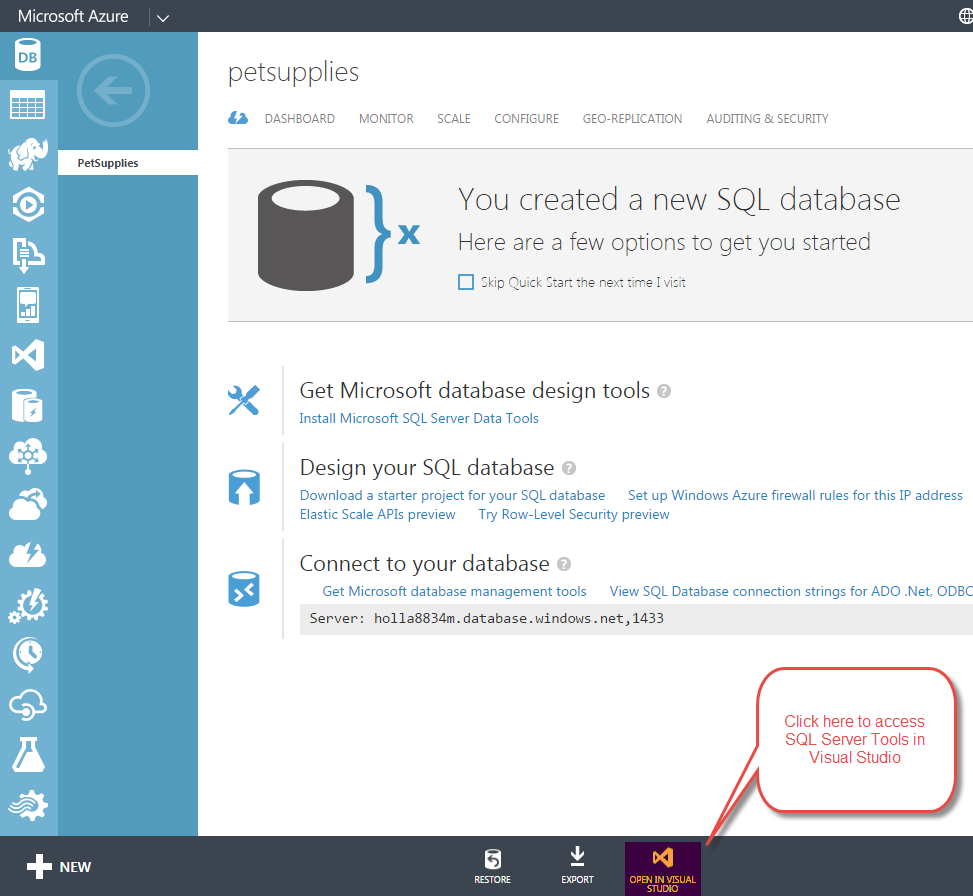
When you click this link, you should be prompted to add your local IP address to the Windows Azure firewall rules. Go ahead and click “Yes”.
One thing to be aware of here is that unless you have a static IP address, you will need to do this every time the address changes (which for some DHCP environments could be daily). This is done by returning to the quick start page and clicking the Set up Windows Azure firewall rules for this IP address link under Design your SQL Database.
TIP: If you know the allowable range of IP addresses you might be assigned, you can configure a range of IP addresses in the Azure Management Portal by going to SQL Databases and selecting the link for the server that your database resides on. From there, select the Configure tab to enter a new rule with starting and ending IP address.
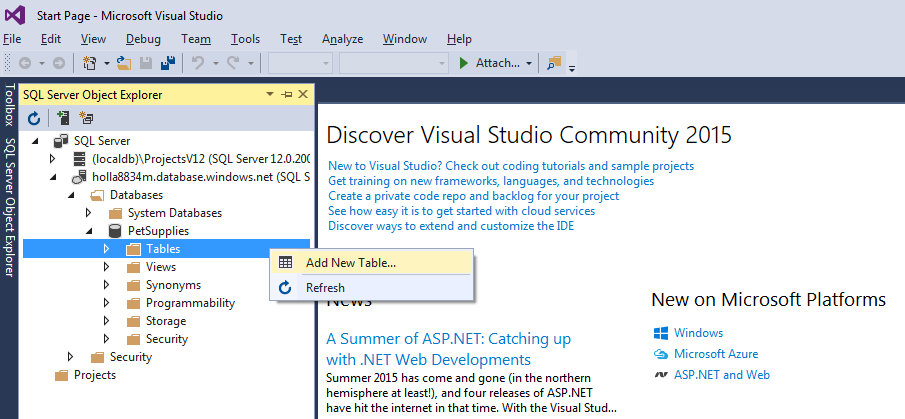
If you are using a browser such as Chrome, you may also be prompted with an external protocol request asking whether you want to launch the application. Go ahead and click Launch Application. Doing so will launch the Visual Studio application and open up SQL Server Object Explorer. The first time you connect, you should be prompted to enter the login name and password you specified when creating the database in Windows Azure Portal.
Once connected, you can use the SQL Server Object Explorer to add tables and data to your new SQL Azure database. If you prefer the point and click approach, you could create a new table for your database by expanding the Databases node, followed by your specific database and then right-clicking Tables and clicking Add New Table (see image below).
If you are more comfortable working with SQL script, you could right-click on your database node and select New Query to bring up a window where you can type or paste in SQL script directly. Once entered, the script can be executed against your SQL Server Azure instance by clicking SQL | Execute.
Click here to see the second post in this four part series.

Hi thanks for pposting this