This post will be the last of a 4 part series in which I will step you through what is necessary to expose and access a multi-table SQL Server Azure database with built-in relationships. These steps were covered at a high-level in my talk , but in this series, I will go through each step in greater detail. The steps will consist of the following:
1.) Create a SQL Server Azure Database
2.) Create ASP.NET application to expose data as OData
3.) Publish Web Application to Windows Azure
4.) Create External Data Source and Define Relationships in Salesforce (covered in this final post – see links above for other posts in the series)
TIP: Click here to access the code for this post, along with the Powerpoint slides from my talk at Dreamforce 2015 (which is what this post series is based on). But, if you follow along with tutorial in this post, you will not need it since you will be generating the code for yourself.
Step 4: Create External Data Source and Define Relationships in Salesforce
In the last step, I walked you through how to publish your ASP.NET application to Windows Azure, which would expose the SQL Server Azure data as read-only OData. Now it is time to setup Salesforce to consume that data.
To begin you will need to login to Salesforce and create a new external data source by going to Setup and typing data source in the Quick Find box. Select External Data Sources and then click New External Data Source. Keep in mind that if you are using a Development org, you will be limited to creating only one external data source at a time.
Enter a label and name for your external data source and select Lightning Connect OData 2.0 as the type. The URL should be the one you created when you published your web application in step 3.
As of Winter 16, the parameters for creating new data sources has increased (see image below). You now have some additional checkboxes and one that specifically allows you to let users create, edit and delete data on the external data source. Prior to Winter 16, you could only access data one way. For the purposes of this walk through, we will be dealing with read-only data, so there is no need to check the Allow Create, Edit and Delete checkbox. I will be covering the topic of write access in an upcoming post.
 Once the data source has been saved, you will need to click Validate and Sync on the page that follows. You should also see a list of tables with checkboxes next to then. Select them all and click Sync. Depending on the size of your database, this may take a while to complete. When it is done, you should see a status of success.
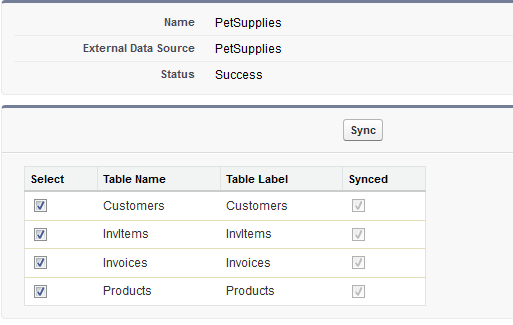 The database I am using for this tutorial only has 4 tables, so when the sync is done, I will see 4 new external objects – one that corresponds to each table. I can click any of the links and be brought straight the object definition page (see image below).
 Your external object definition will look very similar to the definition for any custom or standard sObject. Notice that in the image above, the API Name for this object is sarahasnolimits_Customers__x. The sarahasnolimits part is just a namespace prefix that my development org uses. If you are following along with your own org, you may have a different prefix or none at all.
You should also take note of the __x portion of the name. You will see this for all external objects and it is the main way of distinguishing an external object from a regular sObject.
Even though the metadata for our web service lists the relationships associated with our SQL Azure tables, these relationships are not automatically setup in Salesforce. You will have to define them yourselves by editing the definition for one of the fields in your external object.
But which field do you use?
If you are unsure which fields should be used to define these relationships, you can always look at the metadata for your service by using a browser, entering the url for your publicly exposed web service and adding $metadata to the end of the URL. Such as in the image below, you should see which field names are used to define the relationships between your tables.
 In the example above, I can see that the field used to link Customers to Invoices in CustId. Therefore, I can return to the object definition in Salesforce and edit the field definition for the field that has an external alias named CustID. When I do, I should then click Change Field Type and select External Lookup Relationship as the new type (see image below).
 External Lookup Relationships are used to link external objects together and in this case, the CustId field will be related to the Invoices object. I know this because that was the same relationship it had in the metadata for my web service. Note that you will need to specify a length for your relationship field. I am just going to select a length of 18 and click Save to complete adding the relationship.
I will have to add relationships for all of the relationships specified in my metadata (which in my case is 3): One for the FK_Invoice_ToCustomer association, one for the FK_InvItem_ToInvoice association, and one for the FK_InvItem_ToProduct association.
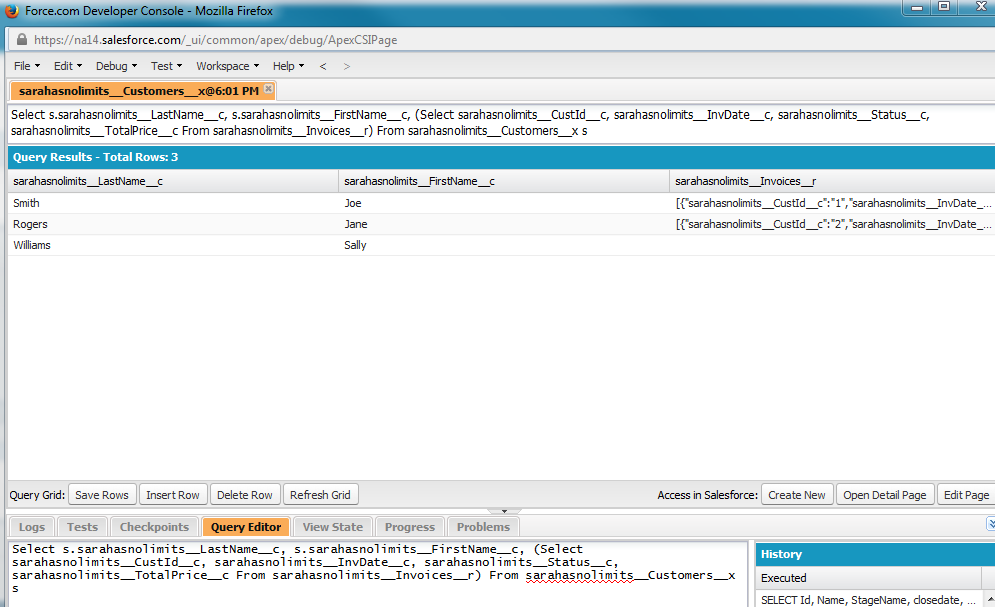
When I am all done creating the relationships, I will be able to query these objects just like I would any other standard or custom sObject. For example, the following query could be executed in the Query Editor of Developer Console:
Select s.sarahasnolimits__LastName__c, s.sarahasnolimits__FirstName__c, (Select sarahasnolimits__CustId__c, sarahasnolimits__InvDate__c, sarahasnolimits__Status__c, sarahasnolimits__TotalPrice__c From sarahasnolimits__Invoices__r) From sarahasnolimits__Customers__x s
The results from the query should look similar to what you see in the image below:
WARNING: If you go back to your External Data Source and re-sync the external objects for which you have defined relationships, they will be removed and restored to their original data types.
External objects work very much like custom objects and so you can create tabs, list views, and even complex Visualforce pages with them. What makes them so special is that unlike standard or custom objects, the data does not reside on Salesforce servers. It just looks like it does.
