Post 2 – Customizing Salesforce with Lightning Aura Components series

This will be the second of a series of posts I will be doing over the next few weeks. They will all lead up to the introduction of my new course titled, “Customizing Salesforce with Lightning Aura Components” from Pluralsight. This course is a total re-write of my most popular course, “Customizing Salesforce with Lightning Components: Getting Started“, which was released back in 2017. It will focus on using the new modern toolset that Salesforce offers as part of Salesforce DX.

Using an Interactive Development Environment (IDE)

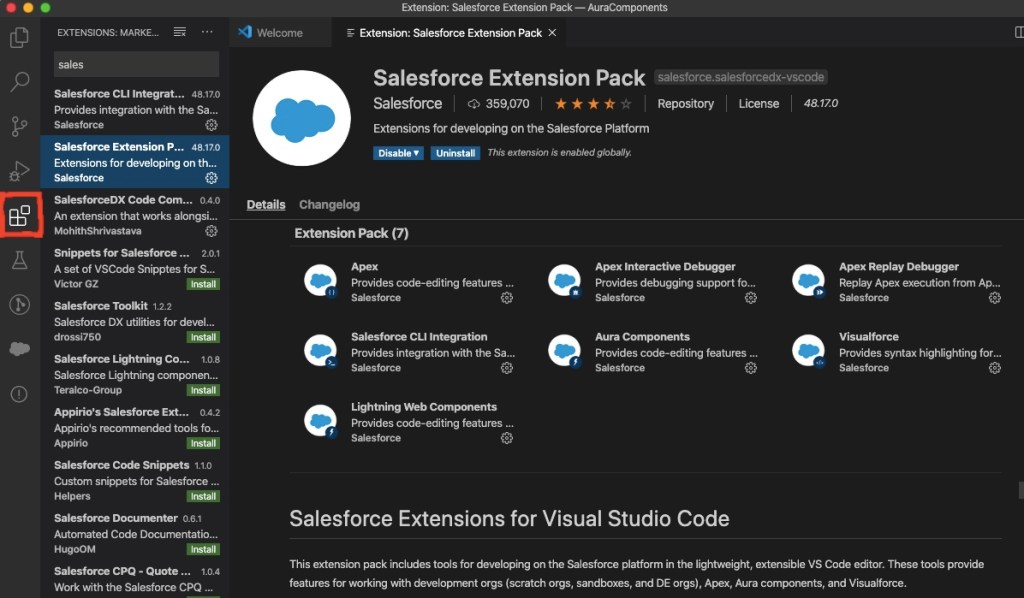
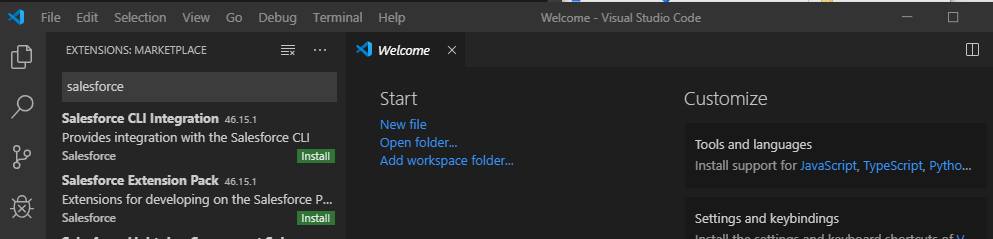
For most modern web developers, their Interactive Development Environment (IDE) is a key to their success. For Salesforce developers, the best choice for an IDE is the Salesforce Extensions for Visual Studio Code.

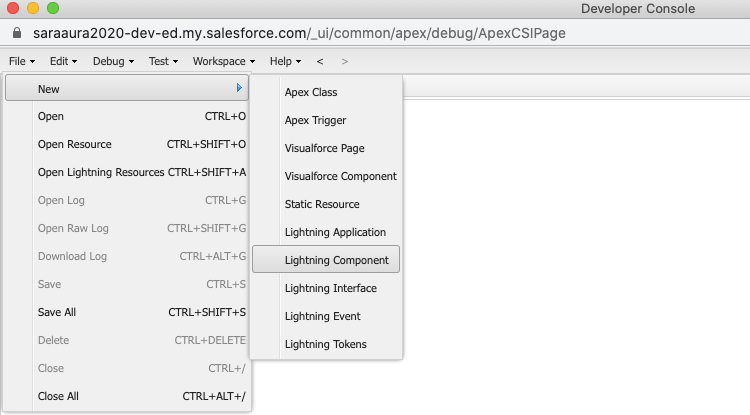
If you have been a Salesforce developer for a while, then this may be new to you. You may be familiar with the Force.com IDE or Interactive Development Environment for Eclipse, which is incidentally not being supported by Salesforce any more.

Salesforce Extension Pack for VS Code

Getting Setup with an IDE

To use the IDE, you will first need to install the latest version of Visual Studio Code. After this has been installed, you can open it up and click the extensions icon on the left toolbar.

Install Salesforce Extension Pack by clicking Extensions Icon

You will also need to install the Salesforce Command Line Interface (CLI). This powerful command line interface allows you to do several things with your Salesforce org, such as:

  • Build and load source code (such as Aura components, Apex classes, Lightning Web Components and).
  • Export data from any Salesforce org and import it into your scratch org, which is a temporary org that has no data loaded by default.
  • Execute both Apex server-side and client-side JavaScript tests.

Once you get used to working with the Salesforce Extensions, you might want to check out the GitHub repo, since it is open source. You can get a lot of information about the extensions on the ReadMe page, as well and browse the useful Wiki and Issues tabs.

Understanding Salesforce DX (SFDX)

Salesforce DX represents a whole new set of developer tools. They represent a source-driven development model, which is considered more modern. It is all built around the CLI, which you just learned about. Most importantly it represents a new way of Salesforce development now known as “Packaging Development”.

Prior to packaging development, the only way developers had to deploy their code was to package it up in a Sandbox org and then deploy it to production. This made the salesforce org the “source of truth”, as developers like to call it. But the new model moves the source of truth from the org to a version control system, like Git.

Before you can create any Aura components in VS Code, you will need to do the following things first:

  1. Authorize a DevHub org using either the command palette or the sfdx force:auth:web:login CLI command.
  2. Create a Salesforce project using either the command palette or the sfdx force:project:create CLI command.
  3. Create a scratch org using either the command palette or the sfdx force:org:create CLI command.

Creating an Aura Component in Visual Studio (VS) Code

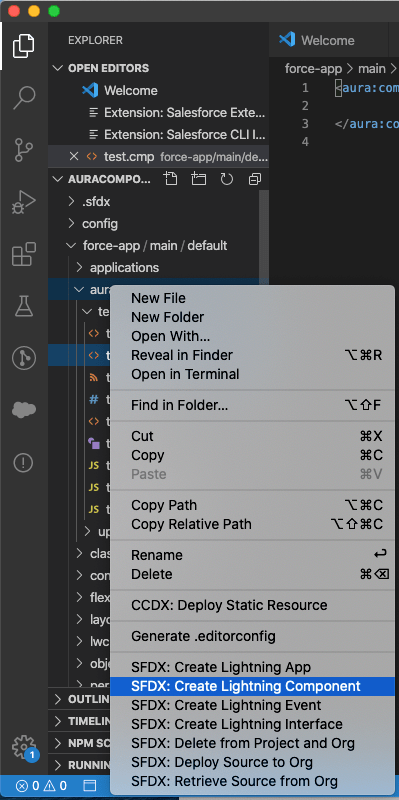
After you have authorized your DevHub and created a project, you can create an Aura component, by browsing to the Aura folder, right-clicking and selecting “SFDX: Create Lightning Component”.

Creating Aura Component in VS Code

Here is the markup code for a very basic component that can be used to update a users mobile phone number.

<aura:component implements="force:appHostable,flexipage:availableForAllPageTypes" access="global" >
	<lightning:card  title="Update Cell Number">
        <p class="slds-p-horizontal_small">
            <lightning:input aura:id="phone" type="tel" label="Cell Phone Number" name="phone" placeholder="343-343-3434" pattern="[0-9]{3}-[0-9]{3}-[0-9]{4}"/>
	    <lightning:button variant="brand" label="Submit" title="Submit" onclick="{! c.handleClick }" />        
        </p>
    </lightning:card>  
    
</aura:component>

And here is the JavaScript for the controller , in which the component will begin by only being able to create a windows alter that displays the number entered when the user clicks Submit.

handleClick : function (cmp, event, helper) {
        alert('phone: ' + cmp.find("phone").get("v.value"));
}

Exposing Aura Components to Lightning App Builder

The main thing you will need in order to expose your new component to Lightning App Builder is the following attributes on the required aura:component tag:

<aura:component implements="force:appHostable,flexipage:availableForAllPageTypes" access="global" >

But in order to make the component more usable to Admins that might build Lightning Pages using these components, it is a good idea to always include a design resource, such as this:

<design:component label="Update Cell Number">
    <design:Attribute name="placeholder" label="Placeholder" placeholder="343-343-3434" />
</design:component>

This will mean that you will also have to make a change to the component markup to add a new Aura attribute such as this:

<aura:attribute name="placeholder" type="String" default="343-343-3434"/>

And you will need to make another change to the lightning:input base lightning component, in which the expression syntax is used, such as this:

<lightning:input aura:id="phone" type="tel" label="Cell Phone Number" name="phone" placeholder="{!v.placeholder}" pattern="[0-9]{3}-[0-9]{3}-[0-9]{4}"/>

You can then save all your changes and push them to the scratch org using either the command palette or the sfdx force:source:push CLI command. You will also need to open the scratch org using either the command palette or the sfdx force:org:open CLI command.

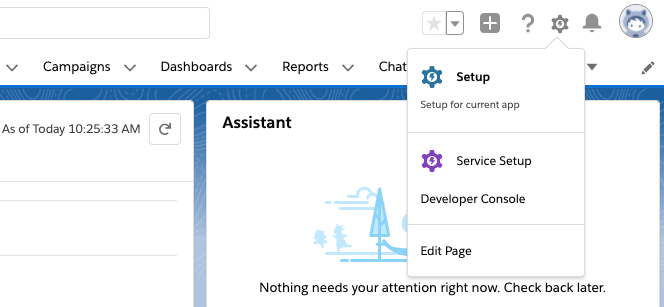
One the org is open, to add the new component to the Sales home page, use App Launcher to go to the Sales app and then click the gear icon and select Edit Page.

Edit Page is used to access Lightning App Builder

You can then just scroll down the list of components until you get to the custom ones and drag the Update Cell Number one onto the design surface.

To finish you just need to save and activate the changes. You can then use the Back button to go back to the Sales home page and see the final component.

Update Cell Number Component, so far

In the next post, this component will be improved on and tied to the Salesforce database.

Stay Tuned…

Post 1 – Customizing Salesforce with Lightning Aura Components series

This will be the first of a series of posts I will be doing over the next few weeks. They will all lead up to the introduction of my new course titled, “Customizing Salesforce with Lightning Aura Components” from Pluralsight. This course is a total re-write of my most popular course (so far), “Customizing Salesforce with Lightning Components: Getting Started“, which was released back in 2017. It will focus on using the new modern toolset that Salesforce offers as part of Salesforce DX.

Understanding the Lightning Component Framework

Lightning components (now called Aura components) were introduced in 2014. At that time, the web standards that existed offered only a limited amount of what developers needed and that is why Salesforce built them on top of the Aura Framework. It was basically, to compensate for what the standards lacked.

Flash forward to 2019 and a LOT has changed in the web development world. That is why in 2019, Salesforce announced the release of Lightning Web Components (LWC’s). It was also at that time that the original Lightning Components were renamed to Aura Components. They co-exist and are completely interoperable with LWC’s.

Who Should be Building Aura Components?

It probably will not surprise you to know that Salesforce developers are perfect for this, but what you might not realize is that so are junior Salesforce developers.

Salesforce Developer
Senior or Junior Salesforce Developers

Another group you may not think of is Salesforce Administrators. You see, Aura components are way simpler to create then Lightning Web Components. Yes, they do still require the developer to know a little about HTML and JavaScript, but since the introduction of Lightning components back in 2014, they have gotten a lot simpler to work with. So, as long as the Admin is seasoned and may even consider themselves as a Super Admin, then I think they too can embrace creating Aura components.

Salesforce Super Admins

Where Can Aura Components Be Used?

Lightning pages

This includes App pages, Home and Record Pages, and even a new Embedded Service Page. The embedded service page will not be covered in this course, but the app and home pages will.

Wizard from Lightning App Builder

salesforce mobile app

In late 2019, Salesforce launched a new and completely redesigned Salesforce Mobile App. You can learn more about it by visiting the New Salesforce Mobile App Quickstart in Setup. This will be covered in the final module on “Creating Components for Salesforce Mobile”.

Access the New Salesforce Mobile App QuickStart from Setup

Other places

These other areas are beyond the scope of this course, but just so you are aware, there is also:

  1. Quick Actions
  2. Stand-alone apps
  3. Inside Visualforce pages
  4. On other platforms such as Heroku, using Lightning Out

Anatomy of an Aura Component Bundle

An Aura component can be made up of several physical files that reside in what is known as a component bundle. Even though there are 8 files that can make up a component bundle, most simple components will only need to access a couple:

  1. Component or Markup file – Uses a .cmp file extension and is a required file and there can only be one per bundle. All markup must be encased in an <aura:component> tag and can include references to other components.
  2. Controller or JavaScript file – Uses a .js file extension and will contain all the client-side methods needed to handle events in your component.

Creating an Aura Component Bundle

The easiest way to create an Aura component is using the online Developer Console. This will be covered only once in this first module. The rest of the course will cover creating bundles using the new modern toolsets.

You can access the Developer Console by logging into a Developer org, click the gear icon and select Developer Console.

Access the online Developer Console

This will launch a new window and from here, you can go to File -> New -> Lightning Component.

Create a new Lightning Component in Developer Console

The initial component I will show viewers how to build is very simple and will be used by Salespeople to update their cell number. From the New Lightning Bundle dialog, you only need to enter the name “updateCellNumber” and select the Lightning Tab and Lightning Page checkboxes in Component Configuration. And finally click Submit.

Create new Lightning Bundle in Developer Console

The component markup will be very simple to begin with and will include 3 Lightning Base Components. as the course progresses, this component, along with others will be expanded upon.

<aura:component implements="force:appHostable,flexipage:availableForAllPageTypes" access="global" >
  <lightning:card title="Update Cell Number">
    <p class="slds-p-horizontal_small">
      <lightning:input aura:id="phone" type="tel" label="Cell Phone Number" name="phone" placeholder="343-343-3434" pattern="[0-9]{3}-[0-9]{3}-[0-9]{4}"/>
      <lightning:button variant="brand" label="Submit" title="Submit" onclick="{! c.handleClick }" />        
    </p>
  </lightning:card>  
</aura:component>

The JavaScript will also be simple to begin with and will only be used to display the phone number in a Windows Alert box.

({
	handleClick : function (cmp, event, helper) {
        alert('phone: ' + cmp.find("phone").get("v.value"));
    }

})

Stay tuned for the remaining modules and posts in the next few weeks. All leading up to the release of the Pluralsight course.

New Upcoming Pluralsight Course on Customizing Salesforce with Lightning Aura Components

I am VERY happy to announce that I am very close to releasing a new Pluralsight course called “Customizing Salesforce with Lightning Aura Components”. Well, kind of a new course.

Upcoming New Pluralsight Course

It is a total re-write of my most popular course (so far), “Customizing Salesforce with Lightning Components: Getting Started“, which was released back in 2017. That was right before Salesforce DX was released and all the other modern developer tools that Salesforce now promotes (for very good reasons).

In this course, all those great shiny new tools will be used to build very simple Aura Lightning Components, as they are now called. The original course used the online Developer Console, which is what Trailhead uses in all their content about Aura Components. On Trailhead, the new tools are only used for Lightning Web Components.

So, if you want to learn about building Aura Components, while also embracing the new modern toolset, this course is perfect for you. And if you want to learn about Lightning Web Components (LWC’s), then you can check out the “Building Your First Lightning Web Component (LWC) for Salesforce” course that I released earlier this year.

Both courses use the new tools, like:

Salesforce DX

Salesforce Command Line Interface

Salesforce Extensions for Visual Studio Code

Starting next week, I will be releasing a series of weekly blog posts that will feature what content will be covered in each Pluralsight module, followed by an announcement of the courses release.

So, keep an eye out for that.

Building Your First Lightning Web Component for Salesforce Pluralsight Course is Live!!!

I am so excited to finally announce that my new Pluralsight course, “Building Your First Lightning Web Component for Salesforce” course is Live!

New Pluralisght course "Building Your First Lightning Web Component for Salesforce"

The development of this course was a labor of love for me and I have to admit something I worked so hard on. I would not compromise the quality for anything (including the three deadlines I missed). Luckily, I was working with some of the best editors in the world (huge shout out to Bentley Lignell, Stacy Sohn and Austin Allen).

As for the course, it covers the following:

  • LWC Benefits and what are Web Components
  • Setting up you development environment with Salesforce, Visual Studio Code and Salesforce DX
  • Component Design using Custom DOM events
  • Working with Salesforce Data using the Wire Adapter and Debugging with Chrome Developer Tools
  • Converting Aura components and lessons I learned
  • Testing your JavaScript with Jest

In the course, we will be building an application that will look like this:

Lead Locator LWC app

If you are looking for the final code created in this course, you can find it here.

For anyone that might not be a Pluralsight subscriber yet, here is a link to a free 10-day trial.

And finally, please feel free to send me your feedback on the course. Good or bad. I appreciate it all because it helps me to develop better content that meets your needs.

Post 6 – Building Your First Lightning Web Component for Salesforce Series

This will be the sixth of a series of posts I will be doing over the next few weeks. They will all lead up to the introduction of my new course in January 2020 titled, “Building Your First Lightning Web Component for Salesforce” from Pluralsight. These posts will contain final code snippets of the code used in each course module, but will not include all the tips and best practices about using Visual Studio Code and SFDX, along with the way I personally approach teaching in my video courses.

Handling Testing and Wrapping Up

If you are already a Salesforce developer then you know that server-side Apex Unit tests are required, but client-side JavaScript tests are not and if you are like most developers, you probably think that creating tests should be optional, kind of like documenting, right?

You might not believe this, but writing tests (even for non-required JavaScript) can actually save you a lot of time, such as:

  • Time from chasing down bugs
  • Fixing those bugs
  • Releasing your fix using whatever release process your company uses

Introducing Jest

Jest is an easy to use tool that was originally created by the engineers at Facebook. It is now supported as open-source by the community. Salesforce DX provides a utility that lets you setup and configure Jest for your LWC project.

There are a few steps involved in getting this setup, which include:

  • Install prerequisites (which includes the latest versions of node.js and npm). Even if you already have node installed, it is recommended that you install the Long Term Support Version of Node.js, which will also include npm. This will guarantee that critical bugs will be fixed for a total of 30 months. You can install the LTS version from here.
  • Setup LWC VS Code project with npm – Go to the Terminal window in your VS Code project and from the root folder, run the following command:

npm init

This will create a package.json file. Just hit enter through all the prompts

  • Install sfdx-lwc-jest and dependencies – Also from Terminal window:

npm install

This will create a package-lock.json file

npm install @salesforce/sfdx-lwc-jest --save-dev

  • Identify test script – Open the package.json file and add this to the scripts section:
,
    "test:unit": "sfdx-lwc-jest --coverage",
    "test:unit:watch": "sfdx-lwc-jest --watch",
    "test:unit:debug": "sfdx-lwc-jest --debug"

Writing Jest Tests

Unlike Apex unit tests, Jest tests are run locally and are completely independent of Salesforce. As a best practice, you should create all your tests in a special folder at the root of your project that is named __tests__. If you look at the .forceignore file in your project, you will see that an entry for this folder already exists, thus excluding any tests from being pushed to your scratch org.

In the course, I walk you through creating a test of the leadList component. That test is just a JavaScript file that is created in the __tests__folder and is named: leadList.test.js (which is also a recommended best practice). In that folder, there is also a data subfolder that contains two JSON files named: getLeads.json and getNoLeads.json. Below is the code for the test:

import { createElement } from 'lwc';
import leadList from 'c/leadList';
import { registerApexTestWireAdapter } from '@salesforce/sfdx-lwc-jest';
import searchLeads from '@salesforce/apex/LeadSearchController.searchLeads';

// Represent a list of valid records
const mockGetLeads = require('./data/getLeads.json');
// Represent a list of no records
const mockGetNoLeads = require('./data/getNoLeads.json');
// Register the Apex wire adapter
const searchLeadsAdapter = registerApexTestWireAdapter(searchLeads);

describe('c-lead-list', () => {
    beforeAll(() => {
        // Use fake timers as setTimeout
        jest.useFakeTimers();
    });

    // Best practice to cleanup after each test
    afterEach(() => {
        // The jsdom instance is shared across test cases in a single file so reset the DOM
        while (document.body.firstChild) {
            document.body.removeChild(document.body.firstChild);
        }
    });

    describe('searchLeads @wire returns records with search parameter', () => {
        it('called with data from input', () => {
            const USER_INPUT = 'Bertha';
            const SEARCH_TERM = { searchTerm: USER_INPUT };

            // Create the leadList element
            const element = createElement('c-lead-list', {
                is: leadList
            });
            document.body.appendChild(element);

            // Simulate user input
            const inputValue = element.shadowRoot.querySelector('lightning-input');
            inputValue.value = USER_INPUT;
            inputValue.dispatchEvent(new CustomEvent('change'));

            // Run the fake timers
            jest.runAllTimers();

            // Return a promise to wait for asynchronous results
            // and fail if promise is rejected
            return Promise.resolve().then(() => {
                expect(searchLeadsAdapter.getLastConfig()).toEqual(
                    SEARCH_TERM
                );
            });
        });

        it('renders data of one record', () => {
            const USER_INPUT = 'Bertha Boxer';

            // Create the leadList element
            const element = createElement('c-lead-list', {
                is: leadList
            });
            document.body.appendChild(element);
            
            // Simulate user input
            const inputValue = element.shadowRoot.querySelector('lightning-input');
            inputValue.value = USER_INPUT;
            inputValue.dispatchEvent(new CustomEvent('change'));

            // Run the fake timers
            jest.runAllTimers();

            // Use the searchLeadsAdapter to emit data
            searchLeadsAdapter.emit(mockGetLeads);

            // Return a promise to wait for asynchronous results
            // and fail if promise is rejected
            return Promise.resolve().then(() => {
                // select some elements that would be rendered if it succeeded
                const detailElement = element.shadowRoot.querySelector('lightning-datatable');
                const rows = detailElement.data;
                expect(detailElement.length).toBe(searchLeadsAdapter.length);
                expect(rows[0].Name).toBe(mockGetLeads[0].Name);
            });

        });

        it('renders data when no record is available', () => {
            const USER_INPUT = '';

            // Create the leadList element
            const element = createElement('c-lead-list', {
                is: leadList
            });
            document.body.appendChild(element);

            // Simulate user input
            const inputValue = element.shadowRoot.querySelector('lightning-input');
            inputValue.value = USER_INPUT;
            inputValue.dispatchEvent(new CustomEvent('change'));

            // Run the fake timers
            jest.runAllTimers();

            // Use the searchLeadsAdapter to emit data
            searchLeadsAdapter.emit(mockGetNoLeads);

            // Return a promise to wait for asynchronous results
            // and fail if promise is rejected
            return Promise.resolve().then(() => {
                // select some elements that would be rendered if it succeeded
                const detailElement = element.shadowRoot.querySelector('lightning-datatable');
                expect(detailElement.length).toBe(searchLeadsAdapter.length);
            });
        });

    });

    describe('searchLeads @wire returns error', () => {
        it('shows error panel', () => {
            // Create the leadList element
            const element = createElement('c-lead-list', {
                is: leadList
            });
            document.body.appendChild(element);

            // Emit error from @wire
            searchLeadsAdapter.error();

            // Return a promise to wait for any asynchronous DOM updates. Jest
            // will automatically wait for the Promise chain to complete before
            // ending the test and fail the test if the promise rejects.
            return Promise.resolve().then(() => {
                const errorPanelEl = element.shadowRoot.querySelector(
                    'c-error-panel'
                );
                expect(errorPanelEl).not.toBeNull();
            });
        });
    });

})

And here are the two data files:

getLeads.json:

[
    {
        "Name": "Bertha Boxer",
        "Phone": "(850) 644-4200",
        "Company": "Farmers Coop. of Florida",
        "Title": "Director of Vendor Relations",
        "Street": "321 Westcott Building",
        "City": "Tallahassee",
        "State": "FL",
        "PostalCode": "32306"
    }
]

and getNoLeads.json:

[]

Running Jest Tests

To run the test seen above, you will need to return to the Terminal window and run this command:

npm run test:unit

Wrapping Up

So, this is the last post in the series and I should be announcing the release of this course soon. Sorry it has taken so long, but I hope you go away with these thoughts:

  •  Less frameworks; more web standards  
  • Embrace VS Code and Salesforce DX  
  • Use CustomEvents when possible  
  • LWC programming model is very different  
  • Never be embarrassed about mistakes  
  • Keep learning and share it

Post 5 – Building Your First Lightning Web Component for Salesforce Series

This will be the fifth of a series of posts I will be doing over the next few weeks. They will all lead up to the introduction of my new course in January 2020 titled, “Building Your First Lightning Web Component for Salesforce” from Pluralsight. These posts will contain final code snippets of the code used in each course module, but will not include all the tips and best practices about using Visual Studio Code and SFDX, along with the way I personally approach teaching in my video courses.

Converting Aura Components to Lightning Web Components

In this module, I will be sharing things I learned based on mistakes I made when I first converted an Aura app to LWC’s. This was the result of that attempt.

For a while I intended to use what I did in that first converted app for this course, but luckily for you, I did not. Instead, I contacted my friend Kevin Hill (@KevinJHill) at Salesforce and he volunteered to review my app. He politely suggested that I make a few changes and thank goodness I did.

The biggest mistake I made was not fully accepting this inevitable truth at first:

“The LWC programming model is fundamentally different than the Aura model”

That message is so important to your success with LWC’s, so here it is again:

I did finally accept this and therefore re-designed the solution I ended up using for this course. The version I will show in the course may look similar to the original version, but underneath it is different and if you watch the course you will even get to see performance results that demonstrate that.

The talented developers at Salesforce (which included Kevin Hill and many others), did an incredible job creating Lightning Web Components. If you attempt to just blindly convert an Aura app to an LWC without accepting that the programming model is different, then you will not get the performance advantages that it provides. And imho, that is like spitting in the face of those GREAT developers at Salesforce.

So, please do not do that. And I hope you watch my course when it is released soon. It is almost finished.

Post 4 – Building Your First Lightning Web Component for Salesforce Series

This will be the fourth of a series of posts I will be doing over the next few weeks. They will all lead up to the introduction of my new course in January 2020 titled, “Building Your First Lightning Web Component for Salesforce” from Pluralsight. These posts will contain final code snippets of the code used in each course module, but will not include all the tips and best practices about using Visual Studio Code and SFDX, along with the way I personally approach teaching in my video courses.

Working With Salesforce Data

The most important thing you need to be aware of when working with Salesforce Data is the Lightning Data Service, or LDS. If you have worked with Aura components, then you have probably already heard about it since it was introduced back in late 2017. The LDS is built on top of the UI or User Interface API. This is the API that Salesforce developers use internally to build the Lightning Experience.

The reason why has to do with the following benefits:

  1. Caching, so loading data is as fast as possible
  2. Progressive loading of data, which also improves performance
  3. Optimization of server calls, which guess what, offers performance advantages.

Hopefully, you are seeing the key factor here.

Using the Lightning Data Service Wire Adapter

As I mentioned in the last post, I am building this solution in stages. In the last post, I created a very simple child component named leadListItem to display all the leads returned by a search term. This was ok, but the output was definitely not pretty. The easiest way to fix that is to take advantage of one of the many LWC base components, which as of Dreamforce 2019, are now mostly available as open source.

And one of the best and easiest to use base components, lightning-datatable offers incredible benefits such as formatting for appropriate data types, header and row level actions, resizing of columns sorting and text wrapping. And there are even more.

I will be replacing the template code in leadList.html that called the leadListItem component, with a call to the lightning-datatable. The HTML will now look like this:

<template>
    <lightning-card title="Lead Search" icon-name="standard:search" class="slds--around_medium">
        <div class="slds-box slds-theme_default">
            <lightning-input
                label="Search Term"
                variant="label-hidden"
                placeholder="Search by name, phone, website, or address"
                type="text"
                value={searchTerm}
                onchange={handleSearchTermChange}>
            </lightning-input>
         </div>
        <div class="slds-m-around_small">
            <lightning-datatable
                key-field="id"
                data={leads}
                columns={cols}
                onrowaction={handleRowAction}
                hide-checkbox-column = "true">
            </lightning-datatable>
            <template if:true={error}>
                // Hint. In the actual course, I will implement something better than this
                The following error was encountered: {error}
            </template>
        </div>
    </lightning-card>
</template>

I will need to remove the JSON data in the JavaScript and add a constant to support the column definitions, as well as a new tracked variable for the columns and another for the error that could be returned and only rendered when there is an actual error using the if:true directive in the HTML template.

To help minimize the number of Apex calls, I will use a common technique that was implemented in the lwc-recipes repo. It involves slightly delaying the dispatch of the newsearch Custom Event.

I will also need to add a new imports command that is used to call Apex Code that returns results from a search. And, I will need to add another imports for the wire directive to the top import command. The wire directive is used to read Salesforce data reactively and when the data is provisioned, it automatically re-renders the component. This will be implemented in loadLeads.

And finally, there will be a handler that uses the navigation service to navigate the user to the Lead record page if they decide to click the info icon displayed in the last datatable column. The code for the leadList.js will now look as follows:

import { LightningElement, track, wire } from 'lwc';
import searchLeads from '@salesforce/apex/LeadSearchController.searchLeads';
import { NavigationMixin } from 'lightning/navigation';

/** The delay used when debouncing event handlers before a method call. */
// This code was copied directly from the trailheadapps/lwc-recipes GitHub repo
const DELAY = 350;

// It is a general convention to capitalize constants
const COLS = [
    {
        label: 'Name',
        fieldName: 'Name',
        type: 'text'
    },
    {
        label: 'Title',
        fieldName: 'Title',
        type: 'text'
    },
    {
        label: 'Company',
        fieldName: 'Company',
        type: 'text'
    },
    {
        label: 'View',
        type: 'button-icon',
        initialWidth: 75,
        typeAttributes: {
            title: 'View Details',
            alternativeText: 'View Details',
            iconName: 'action:info'

        }
    }
];

export default class LeadList extends NavigationMixin(LightningElement) {
    @track leads = [];
    @track searchTerm;
    @track cols = COLS;
    @track error;
    
    handleSearchTermChange(event) {
        this.searchTerm = event.target.value;
        if (this.leads) {
            const selectedEvent = new CustomEvent('newsearch', {detail: this.searchTerm});
            window.clearTimeout(this.delayTimeout);
            // eslint-disable-next-line @lwc/lwc/no-async-operation
            this.delayTimeout = setTimeout(() => {
                this.dispatchEvent(selectedEvent);
            }, DELAY);
        }
    }

    @wire(searchLeads, {
        searchTerm: '$searchTerm'
    })
    loadLeads({ error, data }) {
        if (data) {
            this.leads = data;
            this.error = undefined;
        } else if (error) {
            this.error = error;
            this.leads = undefined;
        }
    }

    handleRowAction(event) {
        const row = event.detail.row;
        this.record = row;
        this[NavigationMixin.Navigate]({
            type: 'standard__recordPage',
            attributes: {
                recordId: row.Id,
                actionName: 'view',
            },
        });
    }

}

The last thing to do is to create the Apex class that will do the actual search of the Salesforce data. It will use a SOSL query to perform a special kind of search across multiple fields in a single object. Notice that the searchLeads method includes an @AuraEnabled tag, as well as the cacheable = true. This ensures the data returned will be cached, which is perfect for mutable data such as the lead addresses. The code for that will look as follows:

public with sharing class LeadSearchController {
    
    @AuraEnabled(cacheable=true)
    public static List<Lead> searchLeads( String searchTerm ) {
        List<Lead> leads = new List<Lead>();
        if ( String.isNotBlank( searchTerm ) ) {
            List<List<SObject>> searchResults = [
                FIND :searchTerm
                RETURNING Lead(
                    Id, Name, Title, Company,
                    Street, City,
                    State, PostalCode
                    ORDER BY Name
                    LIMIT 10
                )
            ];
            leads = searchResults[0];
        }
        return leads;
    }
}

Using the CLI to Load Data

At this point, if you were to save and push all this code to your scratch org and then open the Lead Locator tab and do a search, what do you think would happen?

Well, you should get nothing returned because by default scratch orgs are not loaded with any Lead data. But, we can use some very handy CLI commands to export data from another developer org and then import it into our scratch org as JSON data.

I have already used the export command to get 10 lead records from a developer org. That command looked like the following:

sfdx force:data:tree:export --query \                                                                	"SELECT ID, FirstName, LastName, Phone, Company, Title, Street, City, \ 		State, PostalCode FROM Lead limit 10" \                                                	
--outputdir ./data --json

And to import them, I will only need to use the terminal in Visual Studio Code to execute another CLI command that looks like this:

sfdx force:data:tree:import -f data/Lead.json -u <your scratch org username here>

Adding the Lead Map Component

To finish off the solution, I will need to add the leadMap component. It will use another very useful Lightning base component called lightning-map. That base component can display multiple locations using geocoding and mapping imagery from Google Maps. The leadList.html for that component will look like this:

<template>
    <template if:true={leads}>
        <lightning-map
                zoom-level="11"
                map-markers={markers}
                markers-title="Leads">
        </lightning-map>
    </template>
    <template if:true={error}>
            // Hint. In the actual course, I will implement something better than this
            The following error was encountered: {error}
    </template>
</template>

The leadList.js file will import the same LeadSearchController code used in the leadList, but remember that this data is cacheable. And the @wire directive will do a search using a new variable called searchInput. This variable will be passed to the leadMap component as a public variable from the owner component using the @api directive. The final code for leadList.js will look like this:

import { LightningElement, track, wire, api } from 'lwc';
import searchLeads from '@salesforce/apex/LeadSearchController.searchLeads';

export default class leadMap extends LightningElement {
    @track markers = [];
    @track error;
    @track leads;

    // Private variable
    searchTerm;

    @api get searchInput() {
        return this.searchTerm;
    }

    set searchInput(value) {
        this.searchTerm = value;
    }

    @wire(searchLeads, {
       searchTerm: '$searchInput'
    })
    loadLeads({ error, data }) {
        if (data) {
            this.leads = data;
            this.markers = data.map(lead => {
                return {
                    location: {
                        Street: lead.Street,
                        State: lead.State,
                        City: lead.City,
                        PostalCode: lead.PostalCode
                    },
                    title: JSON.stringify(lead.Name),
                    icon: 'utility:pinned'
                }
            })
            this.error = undefined;
        } else if (error) {
            this.error = error;
            this.leads = undefined;
            this.markers = [];
        }
    }
}

The last thing to change is code in the Owner component. In the myFirstLWC.html, I will need to replace the placeholder text with the a call to the new leadList child component. But, to prevent the map from being displayed when the user first loads the page, I will need to use another CustomEvent called searchcomplete. If no search has been done, then the user will get a helpful info message displayed. The HTML code for the owner will now look like this:

<template>
    <div class="c-container">
            <lightning-layout multiple-rows="true">
                <lightning-layout-item padding="around-small" size="12">
                    <lightning-layout>
                        <lightning-layout-item padding="around-small" size="6">
                            <div class="slds-box slds-theme_default">
                                <c-lead-list onnewsearch={handleNewSearch}
                                onsearchcomplete={handleSearchComplete}></c-lead-list>
                            </div>
                        </lightning-layout-item>
                        <lightning-layout-item padding="around-small" size="6">
                            <div class="slds-box slds-theme_default">
                                    <lightning-card title="Lead Map" icon-name="action:map" class="slds--around_medium">
                                        <template if:true={searchComplete}>
                                            <c-lead-map search-input={searchInput}></c-lead-map>
                                        </template> 
                                        <template if:false={searchComplete}>
                                            <div class="slds-notify slds-notify_alert slds-theme_alert-texture slds-theme_info" role="alert">
                                                <span class="slds-assistive-text">info</span>
                                                <h2>You will need to enter a search term before a map is displayed.</h2>
                                            </div>
                                        </template> 
                                    </lightning-card>  
                                </div>
                        </lightning-layout-item>    
                    </lightning-layout>
                </lightning-layout-item>
            </lightning-layout>
        </div>
</template>

Of course, this will mean I will also need to modify the myFirstLWC.js file to include a handler for that new CustomEvent. This code will now look as follows:

import { LightningElement, track } from 'lwc';

export default class MyFirstLWC extends LightningElement {
    @track searchTerm;
    @track searchInput;
    @track searchComplete = false;

    handleNewSearch(event) {
        this.searchTerm = event.target.value; 
    }

    handleSearchComplete(event) {
        this.searchInput = event.detail;
        this.searchComplete = true;
    }
}

And to explain all this in terms of the component communication, consider the following diagram:

But, the course is not done, and the best is yet to come in the next post in which I will go over converting Aura components using an example similar to this with a completely different approach that I think you will find very interesting.

And finally, if you are super excited about this, you might want to consider taking advantage of this limited time offer from Pluralsight for 40% off an annual subscription until December 6, 2019.

40% Off Pluralsight – Last Chance to Save

Post 3 – Building Your First Lightning Web Component for Salesforce Series

This will be the third of a series of posts I will be doing over the next few weeks. They will all lead up to the introduction of my new course titled, “Building Your First Lightning Web Component for Salesforce” from Pluralsight. These posts will contain code snippets of the code used in the course, but will not include all the tips and best practices about using SFDX, along with the way I personally approach teaching in my video courses.

You also have to realize that the solution is built in stages and so the code you see here is not exactly what you will see by the end of the next module. For all that, you will just have to wait and watch the course, which I hope you do.

And Finally, I know there has been a big delay between the first two posts and these remaining posts, but I promise you that the delay will have been worth the wait. I am VERY proud of how this course is turning out and feel like it will be my best yet. 

Component Design

LWC’s are similar to Aura components in the fact that you should consider each component as an application building block. And just like with Aura components, most LWC’s will contain many smaller, nested components. The biggest difference is that the communication patterns between Aura components and LWC’s is VERY different.

LWC Nested Composition

NestedComposition

In this course, we will actually be creating multiple LWC components that demonstrate a nested pattern. At the outermost layer we will have a Lightning App Page and inside of that will be an owner or container component. The owner can contain other components, which also contain other components. What is happening here is that we have a parent-child relationship going on and that is very important is determining how data is passed between LWC components.

Creating the Owner Component

At first this component (which we will name myFirstLWC) will just contain placeholder text for where the two components it will contain will ultimately reside. Here is the HTML we will use for now:

<template>
    <div class="c-container">
            <lightning-layout multiple-rows="true">
                <lightning-layout-item padding="around-small" size="12">
                    <lightning-layout>
                        <lightning-layout-item padding="around-small" size="6">
                            <div class="slds-box slds-theme_default">
                                <h2>TO DO: Add List LWC Component here</h2>
                            </div>
                        </lightning-layout-item>
                        <lightning-layout-item padding="around-small" size="6">
                            <div class="page-section page-main">
                                <h2>TO DO: Add Map LWC Component here</h2>
                            </div>
                        </lightning-layout-item>
                    </lightning-layout>
                </lightning-layout-item>
            </lightning-layout>
        </div>
</template>

You will also need to modify the metadata file so it exposes this component (but ONLY this component since it is the owner) to the Lightning App Builder.

<?xml version="1.0" encoding="UTF-8"?>
<LightningComponentBundle xmlns="http://soap.sforce.com/2006/04/metadata" fqn="MyFirstLWC">
    <apiVersion>47.0</apiVersion>
    <isExposed>true</isExposed>
    <targets>     
      <target>lightning__RecordPage</target>
      <target>lightning__AppPage</target>
      <target>lightning__HomePage</target>
  </targets>
</LightningComponentBundle>

  1. Type “Lightning App” in Quick Find and select Lightning App Builder.
  2. Click New to start the Wizard.
  3. Leave the default on App Page and click Next.
  4. Enter the label “Lead Locator” and click Next.
  5. Select One Region and click Finish.
  6. In the Builder, scroll down to to the Custom List and drag the myFirstLWC onto the design surface.
  7. Click Save.
  8. Click Activate when prompted.
  9. From the Activation Wizard, accept the defaults, and select the Lightning Experience tab.
  10. Select Sales and click Add Page to app.
  11. Click Save.
  12. Click Back to return to Setup.
  13. Click the App Launcher and select the Sales app.You should see the Lead Locator app and you should select it to see your very basic app so far.

Creating the LeadList Component

The Here is the HTML for our leadList component. Notice that it contains two other nested components. One is a Lightning base component called lightning-input and the other is a custom one yet to be created called lead-list-item.

<template>
    <lightning-card title="Lead Search" icon-name="standard:search" class="slds--around_medium">
        <div class="slds-box slds-theme_default">
            <lightning-input
                label="Search Term"
                variant="label-hidden"
                placeholder="Search by name, phone, website, or address"
                type="text"
                value={searchTerm}
                onchange={handleSearchTermChange}>
            </lightning-input>
            <h3>Leads for {searchTerm}</h3>
        </div>
        <div class="slds-m-around_small">
            <template if:true={leads}>
                <template for:each={leads} for:item="lead">
                    <c-lead-list-item key={lead.Id} lead={lead} ></c-lead-list-item> 
                </template>
            </template>
        </div>
    </lightning-card>
</template>

Since this module is only about Composition and not about data, the JavaScript for this component will just contain some static JSON code to represent the lead data. It will also use the Track decorators for the leads array and the searchTerm, which allow you to keep track of a properties value when it is re-rendered.

Most importantly, it will follow best practices and use the simplest way to communicate with events by using a standard CustomEvent called newsearch.

import { LightningElement, track} from 'lwc';

export default class LeadList extends (LightningElement) {
    @track leads =[];
    @track searchTerm;

    handleSearchTermChange(event) {
        this.searchTerm = event.target.value;
        const selectedEvent = new CustomEvent('newsearch', {detail: this.searchTerm});
        this.dispatchEvent(selectedEvent);
    }

    leads = [
        {
            "Id": "LeadRef1",
            "Name": "Bertha Boxer",
            "Title": "Director of Vendor Relations",
            "Company": "Farmers Coop. of Florida",
            "Street": "321 Westcott Building",
            "City": "Tallahassee",
            "State": "FL",
            "PostalCode": "32306"
        },
        {
            "Id": "LeadRef2",
            "Name": "Phyllis Cotton",
            "Title": "CFO",
            "Company": "Chamber of Commerce",
            "Street": "300 E Park Ave",
            "City": "Tallahassee",
            "State": "FL",
            "PostalCode": "32301"
        },
        {
            "Id": "LeadRef3",
            "Name": "Jeff Glimpse",
            "Title": "SVP, Procurement",
            "Company": "Tallahassee Taxes",
            "Street": "1327 Colorado St",
            "City": "Tallahassee",
            "State": "FL",
            "PostalCode": "32304"
        }
    ];

}

 Modifying the Owner Component

Since we added a CustomEvent to the leadList component, we will need to add some JavaScript to the owner component, myFirstLWC that will handle this event.

import { LightningElement, track } from 'lwc';

export default class MyFirstLWC extends LightningElement {
    @track searchTerm;

    handleNewSearch(event) {
        this.searchTerm = event.target.value; 
    }
}

We will also need to modify the HTML so that we remove the placeholder text for the leadList component. Notice though how it is named. All LWC’s will be rendered with the c namespace, followed by a hyphen and then the component name, which is also separated by a hyphen. LWC knows that the leadList component is two words because we used kebab or camel case when naming it. This is a commonly used HTML standard and it means that the component must start with a lowercase letter and the other letter must be capitalized with no spaces in between, which is how we named the leadList component.

<c-lead-list onnewsearch={handleNewSearch}></c-lead-list>

Creating the leadListItem Component

This is just a very basic component that will display the results of the search. Not much to it for now.

<template>
    <lightning-layout vertical-align="center">
        <lightning-layout-item padding="around-small">
            <p>{lead.Name}</p>
        </lightning-layout-item>
        <lightning-layout-item padding="around-small">
            <p>{lead.Title}</p>
        </lightning-layout-item>
        <lightning-layout-item padding="around-small">
            <p>{lead.Company}</p>
        </lightning-layout-item>
    </lightning-layout>
</template>

And here is the JavaScript for that component. It will use the api decorator since the lead that is passed to it is a public property.

import { LightningElement, api } from 'lwc';

export default class LeadListItem extends LightningElement {
    @api lead;
}

So that is all we have for now. If you push all the code we have here and go to do a search, you should see the term you type displayed right below it, but not much else is happening yet. But stay tuned for the next post, because that is where all the magic will happen and the solution will come together.

Post 2 – Building Your First Lightning Web Component for Salesforce Series

This will be the second of a series of posts I will be doing over the next few weeks. They will all lead up to the introduction of my new course titled, “Building Your First Lightning Web Component for Salesforce” from Pluralsight.

Setting Up Your Development Environment (in 5 somewhat easy steps)

Step 1: Signup for a Developer Org

I know you may already have one of these, but  I suggest you sign up for another one since this will be used primarily as a DevHub. You go can signup here.

The primary function of the DevHub is to create and manage scratch orgs. To enable the DevHub, go to Setup and type Dev in the Quick Find Box and go to the DevHub Page. Click the Enable button and just remember that once enabled, you cannot disable a DevHub org.

Step 2: Install the latest version of Visual Studio CodeVSCode

Even if you already have Visual Studio Code running on your machine, I suggest you to download and install this version by going here.

This is this is the IDE that Salesforce has chosen to recommend and fully support for LWC.

Step 3: Install the Salesforce CLI

The CLI, or Command Line Interface helps to simplify Salesforce development by allowing you as a developer to pretty much do everything you need to do to develop, test and deploy your code.

Be aware that unlike the rest of Salesforce,  the CLI is updated weekly.  You can download the version for your operating system here. Just remember to run the sfdx update command frequently so you know you have the latest version.

Step 4: Install the Salesforce Extension Pack for Visual Studio Code

To get this installed, you should launch Visual Studio Code and when you do,you will want to start by clicking the extensions icon on the left toolbar. If you start to type in Salesforce, you should see a list of all the Salesforce extensions. For now, you will want to click install for the Salesforce Extension Pack.

SalesforceCLI

Step 5: Install the Java Platform Standard Edition Development Kit

This can be found on the Oracle website and you will want to make sure you have installed the latest version 8 or 11 for your particular operating system. During the installation, you will need to ensure that the install points to the directories listed here for either Windows or the mac:

  • Windows: C:\Program Files\Java\jdk1.8.0_221.jdk\
  • MacOS: /Library/Java/JavaVirtualMachines/jdk1.8.0_221.jdk/Contents/Home.

Once the installation is complete you will also need to change a setting in VS Code to reflect this. You do this by going to File, Preferences and Settings. This is where you will point VS code to the right Java install. Enter apex java and select Salesforcedx-vscode-apex. Notice that the path here is not the one you installed to.

UPDATED Instructions below:

So,we will need to change this. You can do that by clicking on the input box, right below the wrong setting and then entering the correct one for your operating system. I am on Windows here. And finally you will relaunch VS Code.

After you re-launch, go to the terminal and type java -version and you should see the output like below.

SettingsJava

I know this seems like a pain, but there are some features in the Salesforce Extension pack that rely on this SDK, so it is important that you install it.

That’s it (Phew)…

See you next week, when we will be talking about composition and communication of your LWC’s.

Post 1 – Building Your First Lightning Web Component for Salesforce Series

This will be the first of a series of posts I will be doing over the next few weeks. They will all lead up to the introduction of my new course titled, “Building Your First Lightning Web Component for Salesforce” from Pluralsight.

Introducing Lightning Web Components

Lightning Web Components is a new programming model from Salesforce,  introduced in January 2019 that takes advantage of all the latest web standards. It should be very intuitive and familiar for any modern web developers, but it will still be fully interoperable with Aura Components (which is what Salesforce used to call lightning components.

The best thing about them is that they are super lightweight and highly performant. In most cases, they should render faster than any Aura equivalents.

In most cases, they should render faster than any Aura equivalents.

Why Are LWC’s Faster?

Aura components were developed back in 2014 and a LOT has changed in the web development world since then. Most notably is the fact that most of today’s web browsers finally support the more advanced versions of JavaScript.

Rather than have to carry the overhead of an additional framework (which is what Aura has to do), LWC’s just rely on accepted web standards. LWC’s are based on a world wide accepted standard known as Web Components.

sandbox_OrangeGet Ready to Play

So now that you know why LWC’s are so cool, I want to direct you to a great place where you can learn more about them and get a chance to play with the code. LWC’s come with a fancy new online playground that you can use to get started learning more about LWC’s. It works kind of like JSFiddle and CodePen.

Going to it will load up a very simple application, but you can use this playground to mock up what your new LWC app will look like.

Playground.png

You can even save any changes you make here and then share what you built with other people by giving them a shareable link.

In the next post, I will be going over what you need to do to setup your own development environment so that you can start building LWC’s today.