Lightning Component Best Practices at Florida Dreamin 2018

Thank you for everyone that attended my talk about Lightning Component Best Practices at Florida Dreamin. As promised, here is a link to the slide deck: Florida Dreamin 2018 – Lightning Tips. Hope it is super helpful to you.

Don’t forget to also check out the other articles on this blog such as:

Debugging Lightning Components with the Salesforce Lightning Inspector

Top 5 Lightning Debugging Tips

Why you should be using the Lightning Data Service whenever possible

5 Ways to Build Lightning Fast Components

FLD18.jpg

Why you should be using the Lightning Data Service whenever possible

If you are creating Lightning components and working with a single record of data, you should be using the Lightning Data Service (LDS) or the force:recordData tag.

And for those of you that have not heard about the LDS, you can think of it as the standard controller for lightning components. It is similar to the standard controller used in Visualforce in that it gets you access to your orgs data, but without the need to write any Apex or SOQL and that is a pretty cool thing because when you don’t have to worry about writing Apex, you also do not have to worry about FLS or Field Level Security and CRUD or Create Access Update and Delete security, which is something you would have to specifically check for in your code if you did not use the Lightning Data Service.

You see I have to tell you that all of you Visualforce developers have been a bit spoiled when it comes to security, b/c in most cases, the pages that you wrote did not have to specifically check for these permissions (even when they used controllers). But, the Lightning Platform works very differently than Visualforce and any Apex code you write does have to do these checks, which involves writing more code.

With the Lightning Data Service, you also get other built-in features like auto-notifications when there are record changes, as well as offline access for Salesforce1.

And if all that was not enough to convince you that Lightning Data Service is something you want to use, here is one more really big reason. Even if you have multiple components using the Lightning Data Service, they are all going to use a single request and deal with a cached response and in terms of performance this is huge.

Even if you have multiple components using the Lightning Data Service, they are all going to use a single request and deal with a cached response

So let’s talk about that a bit more. Let’s say you have two components that are using the force:recordData tag. Each one will make a request for data through the Lightning Data Service Controller, and those requests will be funneled into one single request which is sent to the Salesforce server, such as you see here.

LDSDemo2

But what is returned is a response that will be stored in a shared data cache and also returned back to the two components that started all this, such as in the diagram below. And this means that not only will those two components be able to retrieve the data faster than two components that were using their own apex controllers

LDSDemo3

But if a third component that needed that same data were to come along, it would be able to get a cached response almost immediately without even having to make a call to the server. Boom!

LDSDemo4

And the beauty of it all is that you can implement this with just a few lines of markup code in the component and then a few more lines in the JavaScript controller to load and save the record. You do not have to write any Apex or SOQL code to implement this, but you get all the performance benefits.

So now do you see why you need to be using the Lightning Data Service whenever possible?

If you found this article useful, you might want to checkout my latest course on Pluralsight titled, Lightning Component Development Best Practices, where I talk about the Lightning Data Service and a lot more.


Check Out Lightning Component Development Best Practices on Pluralsight

DevBestPractices

I am so happy to announce that my third course about Lightning Component Development Best Practices was published on Pluralsight last night.

I worked extra hard on this course and have spent every weekend for the past 6 months toiling over every little thing I included. I am really hoping that effort shows through and I would love to hear your feedback (good or bad). All feedback is welcome. The good stuff makes me feel good and the bad stuff makes me better, so it’s all good.

Here is the description for the course and a listing of the specific things it covers:

Are your Lightning Components performing at the best level they can? Are they secure? Will they scale well as you start to build more complex Lightning Applications? In this course, Lightning Component Development Best Practices, you’ll learn the answers to these questions and more. First, you’ll find out what simple best practices you can incorporate to improve client-side rendering. Next, you’ll learn how to enhance server-side efficiency. Finally, you’ll discover what you can do to ensure your components are secure. When you are finished with this course, you’ll have the confidence to build Lightning Components that run “Lightning Fast”.

Modules:

  • Improving Client-Side Performance
  • Enhancing Efficiency on the Server
  • Reusing Code in Complex Applications
  • Avoiding the Pitfalls of Inter-Component Communication
  • Enforcing Security and Mistakes to Next Make


5 Ways to Build Lightning Fast Components

This post is based on a talk I gave twice at this years Dreamforce.

The five tips I cover here were hand picked by me out of a whole bunch of stuff I discovered while creating my latest Pluralsight course about Lightning Best Practices. The course will be released soon, so stay tuned and I will let you know. All of these tips are pretty simple to implement and I think they represent the quickest and easiest things you can do to get better performance.

So, in David Letterman style. here they are from last to first:

# 5 – Check your Settings

Specifically, you want to check the values for debug mode and component caching, which should have different values depending on whether you are in production versus development.

Debug Mode

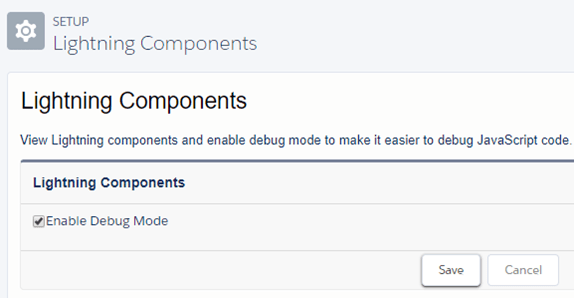
Debug mode is what you can toggle to allow detailed debug messages to appear in your browsers console log and these messages can really help you not only to debug your components, but as you will learn about soon, they feature important messages about performance.

For the debug mode, you want that to be enabled in development, so you can get those messages you need as you are developing, but in production, you want to make sure this is turned off b/c when it is enabled, it means that all the css and javascript that is downloaded to the client is not minified, which means it will take longer to download and longer for your components to render and that is why you do not want it enabled in production.

DebugMode

Component Caching

Component caching has to do with whether pages will be cached to specifically improve performance, which is why that one is so important.

For the component caching, the settings should be the opposite and you want caching disabled in development, because while you are making changes to components and testing how they render, you do not want to have to hit your browser refresh several times before you see your changes which is what will happen if it is enabled. But, in production, where changes to the code are not happening, you want to make sure caching is enabled, since this will result in faster component rendering.

ComponentCaching

# 4 – Use <aura:if> for Conditional Rendering

To do conditional rendering in Lightning, you could use a technique known as css toggling and for a long time this was actually the way even Salesforce recommended you do toggling in the official docs. But in fact, what we now know is that you do not want to do this and the reason why is that when you use this method, any components inside the css toggled code (and most importantly any event handlers associated with those components) are rendered right away.

The alternative is to use the aura:if tag. Using this means that anything inside the aura:if will not actually be rendered until the condition is true. So in the example below, the event handlers associated with the lightning button will not be active until the aura:if condition is true.

<aura:if isTrue="{!v.isVisible}">
             <lightning:button label="Submit"
            onclick="{!c.newRecord}" />
 </aura:if>

# 3 – Check your Console Log

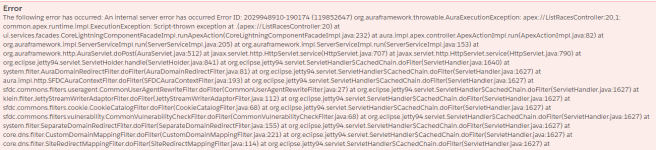
The number 3 tip is a reminder to always check your browsers console log because not only can you use this for debugging your components, but the lightning development team now will push performance warning messages to the console log and so even if your component is rendering fine and doing everything you want it to, you could have a performance issue and not even be aware of it.

PerformanceWarnings.png

You can access the Console log for the Google Chrome browser by right-clicking inside the browser and selecting Inspect. But know that these messages will only appear when debug mode has been enabled, so this is something you want to only check for in your development org.

# 2 – Use the Lightning Data Service whenever possible

The Lightning Data Service is just way cool and offers a whole bunch of great features. If you do not know about it, check out this great Trailhead that tells you all about how to use it.

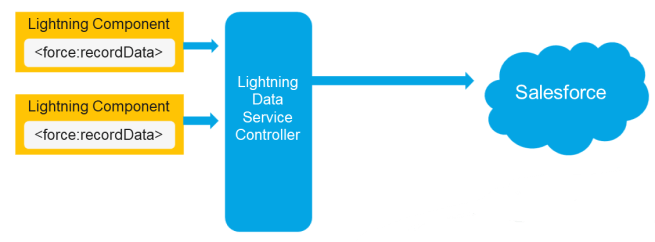
The best thing about the Lightning Data Service (or <force:recordData> tag) is that it provides a single cached response and this can have a big impact on performance.

Let’s say you have three components that are all using the force:recordData tag. Each one will make a request for data through the Lightning Data Service Controller, and those requests will be funneled into one single request which is sent to the Salesforce server.

But what is returned is a response that will be stored in a shared data cache and also returned back to the two components that started all this. And this means that not only will those two components be able to retrieve the data faster than two components that were using their own apex controllers.

And if a third component that needed that same data were to come along, it would be able to get a cached response almost immediately without even having to make a call to the server. Boom!

LDS2

# 1 – Use Storable Actions whenever possible

So here we are at the number one tip and it is to use storable actions whenever possible, which essentially allows you to take advantage of caching and get all the benefits that you just saw demonstrated, even when you are not using the Lightning Data Service.

And a good example of this can be seen with a component that needs to access a list of data (which is something that the Lightning Data Service currently cannot handle, since it only works with a single record).

When paging through a list of records that use storable actions, after the pages are rendered once, the next time they are returned to, the rendering will happen in a fraction of the original rendering time. This can results in significant performance savings when a user needs to page through a long list of records.

And to take advantage of caching, all you have to do is add a single line of code right after you define the action, such as in the following example:

​var action = component.get('c.getRacesDB');
​action.setStorable();
​action.setCallback(this, function(response) {
​            // Code here to handle the response
​}
​$A.enqueueAction(action);

If you found this article useful, you might want to checkout my latest course on Pluralsight titled, Lightning Component Development Best Practices, where I talk about base lightning components and a lot more.

Lightning Best Practice: Handling FLS Exceptions Gracefully

If you found this article useful, you might want to checkout my latest course on Pluralsight titled, Lightning Component Development Best Practices, where I talk about base lightning components and a lot more.

If you are a Visualforce developer, then you may be surprised to learn that FLS (Field Level Security) and CRUD (Create Access Delete and Update) permissions are NOT handled automatically in your Aura-enabled code.

And in case you do not know, Aura-enabled code is the code used for Lightning components and most of this code is used to access the data in your Salesforce org. The gotcha here is that unless you are specifically checking permissions in this code, then it is possible your Lightning components could be unintentionally exposing sensitive data from your Salesforce org. 

Ouch!!!

The Problem

While there are code examples out there (such as this one on in the Lightning Developer Guide), I think there is a fundamental flaw in most of these examples. And that flaw is that they do not handle exceptions gracefully.

To demonstrate, let’s see take a look at some code that is very similar to the code used in the official Lightning docs. This code is used in the Controller of a Lightning component which lists data from a custom object called Race.

String [] raceFields = new String [] {'Id','Name','DateTime__c',
'Location__c','Attended__c','Type__c','Results__c' };

Map raceMap =
        Schema.SObjectType.Race__c.fields.getMap();

for (String field : raceFields) {
   if (!raceMap.get(field).getDescribe().isAccessible()) {
      throw new System.NoAccessException();
         return null;
   }
}

res.races = [SELECT Id, Name, DateTime__c, Location__c,
               Attended__c, Type__c, Results__c FROM Race__c
            ORDER BY DateTime__c desc
            LIMIT :pSize OFFSET :offset]; 
return res;

This code will first check to see if all the fields that need to be queried are accessible and if any one of the fields is not accessible, it will throw a NoAccessException.

Seems ok, right?

Well to begin, let’s take a look at what you would see in the browser if this code is run and the user does NOT have access to one of the fields:

NoAccessException.png

YUK!!!!

Not only is this message ugly, it is extremely unhelpful.  Surely, there must be something better?

Option 1 – a Better Error Message

Well, the first option you have is to simply replace the code that throws a System.NoAccessException, with code that throws an AuraHandledException, such as this:


 for (String field : raceFields) {
    if (!raceMap.get(field).getDescribe().isAccessible()) {
        throw new AuraHandledException(
            'Were sorry, but you do not have access to this field: ' 
            + raceMap.get(field).getDescribe().getName());
        return null;
    }
 } 

The message you will see now when one of the fields is not accessible is this:

BetterException

Much better, don’t you think?

Option 2 – Handling the Exception Gracefully

But wait, it can get EVEN better…

Instead of returning null when a field is not accessible, we can instead make a few more changes to the code, such as this:


String [] raceFields = new String [] {'Id','Name','DateTime__c',
            'Location__c','Attended__c','Type__c','Results__c' };
  
Map raceMap = 
      Schema.SObjectType.Race__c.fields.getMap();

List fields = new List();
String query = '';
for (String field : raceFields) {
    if (raceMap.get(field).getDescribe().isAccessible()) {
        fields.add(field.trim());
    }
}
if(fields.Size() > 0) {
    query = 'SELECT ' + String.join(fields, ',') + ' FROM Race__c';
    query+= ' ORDER BY DateTime__c desc LIMIT ' + pSize;
    query+= ' OFFSET ' + offset;
}
res.races = Database.query(query);
      
return res;

In this version, I am still looping through all the fields to see if they are accessible, but rather than throwing an exception when even one field is not accessible, I am instead adding the accessible field to a list I created called fields. I am then building a dynamic query string using only the fields that are accessible and finally just executing the query using the database.query method instead.

The result is that when the component renders, rather than seeing any error message at all, the user sees the list of races. But, any fields that are not accessible are just left blank.

Now, I happen to think this is the best solution. What do you think?

If you found this article useful, you might want to checkout my latest course on Pluralsight titled, Lightning Component Development Best Practices, where I talk about handling FLS exceptions and a lot more.

Lightning Best Practice: Storable Actions

File_Server_Cache_Blue

Storable Actions are a GREAT way to enhance the performance of your Lightning components and implementing them is incredibly easy, but there is one big gotcha to seeing them work with a stand-alone Lightning Application.

Even though storable actions are automatically configured in Lightning Experience and Salesforce1, any Stand-alone Lightning apps that are used to host your components will NOT use caching by default.

For these apps to use storable actions, you must do these two things:

1.) Add a new component which you can name whatever you want, but I named mine AppTemplateComponent and have it use the following code:

AppTemplateMarkup

2.) You then need to add the following attribute to the aura:application tag of your Lightning Standalone app:

template="c:AppTemplateComponent"

Once you do this, you should be able to see the caching working for any component used in that app that calls the following line of code:

action.setStorable();

Isn’t that amazing?

Just one line of code is all you need to add to start taking advantage of caching in your server-side actions. The impact on performance can be amazing and perhaps the best place to see is when it comes to rendering a list of data (especially if that data is non-mutable and therefore will not be updated).

This best practice really is a no brainer that everyone building Lightning Components should consider using.

If you found this article useful, you might want to checkout my latest course on Pluralsight titled, Lightning Component Development Best Practices, where I talk about storable actions and a lot more.