Since Lightning Components are built with JavaScript, you can use standard browser development tools, such as the Chrome Developer Tools to debug your components. You can easily access the tools by right-clicking in your Chrome browser and clicking Inspect. You can learn more about the Dev Tools and how to debug with them from this great video here.
But, if you are really serious about debugging your Lightning components, then you need to go one step further and install the Salesforce Lightning Inspector, which is available as a Google Chrome extension. Just click the last link and select the Add to Chrome button. Once installed, you will have access to another tab in the regular Dev tools called Lightning.
Why this tool? Because it gives you an inside peek into exactly how your Lighting Components are constructed and behaving. The Lightning Tab includes several sub tabs, which each reveal more detailed information about your component, beginning with the Component Tree.
Component Tree Tab
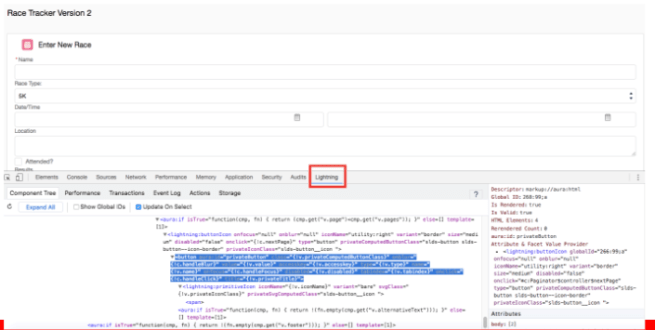
The Component Tree shows you a detailed tree view of the structure of your components. As opposed to the regular elements tab in Dev Tools, which only shows you the rendered version of your components, the Component tree shows you the actual components themselves and gives you information about the attributes they use.
For example, if I use the component tree to look at the Race Tracker Lightning app and expand the elements of the tree, I can click on one of the elements (such as the Race Type, which is really just a lightning:select component) and see detailed info about that component on the right.

Notice how when I select the lightning:select component in the component tree window, that component is highlighted in the browser. Also notice on the right, I have additional information displayed about the attributes and value provider. This type of information can not only be valuable as you are debugging components, but also when learning what all is possible with your existing components. You may discover attributes here you did not even know existed.
Performance Tab
Next up is the Performance tab, which at first glance may look very similar to the regular Performance tab offered by the Dev Tools. However, the Lightning Performance tab provides information that is just specific to your Lightning components and not the Document Object Model (DOM), so you do not have to sort through stuff you are really not interested in.
To use the tab, you must first click the circle icon, which should turn to red when it is turned on. But this is not all you must do. You must also refresh your page or perform some action and then click the graph icon to show the current Collected data. Only then will you see information such as you see below.
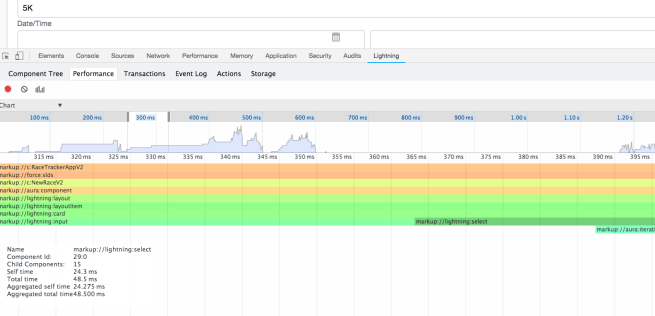
Once the chart is loaded, you can hover over areas in the timeline and narrow in on certain areas, or click on one of the components and see specific performance info about just that component. This can be especially useful when you have a slow performing Lightning page with several components. You can use the chart to visualize the performance of each component and then spot pretty easily any outliers.
Transactions Tab
The Transactions tab is similar to the Performance tab in that you must toggle the recording on before getting any useful information. But the transactions that appear here are triggered by Salesforce apps, so I do not see much use in this particular tab.
Event Log Tab
Just like with the Performance and Transactions tabs, this tab requires you to toggle on the recording and then initiate some action (like a button click) or refresh the page to see the results. You will likely be amazed once you see just how many events are firing off behind the scenes. You can easily spot whether the event was a component or an app event by looking for CMP or APP below the event. And there are buttons that let you filter for either one, as well as unhandled events.

Expanding out the event will reveal very useful information such as the parameters, caller, source, duration and call stack. You can also click the Toggle Grid button to toggle on or off a diagram of the event. This can be very useful when you have a page with multiple components and you are not sure which component fired which event.

Actions Tab
This is my favorite tab and one I use the most. Toggling on the recording will show you actions sorted according to whether they are pending, running, or completed. The view defaults to show all actions, but you can narrow down the list by using the filter buttons at the top. This can be useful for quickly zeroing in on an error since most pages will produce a lot of actions. For example, you can toggle off all the action types, except for error in order to just see those actions.

You can see from the image above, narrowing down my list shows that I have one action that produced an error on the Race Tracker page and it was the one to get all the races. To see the error message that was returned, I can expand the action node. This will also show me the component source, which in this case is the ListRaces component.

Storage Tab
The final storage tab shows you the client-side storage size of any storable actions your page may use. It will also show the specific items contained in storage, if you expand out the items.

If you do not know about storable actions and want to learn more, check out this post. They are easy to use and can really improve the performance of your components.
If you found this article useful, you might want to checkout my latest course on Pluralsight titled, Lightning Component Development Best Practices.

Best way to zero-in on errors is to use Pause on Exceptions – you can then trace back the call stack, inspect variables at that very moment and set breakpoints for next test.
Absolutely! Knowing how to use the regular dev tools is very important to Lightning debugging and why I mentioned it first.