Best Way to Generate Lots of Fake Test Data for Force.com Orgs

UPDATE on 11/16/2022 – This post was written several years ago and is still very popular on my blog, so I decided to do an update. If you are working for a non-profit and using the Nonprofit Success Pack (NPSP) and CumulusCI, then you should strongly consider looking into open-source Snowfakery to generate fake data that adheres to relationships. 

I am currently designing a course for lynda.com about improving Visualforce performance. I decided that it was necessary to load my Developer org with a bunch of fake Account data in order to demonstrate some of the performance improvement techniques I was suggesting. I am NOT talking about unit test data, but actual data (just randomly generated). I have tried to generate things like this in the past and it always turned into a big pain. So I went ahead and did some general queries to see if anyone had already slayed this dragon.

At first I was excited about an article I found on DeveloperForce about Generating and Loading Representative test Data for Salesforce and Force.com Orgs. Perfect, I thought. That is just what I need. Unfortunately, I needed it fast and this article details a painfully long way of generating a Ruby on Rails app and installing all sorts of things that I really did not have the time for. I have worked with RoR a bit and knew this method would take way too long.Fake

I did not want to create my own custom Apex factory or install some expensive app off the AppExchange. So back to searching and then I came upon the website GenerateData.com. I was a bit skeptical about it working, but in less than 15 minutes, I had generated my first data set for 100 Accounts and loaded it into my Dev org. I had hit the fake data jackpot!!!!

Now in all fairness, it did take me a few more tries before I got the data exactly the way I wanted, but this method was definitely fast and effective. I will also tell you that you are limited to only generating datasets of 100 records at a time using the Free version, but if you are willing to pay a very small fee (which I was, since I think it is a GREAT deal for all the time it saved me), then you can save data sets and generate as many records as you need.

And to save you a little time, I am including a screenshot of what my final Account Data Set looked like.

GenerateData

With my paid account, I generated 1000 Account records and imported them using the Data Import Wizard in Setup | Data Management. It took me less than 2 hours to get all the data loaded exactly as I needed it. I consider that HUGE!!!

I hope you find this tool as useful as I did. I sure do appreciate the developer, Ben Keen who wrote it! GREAT job!!!!

Apply .NET Skills to Salesforce

NETTrailReleased yesterday is a new trail titled, “Apply .NET Skills to Salesforce” and it is all about wooing more .NET developers to the Salesforce platform, which I am of course, all for.

This FREE and most excellent resource is written by a .NET developer for .NET developers. It does not sugar coat anything about the platform, but instead tells .NET developers honestly and directly what the platform offers and how their existing .NET skills can allow them to transition easily to Force.com. It also points out a lot of the common pitfalls they will want to avoid to be successful on the platform.

It consists of two modules. The first is all about SOQL and database basics and it has the following 4 units:

  • Moving from SQL to SOQL
  • Writing SOSL queries
  • Writing Efficient Queries
  • Manipulating Records with DML

The second module (which is my absolute favorite), it all about Apex and the Force.com platform and it has the following units:

  • Mapping .NET concepts to Force.com
  • Understanding Execution Context
  • Using Asynchronous Apex
  • Debugging and Running Diagnostics

I hope you check them out, as well as the Salesforce platform, which is growing more impressive by the day. And please let me know what you think.

Nothing but .NET Series on DeveloperForce

microsoftnetYesterday marked the beginning of a new series of posts I am doing for the DeveloperForce Blog on .NET integration with Force.com. The first post, which you can find here goes over the differences between using a service reference versus a web reference when connecting to the Force.com SOAP API using .NET.

I actually discovered a surprise result when doing the research for this post, so if you work with.NET integration at all, I highly suggest you check it out.

How to Run the Sample Ruby on Rails Force.com Canvas App Using Windows

First off, I am a big fan of Jeff Douglas and all that he has done for the Salesforce community. I am constantly getting really useful stuff from his blog. That was why I was so excited to see a post he did this month about getting a sample Ruby on Rails Force.com Canvas App.

I have been playing with Ruby, Node.js, and Heroku for several weeks now, so this seemed like a great thing for me to install and check out. The problem was that I ran into quite a few issues while trying to get the app working (primarily because I am trying to do all this on a Windows machine/command line) and not a Linux or OSX shell (as Jeff was obviously using).

This post is all about the problems I ran into and what you can do to avoid them if you are trying to run this on a Windows machine. So, if you want to install Jeff’s Sample Ruby on Rails app, first follow the great instructions on Jeff’s blog, which have you setup the connected app in your developer org.

For the next section about installing the rails-canvas app, if you are running all this on a Windows machine, you will want to consider the following when completing that section:

  • You will need to already have Ruby running on your machine. But, you will specifically need to be running an older version of it in order to get this particular tutorial to work. I already had the newest version of Ruby (2.0) running on my machine, but I found out that it would not work until I used a particular older version (1.9.3) that is deemed more stable (especially on Windows, and even more specifically on a Windows 64bit machine, as I am using). Specifically, I was not able to start the rails server, without getting an error with the eventmachine. I imagine, you might be able to get around this eventually (even though I tried several things), but I think the easiest way is to just use the more stable version of Ruby.
  • To install Ruby on Windows, go to the RubyInstaller web site and download the Ruby 1.9.3-p545 version specifically. If you already have the latest version of Ruby running on your machine, you will either need to uninstall that version or use a Ruby version manager tool (such as rvm for Linux or Pik for Windows) to specify that you need to be running the older version of Ruby.
  • If you do not already have Git (which is an open source code versioning application) installed on your Windows machine, you will need to install this first in order to get the source code required for this demo. To do that on a Windows machine, you will want to go to the GitHub page to download the installer for the msysGit project. I would also recommend installing GitExtensions for Windows, as it makes it much easier (via a GUI) to clone (aka, copy) GitHub projects to a Windows machine.GitRailsClone
  • Once Git is installed, you will need to use either GitBash (which is installed on your Desktop by default with msysGit) or GitExtensions (as seen in the picture on the right) to clone the sample code that Jeff has provided on GitHub.
  • Once the project is cloned to your local machine, you will need to open a command prompt and change directories to the directory where your project files are located. You will then need to bundle the project (which will install any of the gems this project requires). This is done by issuing the following commands from the command prompt (as seen in the image below).
cd/
cd apps/rails-canvas
bundle

BundleRailsProject

  • You will now need to return to Jeff’s post and follow the instructions to get the Consumer Secret for your connected app. Once you have this secret number, you will need to add it as an environment variable. In Windows, this is done using the Set command from the command window. Jeff’s post refers to the export command, but this is specific to the Linux environment. In Windows, you will just change the command to be “set” instead of “export”, and “YOUR_SECRET” will be the numeric code you retrieve from Salesforce, such as the following:
set CLIENT_SECRET=YOUR-SECRET
  • Now this step is something Jeff’s post does not refer to, but is VERY important if you want to get this tutorial to work. If you were to proceed at this point with Jeff’s instructions, you could start the server, tunnel through port 443 to 3000 and even start your Canvas app, but you would probably get a connection failed error in your browser. The error is caused by the fact that the OpenSSL library that Rails installer uses has no certificate authorities defined by default. Yes, you “could” get around this by changing a line of code in the Gemfile to use http and not https, but that would defeat the whole purpose of this tutorial, since Canvas requires https. So, to fix this, you will need to download a certificate (cacert.pem) and install it on your local machine. Follow the steps in this GitHub Gist post to do that. I imagine Jeff did not mention this because he has been working with this stuff for so long, he probably installed a cert file on his machine two years ago.
  • You will then need to start the Rails server, which you can do from the Windows command prompt. You do this by entering “rails s” or “rails server” from the command prompt.TunnelsUsingCommandprompt
  • Jeff’s post instructs you to use sudo to run the tunnels command, but this is a linux command and will mean nothing to you Windows users. Alternatively, you will need to fire up another instance of the Windows Command Prompt, but do so by right-clicking on the app and selecting, “Run as Administrator”. This essentially does the same thing that the sudo command does. From there just enter “tunnels 443 300” (as I did in the screenshot on the right).
  • From there, you will want to open your browser and go to the https:/localhost/canvas page and click the “Understand the Risks” button that you should be presented with.
  • Finally, you can go back to Salesforce and browse to your Sample Canvas app (either using the Chatter tab) or by going to the Canvas App Previewer (as seen below).

RailsCanvasApp

Now, I realize with all these steps, you might be thinking, “Why the Heck bother?” I hear ya!

But, there is something very powerful in understanding how to do all this. Salesforce and the Force.com platform will only be powerful if you are able to interact with it as seamlessly as possible and Canvas apps offer a GREAT way to do this. I hope you are able to get it working using the steps in this post and you do not waste two days (as I did). 🙂

Good Luck…


Motivation and Tips for Passing the Force.com Advanced Developer Certification

AdvancedDeveloperCertVideoIf you are currently pursuing or even just thinking about pursuing the Force.com Advanced Developer Certification, I strongly suggest you check out this video. It is a recording of a panel discussion held at the most recent Dreamforce (late 2013), in which 3 people (seen in the image on the left) who have recently passed the Advanced Developer Certification shared their personal stories.

All three of the speakers had very different backgrounds and experiences in which to share. They each explained why they chose to pursue the certification, as well as specifics about how they studied for the exam and prepared for the coding assignment.

I found the third speaker, Barry Hughes, tips to be particularly helpful, which included some of the following:

  • Prepare for the essay exam by keeping notes and commenting your code as you complete the programming assignment.
  • When doing the programming assignment, focus on the functionality and not the visuals or the security
  • Make sure when you do your unit tests, that they include tests for positive, negative, bulk and specific profile scenarios.
  • Schedule the essay exam when you have the development for the programming assignment nearly finished. You do not have to wait until after you submit it.
  • When taking the actual essay exam, DO NOT try to copy and paste answers from one section to another. If you do, the testing software will deliberately erase what you typed and you will have to re-type it all (or madly find a proctor to get it back, as Barry ended up doing).

All of the panelists seemed to agree on the following advice:

  • Practice as much as possible by going through all of the workbooks available to you on DeveloperForce.
  • Take as much time as you can for the programming assignment and start as soon as you receive it. You will only have 4 weeks to complete. It took the panelists an average of 40 – 80 hours to complete the programming assignment and all had to do it in addition to their regular jobs.
  • Focus heavily on creating good test code for your programming assignment.

If you have not already run across this document about the Road to Advanced Developer Certification, I strongly suggest you read it too.

Training Review: Force.com Training on Pluralsight.com

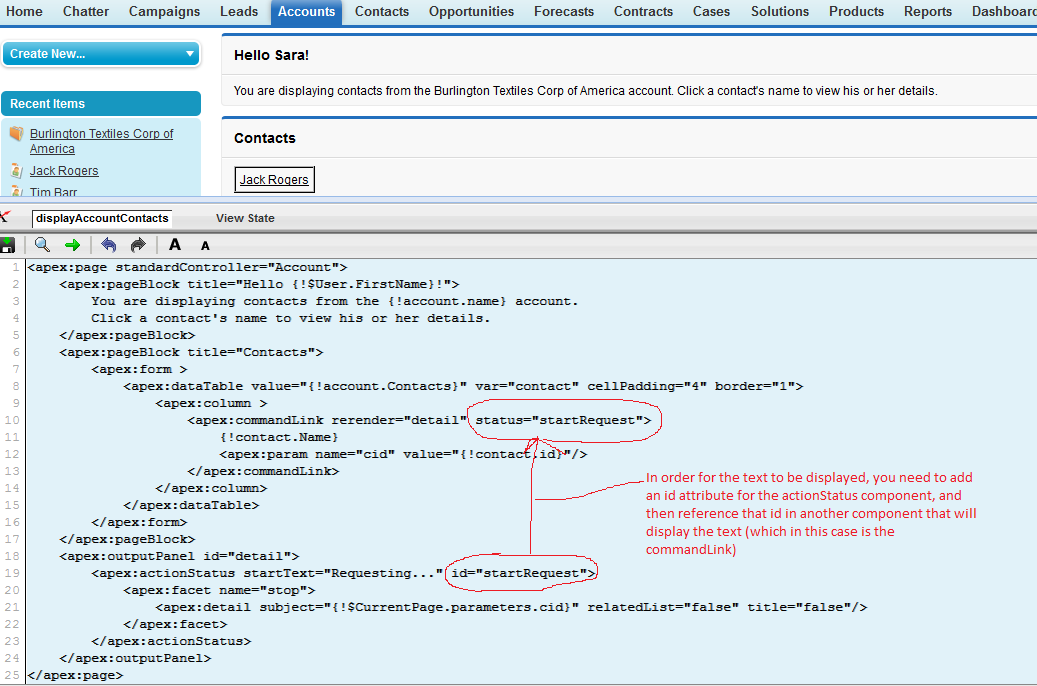
Anyone that reads my blog knows that I am big fan (and regular subscriber) of the Pluralsight training videos. I cannot imagine staying up to date as a programmer without them. At this time, there are only a limited number of courses that cover the Force.com platform (8 to be exact), but I expect new titles will be added very soon. logo-v4

I really think that viewing these courses can be beneficial to anyone studying for the basic or advanced developer certification, or just people working with the Salesforce.com platform in general. These courses can also be valuable to developers (of any platform) that want to determine whether learning more about the Force.com platform is beneficial to them.

Pluralsight offers a free trial that allows you to view 10 days and up to 200 minutes of training. That would allow you to view for free at least one, but maybe two of the courses I describe in this post. Below, I will summarize which courses you should view, depending on where you are coming from and what you are trying to achieve.

First of all, if you only have time to watch one of these courses, I would watch this one:

Force.com Platform: The Big Picture by Don Robins – This is a high-level course that would be very useful for someone brand new to the platform. It is short (1 hours and 24 minutes) and would also be of great interest to experienced developers that have not worked with the platform for long. Robins includes a lot of history about Salesforce and does an excellent job of describing the “Perspective Shift” that is necessary for developers that want to be successful on the platform.

If you are studying for the First-Level Salesforce Developer Exam, I recommend viewing the following course:

Force.com For Developers by Richard Seroter – This is the longest course in the series (5 hours and 47 minutes), but it is also the most thorough. It provides a good overview of the entire platform in a very clear and easy to understand way. Seroter covers many topics that are covered on the 401 Dev exams, such as Reports, Workflows and Approval Processes. He also covers topics on the 501 Advanced Developer Exams, so this course would be good for people studying for that exam as well.

If you are studying for the Second-Level Salesforce Advanced Developer Exam, I recommend viewing the following courses:

Force.com Design Patterns – Part 1 by Adam Purkiss – This course is definitely not for beginners or anyone new to the platform. Purkiss talks about advanced topics such as the use of wrapper classes to get around some of the inherent limitations of SOQL. Some of the code walk-throughs were unpolished and appeared to have not been practiced in advance, but the beginning of each section was very good. My favorite section was the one on Trigger Design Patterns.

Force.com Design Patterns – Part 2 by Adam Purkiss – This course has three distinct segments and I can see the first two (Test Design Patterns and VisualForce Architecture) being especially valuable to anyone pursuing the Advanced Developer Certification. I actually enjoyed this course more than the preceding Part 1, because the examples were more general and the author did not have to waste a lot of time describing how the sample application worked. Purkiss includes many best practices that if you follow will ensure that your code stands the test of time. I really enjoyed the section on how to use Knockout.js to do JavaScript Remoting to create an HTML page that saved custom settings directly to Apex.

Introduction to Visualforce by Matt Lacey – This was my least favorite course, mostly because the speaker had a heavy accent that was hard to understand. He also rushed through the content and the general audio quality of the video was bad. However, the course did provide useful content that would be relevant to anyone studying for the Advanced Developer exam.

If you are an Experienced Software Developer that wants to understand more about the Force.com platform, I recommend viewing the following courses:

Force.com for .NET Developers by Dan Appleman – This course does a very good job of describing the Force.com fundamentals in way that makes sense to .NET developers specifically. Appleman is an experienced author who spent many years creating content for the .NET community, but a few years ago he switched (almost primarily) to working with the Force.com platform. Like myself, Appleman does not dismiss the .NET platform and certainly sees it as still viable, but he also can see the alluring reasons to understand the Force.com platform as well.

Force.com and Apex Fundamentals for Developers by Dan Appleman – Unlike the last course that was specifically designed for .NET developers, this course was designed for developers coming from any platform. It is not a course for people new to programming, but attempts to give experienced software developers a head start to writing “GOOD” code on the Force.com platform. Appleman will tell you about best practices and describe real-world scenarios that only come from hard-earned experience. Most importantly, he covers why design patterns used in other languages do not always apply in Force.com. He focuses on the 4 most important concepts (Execution Context, Use of Static Variables, Limits and Bulk Patterns) that you need to know to start working safely and efficiently in Force.com.

Patterns of Cloud Integration by Richard Seroter – This is NOT a course specifically about Force.com and instead focuses on many technologies that can be used to accomplish integration with cloud applications (on any platform, Force.com included). This course would be of great interest to any technical architects that need to understand to complexities involved with integrating cloud-based applications. Seroter is no doubt an expert in this field and he covers a variety of tools and platforms (such as Biz Talk Server, Windows Azure Service Bus, Mule Cloud Hub and custom code using .NET, node.js, Java, etc) used to integrate Ground to Cloud, Cloud to Cloud, or Cloud to Ground scenarios.

Why a .NET Developer Loves Force.com

When I graduated from College 20 years ago, I had no idea how much would change in the world of Software Development. Back then, the college I attended taught students COBOL as the primary language (and yes, I realize that some people reading this will not even know what that is).

It is lucky for me that I love learning new things. My entire career has been one VERY long lesson – one that changes on an almost daily basis. Blink and you’ll miss the next great language, platform or tool.

While learning new things never bothered me, the other day a simple exercise demonstrated to me how much of a hit my productivity has taken as a result of all the constant big changes in the .NET world of development.

I have been focused on .NET development ever since it emerged and before that, I was a big Visual Basic developer. A little over two years ago, I was introduced to the world of Force.com. One of my clients was using Salesforce and they needed to make it work well with the .NET-based Portal platform they were using.

Despite some initial hesitations, I found myself liking the platform more and more. I loved how stable it was and how I did not have to waste days tracking down crazy server configuration issues (like I did so often when deploying .NET applications). So over the past two years, I have spent as much time as possible learning all about it. A few months ago, I earned the Developer certification and I am currently studying for the advanced certification.

I really came to appreciate the platform when the other day I decided to use it to build a prototype application for a new client. The client was unsure about whether to go further with a project to replace their membership management system. In less than two days (10 hours total), I was able to put together a bare-bones membership management system using a free developer edition.

gbrarams

The prototype application (which has been intentionally blurred to hide sensitive data) included tabs for Documents, Reports, Dashboards, Chatter and Ideas, right off the bat. No programming required. Not a single line of code had to be written. All I did was use the declarative features of the platform to build the app and then I used the Apex Data Loader to import a large group of production member data into the new system. This really helped the client to see the potential of the platform.

I could have never put together something like this on the .NET platform so quickly. The reality is that it would have taken weeks to have put together a .NET prototype with the same amount of functionality. Now, do not get me wrong. I Still love .NET and I am not trying to put it down in any way. But, I have to be honest when I acknowledge that being a .NET developer these days can be a tad bit overwhelming. It seems like just when you have some new tool or language figured out, it has become obsolete and no one is using it any more.

I doubt I will ever get to the point where I am focused solely on any one platform (Force.com or .NET). I think the trick to being valuable as a developer is to keep an open mind and have as vast a skill set as possible. There is never one tool for every job in this business.

I would love to hear what you think???

Proper Use of ActionStatus component

In preparation for the Advanced Developer exam, I have been painstakingly going page by page through the Visualforce Developers Guide (which can be found online here). Almost every single person that has passed the exam has suggested that you become intimate with this document, but I wonder how many people truly are. I keep finding that the code listed in the tutorials does not work as it should. My last post was about one such error and now I have another big one.

On page 44 of the guide, they provide an example of using the ActionStatus component to provide a status for Ajax operations. Great! It is an awesome tool, but unfortunately, the code example they provide on that page does not work. If you copy the code from this tutorial and use it in a page and then try to see the text, you will not see it.

You can however, make two simple code changes to the code they provide and it will work as promised. But, only if you do this, will it work. So, the code that does work is seen below. What the tutorial authors missed was that an id attribute is needed for the ActionStatus component and that id value must be referenced in the status attribute of another component on the page.

ActionStatusProblemCode

Hope this helps someone else from not being confused about how ActionStatus is supposed to work. At first, I thought I was just not seeing it quickly enough (silly me…)