This will be the fourth of a series of posts I will be doing over the next few weeks. This particular post will cover working with the Record Form Base Lightning Component. The series will all lead up to the introduction of my new course titled, “Customizing Salesforce with Lightning Aura Components” from Pluralsight. This course is a total re-write of my most popular course, “Customizing Salesforce with Lightning Components: Getting Started“, which was released back in early 2017. It will focus on using the new modern toolset that Salesforce offers as part of Salesforce DX.
Working with Record Forms
The recordEditForm and recordViewForm components have been around for a while, but the recordForm component was introduced in Summer 18 and was a big improvement. In fact, I was so impressed with this component, I wrote about it on this blog.
The recordForm component represents the best of two other components and essentially merges them into one. This means you will need to write less JavaScript code in the form of handlers, such as onload and onsubmit because the new component will handle these automatically.
Along with less markup, since you will not have to use lightning:input or lightning:output, along with cancel and submit buttons. They are provided for you automatically. And finally, the recordForm component is exposable to more platforms, which at this time includes Lightning Experience, Lightning Communities, Salesforce Mobile App, along with Lightning Out combined with Visualforce.
And the Drawbacks? Well, it is slightly less flexible and as of now, there is a known issue involving validation that I hope you consider voting for (since that is the only way Salesforce will fix it).
Creating a New Quick Case Component
In this section, I will show you how to build a component that let’s users quickly create a new case. The end result will be a component like this:
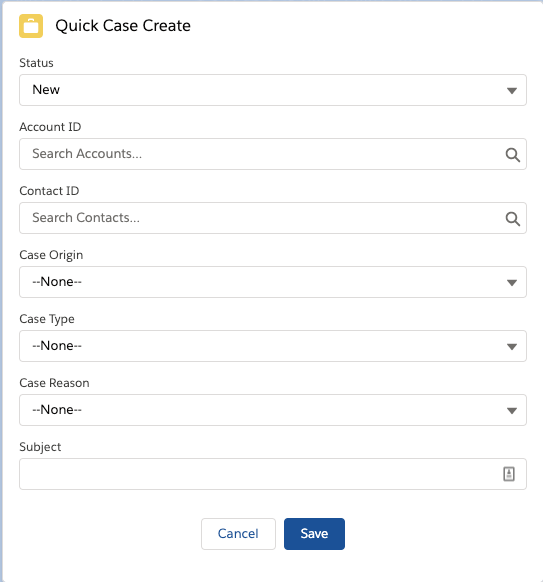
This component will use the recordForm base lightning component. Here is the code for the markup:
<aura:component implements="force:appHostable,flexipage:availableForAllPageTypes,flexipage:availableForRecordHome,force:hasRecordId,force:lightningQuickAction"
                            access="global"
>
    <aura:attribute name="fields" type="String[]" default="['Status','AccountId',
                                    'ContactId','Origin','Type','Reason','Subject']" />
    <aura:attribute name="reqFields" type="String[]" default="['Origin','Status']" />
    <aura:attribute name="recordId" type="String"/>
    <lightning:notificationsLibrary aura:id="notifLib"/>

    <lightning:card iconName="standard:case" title="Quick Case Create" >
        <p class="slds-p-horizontal_small">
            <lightning:recordForm objectApiName="Case"
                          fields="{!v.fields}"
                          onsuccess="{!c.handleSuccess}"  />
        </p>
    </lightning:card>
</aura:component>
And here is the code for the client-side controller. Note that it includes a commented method that would handle validation, since the component unfortunately does not do this (at this time – refer to issue above). I don’t really consider this a workaround, since the whole purpose of the component was to eliminate the need for the additional code. I personally think Salesforce needs to fix it, and hope you agree.
({
    handleSuccess : function(cmp, event, helper) {
           cmp.find('notifLib').showToast({
            "variant": "success",
            "title": "Case Created",
            "message": "Record ID: " + event.getParam("id")
        });
    }
    // },
    // handleValidation : function(cmp, event, helper) {
    //     // NOTE: This method will handle validation if you specify which field to check for specifically, which is
    //     //  not a good workaround since the component should handle this for you without the need to write
    //     //  all this unecessary code (especially since the whole point of the component is to lessen the
    //     //  amount of code that needs to be written). That is why it was not mentioned in the actual course.
    //     var evtFields = event.getParam("fields");
    //     var reqField = 'Origin';
    //     if (evtFields.hasOwnProperty(reqField)) {
    //         event.preventDefault();  //Stops the record from being created
    //         cmp.find('notifLib').showToast({
    //             "variant": "error",
    //             "header": "Error was encountered",
    //             "message": "The following field is required: " + reqField
    //         });
    //     }


})
The code includes the notifications base lightning component. This is used to alert the user with a toast message when the case was added successfully.
Creating Quick Actions
In addition to including this component on the Sales Home page, I exposed it as a quick action and then created a global action using the following steps in Setup.
- In Quick Find, type “global” and select Global Actions.
- Click New Action.
- Select “Lightning Component” as the Action Type.
- Select the quickCase component from the drop down list.
- Enter a label as “Quick Case Create” and tab to next line.
- Click Save to Finish.
After creating the global action, you still need to add the new action to the Publishers layout, which you do using the following steps:
- In Quick Find, type “Publisher” and select Publisher Layout.
- Click Edit to modify the default layout.
- Select “Mobile and Quick Actions”.
- Scroll down to the section for Salesforce Mobile and click the override the predefined actions link.
- Drag the Quick Case Create action onto the section.
- Click Save to finish.
In the next and final post, I will go over the newly redesigned Salesforce Mobile App.

You don’t seem to specify in the code which Global Action to use. Is this why the extra method in the controller was commented out?
The Contact Support Form (https://help.salesforce.com/articleView?id=sf.rss_contact_support_form.htm&type=5) in the Help Center template for Salesforce Communities is based on setting a specific Global Action in the component properties, You add additional fields to the form by adding them to the Global Action layout, and I’m trying to replicate the behavior, so maybe there is a way to do it now?
Hi Amanda. The commented code was provided to demonstrate how to handle validation when you specify what fields to handle in the markup (which was not done in this particular example, since I consider that not a best practice). Hope that helps clarify.