
 This is a list similar to the one I did for Visualforce, which continues to be one of the most popular posts on this blog. So, I thought since I just published a course about Lightning development, I should do a Top 5 Tip list for it as well.
#1 – Refactoring is a Key Principle
Building Lightning Components is very different than traditional web development. When you are first getting started with this type of development, you are better off if you accept right from the beginning that refactoring is inevitable.
When you are first evaluating a solution, the right combination of components may not be intuitively obvious. This is especially true if you are coming from an object-oriented background and tend to look at breaking everything up into nouns and verbs. That approach does not really work with component-based design.
More than likely, you will start off with a design and then find that it makes more sense to refactor your code and break it up into additional or even nested components. There is nothing wrong with this and when developing with the Lightning Component Framework, refactoring is typically quite painless.
#2 – Apps and Components Run in System Mode
All Lightning apps and components run in system mode, which means that it is possible for your components to expose sensitive data without the correct permissions checks. The first thing you want to do is always include the with sharing keyword in all Apex code. This will enforce record access. But, to make your components truly secure, you must also include CRUD (Create Update and Delete) and FLS (Field Level Security) permission checks.
All Lightning apps and components run in system mode, which means that it is possible for your components to expose sensitive data without the correct permissions checks.
Unfortunately, most of the sample Lightning code that is out there right now (including what is on Trailhead and even what is in my first Pluralsight course on Lightning development), does NOT include code to check for proper CRUD or FLS access on the server-side.
In all fairness, Trailhead does include comment markers telling you where it should be inserted, but does not include the code. And in my course, I include a discussion about this topic in the last module and suggest that the viewer add this code themselves as a learning experience. It is not ignored. It is just that when you are learning how to develop Lightning components, there is a bit of a steep learning curve that goes with it. Educational providers such as Tailhead and my first Getting Started Pluralsight course are introducing you to all this in baby steps.
That does not mean that the concept of checking for CRUD and FLS permissions in your Apex server-side code is not important and why I wanted to include this as one of my tips. So, what is all this about?
Since Lightning components do not automatically enforce CRUS or FLS, your components must do this manually. You should check isAccessible(), isDeleteable(), isCreateable() and isUpdateable before running any queries or DML statements.
My friend at Salesforce University, Andres Perez has posted to his GitHub repo a secured data access helper that you can download and install into your org very easily. It includes methods to both query the database and perform DML securely and will throw back an exception if not valid. I strongly suggest that you check it out and consider using it with your projects.
#3 – Mark Most Resources as Global
You should mark your component resources as global for any that need to be accessed outside of your own org. Otherwise your components, attributes and events will not be seen in Lightning App Builder, Community App Builder or an installed package.
For the moment, the access check restrictions are limited and not being checked for all resources. This means that it is possible for you to create a Lightning component now, not mark it as global and have it show up fine in an outside tool. But then, in a later release, the access checks will be tightened and all of a sudden your component is no longer visible or usable.
Therefore, I suggest automatically marking all the following resources with access=”global”, unless there is a security reason not to expose them to outside tools:
- aura:application
- aura:interface
- aura:components
- aura:attribute
- aura:event
#4 – Use Lightning Inspector to Debug and Learn about Lightning
The Salesforce Lightning Inspector is a Google Chrome DevTools extension that offers a lot of really neat features that can help you not only debug your Lightning app, but also learn more about Lightning in general. For example, the Components Tree, which you can see an image of below, shows you attribute names and values for all your Lightning components. Not just the rendered HTML elements, but the actual components as they are defined in your source code. This can be really valuable when you are trying to identify default values for component attributes.

Other useful tabs include the Event Log and Actions. My favorite is the actions, because you can see exactly what data in being passed into the action and then what is being passed back (see image below), which can be incredibly useful when debugging an issue.
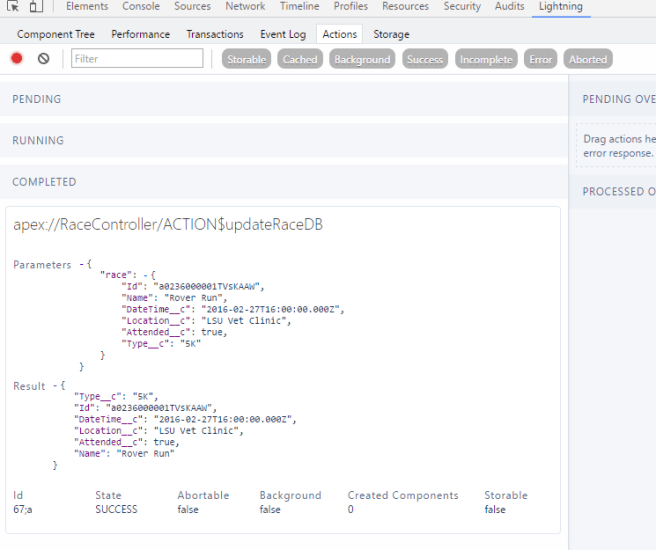
Just keep in mind that when using these tabs, you do need to turn on the recording before you will see results. You do that by clicking the circle icon in the top left corner, which in the screenshot above is red since recording was turned on. If it wasn’t that circle would be grey.
#5 – Take Advantage of Built-in Docs Feature
The last tip involves documentation, which I know is not typically a developers favorite subject, but Lightning makes it so easy to document your components, that it would be silly not to take advantage of this.
You can add a document resource to your component bundle, such as you see in the image below:
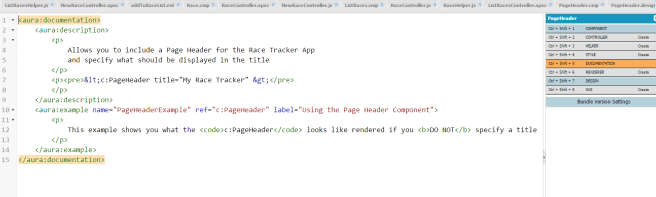
Once created, this documentation resource will be rendered in the AuraDocs app, which every Lightning enabled org has and can be accessed through a URL, such as the following:
https://saralightning1-dev-ed.lightning.force.com/auradocs/reference.app
Where you replace the end of your unique org URL with /auradocs/reference.app
So, my rendered doc resource file defined above, will look like the following:

Cool, eh?
Even if you do not want to create a document resource for your component, then you can at least add a description attribute for each of the following elements:
- Components
- Attributes
- Events
- Interfaces
These descriptions will automatically appear in the AuraDocs for your org (even if you never create a document resource).
