I recently wrapped up a course for Pluralsight about “Salesforce Einstein: The Big Picture”. By the end of the course, I identified key areas where special attention could bring about success. Here are four specific tips and resources on preparing for your own success.
#1 – Get Your Data in Order
High quality data is crucial for the Einstein engine. Issues like missing records, duplicate entries, and inconsistent data standards can cause problems. It’s important to regularly review and update data to prevent inaccuracies.
Identifying low quality data can be done using the free Data Quality Analysis Dashboards from Salesforce Labs.
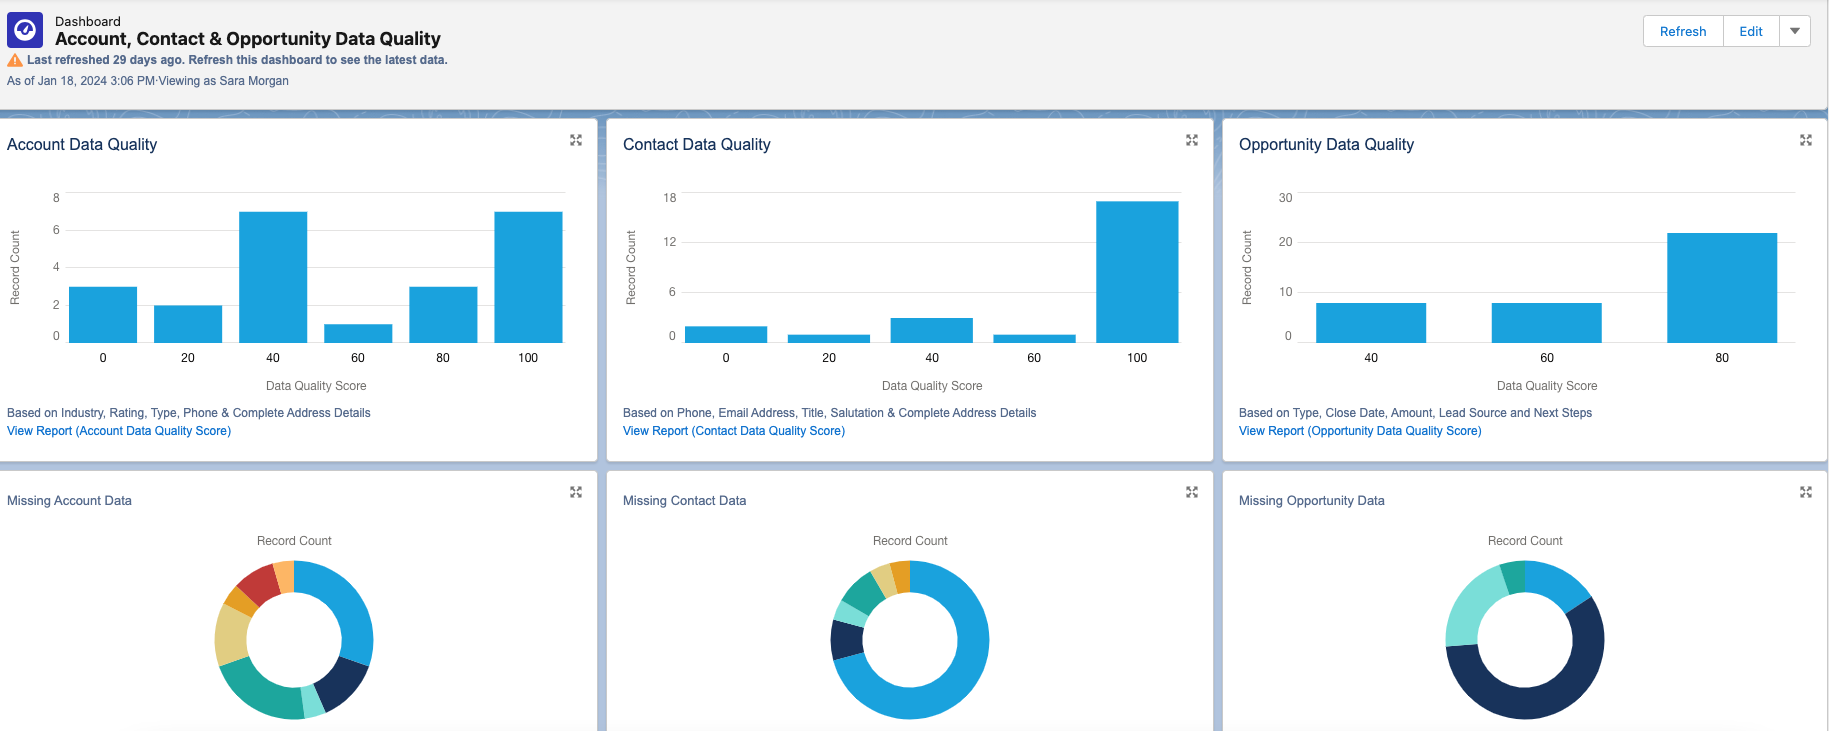
This tool provides reports and dashboards to track data quality for various standard objects. Each dashboard includes a report that you can drill down into for further detail. You can also customize it to monitor additional custom objects.
# 2 -Consider Bias
In computer systems, bias can cause unfair outcomes, even if not on purpose. It’s important to identify and deal with bias to ensure fairness in models and data quality. Here are some types of bias to watch out for:
Measurement Bias: Occurs when data is oversimplified or mislabeled, leading to over or underrepresentation of certain groups. For example, using zip codes could unfairly include or exclude customers from certain areas.
Confirmation Bias: Happens when models reinforce existing belief systems. For instance, a recommendation system based solely on past purchases may limit options for customers.
Association Bias: Occurs when products are connected based on past assumptions, like assuming only girls play with dolls and boys with trucks.
To reduce bias, involve a diverse group in planning and design. Let everyone offer feedback freely and make sure they understand the importance of ethical design and bias detection. This group can also help review results and decide necessary changes.
When choosing training data, consider its source and potential biases. Removing biased data or fields from the dataset can prevent reinforcement of bias in AI systems.
By dealing with bias in the planning and design stages and including a diverse group of participants, we can move towards more fair and ethical AI systems. Check out this blog post for more on how AI can amplify biases.
# 3 -Go with the Flow
Models created with Prediction Builder or Recommendation Builder can produce a score that results in a recommendation. The recommendation is just a suggested action given either to an employee or a customer. For example, “Upsell this customer to the following package our company offers”.
Einstein Next Best Action is a tool used to create an “action strategy” based on that recommendation.
But what is an Action Strategy?
Quite simply it’s a flowchart that automatically executes business logic to generate some type of output. It could be an instruction given to an employee, a task assigned, an email sent, etc. The choices are endless.
For now, you can create strategies with Strategy builder or Flow builder, but be aware that Salesforce plans to retire Strategy Builder in the future, so I suggest only using Flow Builder. If you are not familiar with Flow Builder, now is the time to learn.
It is not difficult to use, but the flows you need to build may be quite complex, so the more comfortable you are using it, the better. I suggest you check out:
Building Flows With Flow Builder
Put Predictions Into Action Using Next Best Action
# 4 – Learn About Prompt Engineering
Are you familiar with ChatGPT? It’s quite the tool, capable of impressive feats. But let’s face it, sometimes it falls short of our expectations. The secret to unlocking its full potential, along with other GPT products from Salesforce, lies in the art of crafting the perfect prompt.
So, what’s a prompt? It’s simply the input you give to ChatGPT or any similar tool to get the desired output. But here’s the catch: getting the right answer often requires some trial and error. You ask a question, ChatGPT responds, and if it’s not quite what you need, you refine your prompt and try again. It’s a bit like a conversation where you keep tweaking your query until you hit the jackpot.
But who has the time to craft elaborate prompts every single time? Not your average Sales or Service rep, that’s for sure. That’s where prompt templates come into play. These are pre-made prompts tailored for specific scenarios. They’re like ready-made templates you can select whenever you need ChatGPT to do something for you.
But here’s the real magic: connecting these templates with your Salesforce data. This is where merge fields come in handy. They allow you to pull in information from Salesforce, making your prompts even more powerful.
Designing a prompt template, especially for something like crafting a customer email, requires careful planning. You need to consider who the email is for, what it aims to achieve, the context, any constraints, and more. It’s an iterative process that involves testing, reviewing, and refining until you get it just right.
Luckily, Salesforce provides tools like Prompt Builder to make this process easier. With Prompt Builder, you can not only include merge fields but also add logic to your templates. This opens up a world of possibilities for common business workflows like email generation or creating text for case summaries.
So, if you want to unlock the full potential of ChatGPT and take your business workflows to the next level, dive into prompt templates and Prompt Builder. And hey, if you need some tips, Salesforce has got you covered with their blog offering 7 tips for powerful prompt design. Happy prompting!


 in Salesforce and clicking Developer Console. This brings up a new window. From the Query tab, you can type in your query using the ID’s gathered in the first two steps. Click Execute to run the query.

