If you have to support a Salesforce org, you will undoubtedly be faced with this question eventually. Why can’t a Salesforce user delete a certain record?
Most people will understandably think of permissions. These are not the only things to consider. There is also Record Sharing. If you want to learn more about that, I suggest you check out this post about Record Sharing.
Salesforce security is multi-layered and rarely enforced by only one of those levels. They work together to restrict and then open up access. You might want to check out the Salesforce Certified Sharing and Visibility Designer Skill Path on Pluralsight that covers all the layers.
Now, back to how to determine user record access. A simple SOQL query can tell you the answer. You can run this query in VS Code’s SOQL Builder or the Query Editor in Developer Console.
SELECT RecordId, HasEditAccess, HasDeleteAccess FROM UserRecordAccess
WHERE UserId = [18 digit User ID]
AND RecordId = [Record ID user trying to delete]
This query will tell you right away whether a user can edit and/or delete a certain record. NOTE: Edit and Delete access are not the same thing. As far as how to get the Id’s and run the query, use the following three steps.
Step 1: Get the UserId
To get the UserID, just go to Setup and Users. Click on the User record you are interested in. Select a portion of the ID that happens right after the address=%2F portion of the URL. It should start with 005. This is the UserID you can use in the query.
Step 2: Get the RecordId
The next thing you need is the RecordId, which in this case is for a Contact record. We can do that by accessing the Contact record in Salesforce and then selecting the portion of the ID in the URL that starts with 003. Go here to learn more about locating ID’s in the URL for Salesforce.
Step 3: Run the Query
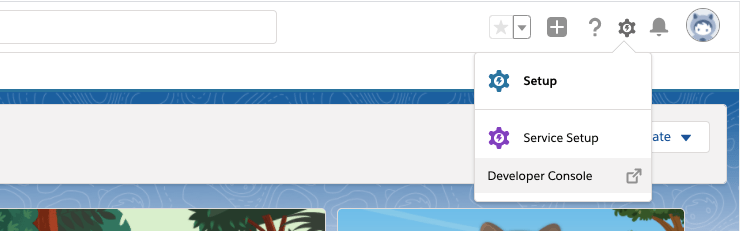
You can access Developer Console by clicking the Gear icon in Salesforce and clicking Developer Console. This brings up a new window. From the Query tab, you can type in your query using the ID’s gathered in the first two steps. Click Execute to run the query.
This is what the final query will look like, which returns false for both edit and delete access.
SELECT RecordId, HasEditAccess, HasDeleteAccess FROM UserRecordAccess
WHERE UserId = '005d0000002rqaS'
AND RecordId = '003d000002ScEwPAAV'
Since this user is not the record owner, by default Salesforce does not allow other users to access the record.
Hope this Tip helps you. If you like this and want to learn more about Record Access in particular, check out this course about Record Sharing.
Today my course about Getting Started with Salesforce Lightning Web Components was published on Pluralsight. This is my 14th course for Pluralsight. This not a tutorial. Instead, I tried to to explain why things were done the way they were and provide tips for how you can do the same when building your own solutions.
10 minute preview video
If you do not have a subscription to Pluralsight, you can always sign up for a free 10-day trial here. I have also created a GitHub repo that contains all the code for the course. Here you will find detailed instructions for how to install this in your own scratch org.
UPDATE: As of 2024, LWC.Studio is shutting down and the tool I used in this post is only available in read mode. Salesforce now recommends you use a tool called StackBlitz to Fork the LWC GitHub repo and create your prototypes, such as what you see here.
This post is in preparation for my soon to be released Pluralsight course, Getting Started with Salesforce Lightning Web Components. While creating that course, I realized how super valuable a tool called webcomponents.dev can be for prototyping an app using Lightning web components (LWC’s).
I created a sample app using their free online IDE. This prototype uses the scaffolding provided for a basic LWC app, with nested components. I am using JSON data to render a list of product tiles. My favorite reasons to use this tool:
See preview of app immediately – In VS Code, you have to configure your meta config file to expose the component, push/deploy to an org and then open that org to see the results. Best of all, you can see it on different screen sizes like tablet and phone.
Integration with GitHub – Create a new repo and then create a branch to make changes.
Share results with others – You can share with a URL (as I have done in this post) or by posting right to Twitter. Share as either a simple view or in play mode where the user is not required to fork for tinkering with the code.
This tool was selected by Salesforce to replace the old playground feature, that has been deprecated. In all fairness, this tool is so much better than the playground. You can use it to create more than just LWC apps. It supports JavaScript, TypeScript, React, Vue 3, etc.
All that being said, this is NOT a replacement for the Salesforce CLI or the Salesforce Extensions for VS Code.
All that being said, this is NOT a replacement for the Salesforce CLI or the Salesforce Extensions for VS Code. I would just use this for prototyping an app quickly or testing out a LWC base component.
As a former member of the Trailhead team, I am hesitant to write this, but I think it is an important thing for people to be aware of. If you have been using Trailhead for longer than a year, then you need to be aware of these pretty serious limitations.
While you can retake challenges for badges and projects, you cannot do so for Superbadges. More importantly, once you complete a badge, you have no way of knowing that the content for that badge may have been significantly updated. As in, all the content you understood when you completed the badge, is no longer relevant.
As I am sure you are aware, Salesforce does major releases three times a year. When they do, they prepare comprehensive release notes and the Trailhead authors are instructed to review these notes and update their content as necessary. That part is great. What is not great is that you as a consumer of Trailhead content have no way of knowing that the content was updated (without revisiting EVERY badge you have earned to examine the content).
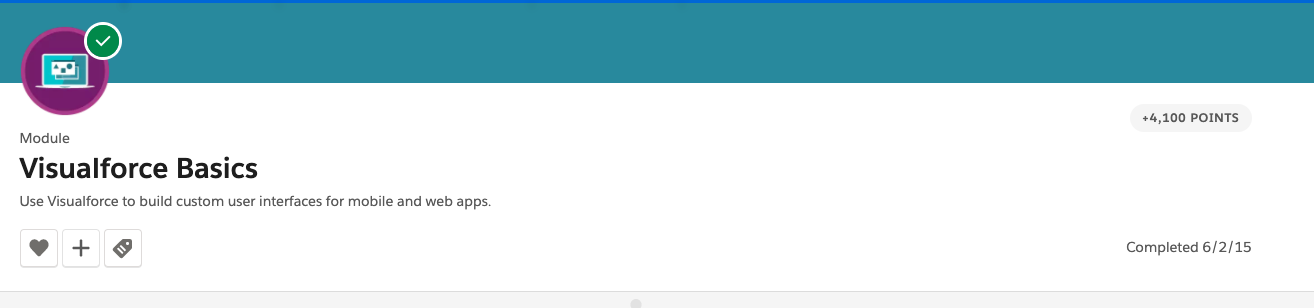
The badge itself just indicates that it was completed on a certain date. As in the image below of a badge I completed in 2015. This badge has since been significantly updated and the content that was once relevant when I completed the badge is VERY different.
Trailhead badge completed in 2015 that now has VERY different content
How do you know that you are aware of the latest features and updates to the platform? Well, it is up to you to pick through the release notes and then cross reference any Trailhead content that you may have completed. Nice, right?
Just wanted to make sure everyone was aware of this (what I consider to be) serious limitation. I hope the team is actively addressing it. I would say I know, but they don’t talk to me since I left the team.
This will be the second of a series of posts I will be doing over the next few weeks. They will all lead up to the introduction of my new course titled, “Customizing Salesforce with Lightning Aura Components” from Pluralsight. This course is a total re-write of my most popular course, “Customizing Salesforce with Lightning Components: Getting Started“, which was released back in 2017. It will focus on using the new modern toolset that Salesforce offers as part of Salesforce DX.
Using an Interactive Development Environment (IDE)
For most modern web developers, their Interactive Development Environment (IDE) is a key to their success. For Salesforce developers, the best choice for an IDE is the Salesforce Extensions for Visual Studio Code.
If you have been a Salesforce developer for a while, then this may be new to you. You may be familiar with the Force.com IDE or Interactive Development Environment for Eclipse, which is incidentally not being supported by Salesforce any more.
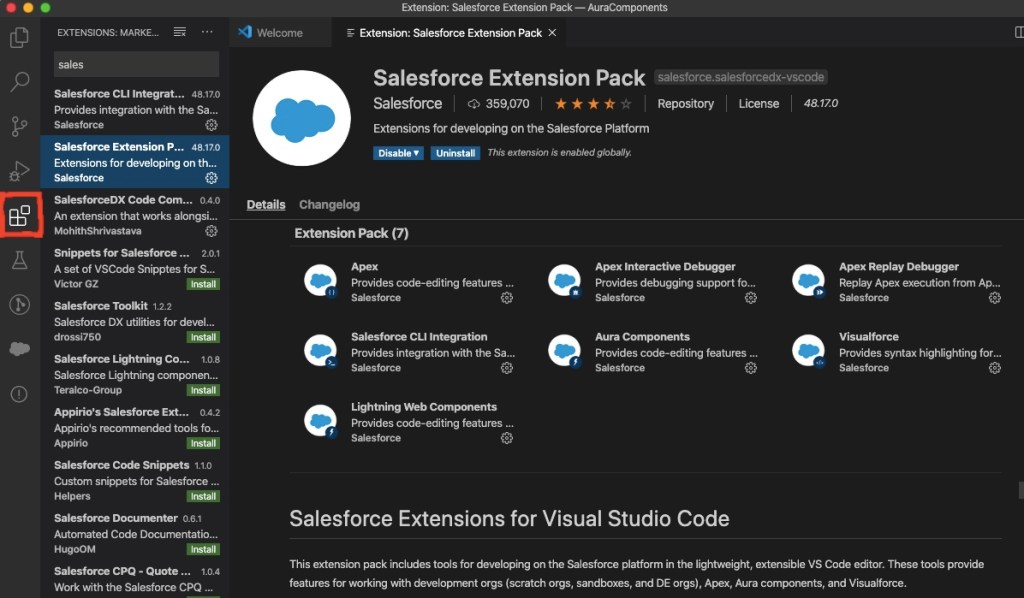
Salesforce Extension Pack for VS Code
Getting Setup with an IDE
To use the IDE, you will first need to install the latest version of Visual Studio Code. After this has been installed, you can open it up and click the extensions icon on the left toolbar.
Install Salesforce Extension Pack by clicking Extensions Icon
You will also need to install the Salesforce Command Line Interface (CLI). This powerful command line interface allows you to do several things with your Salesforce org, such as:
Build and load source code (such as Aura components, Apex classes, Lightning Web Components and).
Export data from any Salesforce org and import it into your scratch org, which is a temporary org that has no data loaded by default.
Execute both Apex server-side and client-side JavaScript tests.
Once you get used to working with the Salesforce Extensions, you might want to check out the GitHub repo, since it is open source. You can get a lot of information about the extensions on the ReadMe page, as well and browse the useful Wiki and Issues tabs.
Understanding Salesforce DX (SFDX)
Salesforce DX represents a whole new set of developer tools. They represent a source-driven development model, which is considered more modern. It is all built around the CLI, which you just learned about. Most importantly it represents a new way of Salesforce development now known as “Packaging Development”.
Prior to packaging development, the only way developers had to deploy their code was to package it up in a Sandbox org and then deploy it to production. This made the salesforce org the “source of truth”, as developers like to call it. But the new model moves the source of truth from the org to a version control system, like Git.
Before you can create any Aura components in VS Code, you will need to do the following things first:
Authorize a DevHub org using either the command palette or the sfdx force:auth:web:login CLI command.
Create a Salesforce project using either the command palette or the sfdx force:project:create CLI command.
Create a scratch org using either the command palette or the sfdx force:org:create CLI command.
Creating an Aura Component in Visual Studio (VS) Code
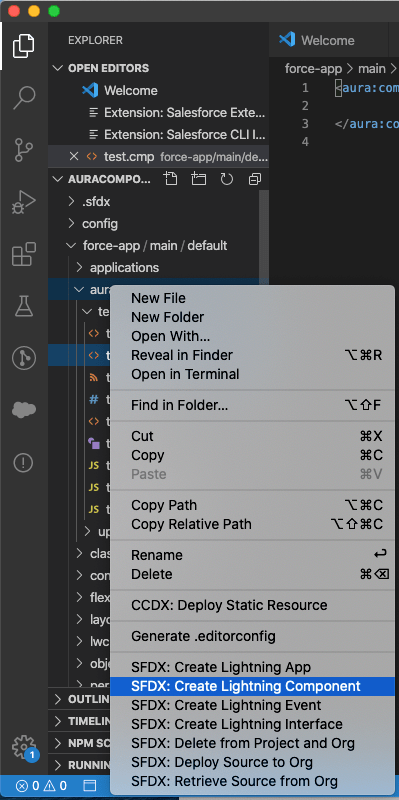
After you have authorized your DevHub and created a project, you can create an Aura component, by browsing to the Aura folder, right-clicking and selecting “SFDX: Create Lightning Component”.
Creating Aura Component in VS Code
Here is the markup code for a very basic component that can be used to update a users mobile phone number.
And here is the JavaScript for the controller , in which the component will begin by only being able to create a windows alter that displays the number entered when the user clicks Submit.
The main thing you will need in order to expose your new component to Lightning App Builder is the following attributes on the required aura:component tag:
But in order to make the component more usable to Admins that might build Lightning Pages using these components, it is a good idea to always include a design resource, such as this:
You can then save all your changes and push them to the scratch org using either the command palette or the sfdx force:source:push CLI command. You will also need to open the scratch org using either the command palette or the sfdx force:org:open CLI command.
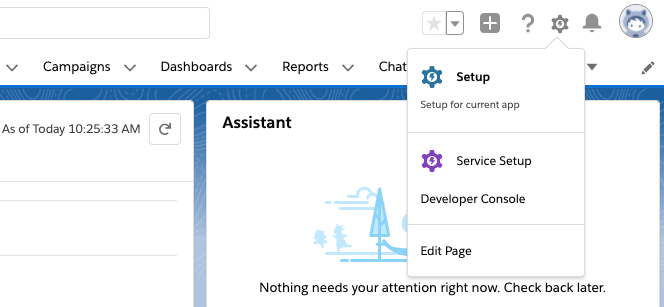
One the org is open, to add the new component to the Sales home page, use App Launcher to go to the Sales app and then click the gear icon and select Edit Page.
Edit Page is used to access Lightning App Builder
You can then just scroll down the list of components until you get to the custom ones and drag the Update Cell Number one onto the design surface.
To finish you just need to save and activate the changes. You can then use the Back button to go back to the Sales home page and see the final component.
Update Cell Number Component, so far
In the next post, this component will be improved on and tied to the Salesforce database.
This will be the first of a series of posts I will be doing over the next few weeks. They will all lead up to the introduction of my new course titled, “Customizing Salesforce with Lightning Aura Components” from Pluralsight. This course is a total re-write of my most popular course (so far), “Customizing Salesforce with Lightning Components: Getting Started“, which was released back in 2017. It will focus on using the new modern toolset that Salesforce offers as part of Salesforce DX.
Understanding the Lightning Component Framework
Lightning components (now called Aura components) were introduced in 2014. At that time, the web standards that existed offered only a limited amount of what developers needed and that is why Salesforce built them on top of the Aura Framework. It was basically, to compensate for what the standards lacked.
Flash forward to 2019 and a LOT has changed in the web development world. That is why in 2019, Salesforce announced the release of Lightning Web Components (LWC’s). It was also at that time that the original Lightning Components were renamed to Aura Components. They co-exist and are completely interoperable with LWC’s.
Who Should be Building Aura Components?
It probably will not surprise you to know that Salesforce developers are perfect for this, but what you might not realize is that so are junior Salesforce developers.
Senior or Junior Salesforce Developers
Another group you may not think of is Salesforce Administrators. You see, Aura components are way simpler to create then Lightning Web Components. Yes, they do still require the developer to know a little about HTML and JavaScript, but since the introduction of Lightning components back in 2014, they have gotten a lot simpler to work with. So, as long as the Admin is seasoned and may even consider themselves as a Super Admin, then I think they too can embrace creating Aura components.
Salesforce Super Admins
Where Can Aura Components Be Used?
Lightning pages
This includes App pages, Home and Record Pages, and even a new Embedded Service Page. The embedded service page will not be covered in this course, but the app and home pages will.
Wizard from Lightning App Builder
salesforce mobile app
In late 2019, Salesforce launched a new and completely redesigned Salesforce Mobile App. You can learn more about it by visiting the New Salesforce Mobile App Quickstart in Setup. This will be covered in the final module on “Creating Components for Salesforce Mobile”.
Access the New Salesforce Mobile App QuickStart from Setup
Other places
These other areas are beyond the scope of this course, but just so you are aware, there is also:
Quick Actions
Stand-alone apps
Inside Visualforce pages
On other platforms such as Heroku, using Lightning Out
Anatomy of an Aura Component Bundle
An Aura component can be made up of several physical files that reside in what is known as a component bundle. Even though there are 8 files that can make up a component bundle, most simple components will only need to access a couple:
Component or Markup file – Uses a .cmp file extension and is a required file and there can only be one per bundle. All markup must be encased in an <aura:component> tag and can include references to other components.
Controller or JavaScript file – Uses a .js file extension and will contain all the client-side methods needed to handle events in your component.
Creating an Aura Component Bundle
The easiest way to create an Aura component is using the online Developer Console. This will be covered only once in this first module. The rest of the course will cover creating bundles using the new modern toolsets.
You can access the Developer Console by logging into a Developer org, click the gear icon and select Developer Console.
Access the online Developer Console
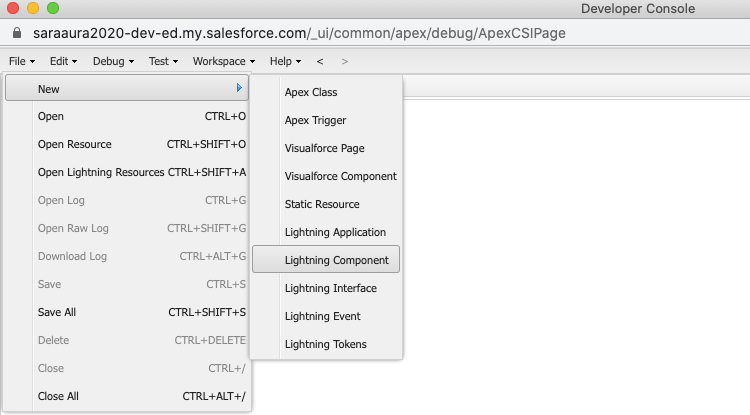
This will launch a new window and from here, you can go to File -> New -> Lightning Component.
Create a new Lightning Component in Developer Console
The initial component I will show viewers how to build is very simple and will be used by Salespeople to update their cell number. From the New Lightning Bundle dialog, you only need to enter the name “updateCellNumber” and select the Lightning Tab and Lightning Page checkboxes in Component Configuration. And finally click Submit.
Create new Lightning Bundle in Developer Console
The component markup will be very simple to begin with and will include 3 Lightning Base Components. as the course progresses, this component, along with others will be expanded upon.
When I discovered Salesforce in 2011, the best way to learn all about it was to go through the Force.com Workbook, which has now been retired. I want to say the workbook was over 400 pages long and even though it did contain a ton of useful information, it was a bit dry and hard to read.
Fast forward to today and the old retired workbook has been replaced by a much improved source of information in the form of Trailhead. Trailhead uses the phrase, “The fun way to learn Salesforce” and they sure aren’t exaggerating.
Since it began in late 2014, Trailhead has grown quite a bit and just recently got it’s biggest update, which you can learn about here. If you are a developer that is interested in learning more about Salesforce, this is the way to go. Not only is the content free, but it is top quality. It is a GREAT, and as they say “fun” way to get introduced to any Salesforce related topic.
If you are interested in learning about Lightning (and who doesn’t want to learn more about Lightning?), and you are new to Lightning, check out:
And if you are already comfortable with the basics of Lightning and looking for something a little more challenging, then check out the following brand new modules:
But don’t stop with Trailhead. If you are really interested in becoming a Salesforce Ninja and earning a 6 figure income, then you need a subscription to Pluralsight too. I know developers tend to shy away from paying for anything, but the low cost of a Pluralsight subscription is more than worth it. And after all, if you are earning a 6 figure income, the low cost of a monthly subscription is nothing really.
The quality of the content on Pluralsight is unmatched by none. I know this because before I became a Pluralsight author, I produced courses/books for other vendors and none of them come close to Pluralsight. No one does more to ensure their authors will be successful and produce unique, quality content like Pluralsight. Period!!!
Also, as great as Trailhead is, it usually is only a starting point. It tells you the most important things you need to know, but tends to skip over a lot of the details. This is part of what makes it fun, but sometimes the details are good to know. Especially if you want to become a Salesforce Ninja, like I know you do. Well that is where the Pluralsight courses will come into play.
I know my two courses on Lightning, which you can find here, are loaded full of details that you will find no where else. The kind of details you get from blood, sweat and tears. From banging your head on the desk for hours before you finally figured out how something worked (NOTE: While I have not literally hit my head on the desk, I have certainly considered it enough).
And besides my two glorious Lightning courses, there are a bunch more about Salesforce (with more coming out everyday). In particular, I recommend:
I have recently been using Trailhead to help me study for an upcoming exam and I have been incredibly impressed with how good it is. I have already posted about the Trailhead modules that cover new material, such as Lightning, but what I was surprised about was how useful it was for reviewing material that I thought I already knew pretty well.
Trailhead is definitely not exhaustive in it’s coverage, but what I like most about the modules is that they go over just the stuff you really need to know. And most importantly, they go over best practices. There are so many examples of inefficient and just plain bad code out there (even on some of the Salesforce sites I hate to say). The text and challenges in the Trailhead modules were well thought out and it is obvious they put a lot of time into developing them. It still surprises me that something this good is free, but fortunately for us, it is.
If you are preparing for one of the Certified Developer tracks, you really need to check out the Developer Trail. It covers a lot of what goes into the exams and the progressively harder challenges really solidify what you just learned. Unlike tutorials that you can just follow in your sleep, the challenges tell you to do something, but not how to do it. And, if you do not do it exactly right, you do not get the points. You actually have to THINK about what you are doing and this is absolutely the best way to learn.
And if you are a certified developer who has been doing this for several years, there is still stuff for you to learn, even when it comes to best practices. As we all know, this platform is changing constantly and that means that so are best practices.
And honestly, it is just fun seeing yourself rack up the points. I really like the WooHoo I get at the end of the challenge. I am proud to say I have 5 badges and over 12,000 points so far (with more to come). How many will you get?


 in Salesforce and clicking Developer Console. This brings up a new window. From the Query tab, you can type in your query using the ID’s gathered in the first two steps. Click Execute to run the query.


 surprises me that something this good is free, but fortunately for us, it is.