If you have to support a Salesforce org, you will undoubtedly be faced with this question eventually. Why can’t a Salesforce user delete a certain record?
Most people will understandably think of permissions. These are not the only things to consider. There is also Record Sharing. If you want to learn more about that, I suggest you check out this post about Record Sharing.
Salesforce security is multi-layered and rarely enforced by only one of those levels. They work together to restrict and then open up access. You might want to check out the Salesforce Certified Sharing and Visibility Designer Skill Path on Pluralsight that covers all the layers.
Now, back to how to determine user record access. A simple SOQL query can tell you the answer. You can run this query in VS Code’s SOQL Builder or the Query Editor in Developer Console.
SELECT RecordId, HasEditAccess, HasDeleteAccess FROM UserRecordAccess
WHERE UserId = [18 digit User ID]
AND RecordId = [Record ID user trying to delete]
This query will tell you right away whether a user can edit and/or delete a certain record. NOTE: Edit and Delete access are not the same thing. As far as how to get the Id’s and run the query, use the following three steps.
Step 1: Get the UserId
To get the UserID, just go to Setup and Users. Click on the User record you are interested in. Select a portion of the ID that happens right after the address=%2F portion of the URL. It should start with 005. This is the UserID you can use in the query.
Step 2: Get the RecordId
The next thing you need is the RecordId, which in this case is for a Contact record. We can do that by accessing the Contact record in Salesforce and then selecting the portion of the ID in the URL that starts with 003. Go here to learn more about locating ID’s in the URL for Salesforce.
Step 3: Run the Query
You can access Developer Console by clicking the Gear icon in Salesforce and clicking Developer Console. This brings up a new window. From the Query tab, you can type in your query using the ID’s gathered in the first two steps. Click Execute to run the query.
This is what the final query will look like, which returns false for both edit and delete access.
SELECT RecordId, HasEditAccess, HasDeleteAccess FROM UserRecordAccess
WHERE UserId = '005d0000002rqaS'
AND RecordId = '003d000002ScEwPAAV'
Since this user is not the record owner, by default Salesforce does not allow other users to access the record.
Hope this Tip helps you. If you like this and want to learn more about Record Access in particular, check out this course about Record Sharing.
I have had a few people ask me this question and I think it is a good one, so I wanted to answer it in a post. First of all, for anyone not sure what the difference is between Aura and LWC, you might want to checkout this post I did.
As for the answer….wait for it…..It depends. It depends on:
How experienced you are as a Developer with JavaScript and HTML5, or modern development tools such as Visual Studio Code, Command Line Interfaces, GitHub? If you are very experienced and have even done work with React or Angular, then I would suggest starting with LWC’s. Developing with Aura components is a legacy method that Salesforce is not actively enhancing.
HOWEVER, If you are supporting or might be supporting a legacy Salesforce org? Knowing about Aura (and even Visualforce) is a very valuable skill set to have. For example, if you are doing work for a large org that is currently using many Aura components and there is no need to change these components, then having that Aura skillset can be invaluable. If you want to learn about Aura components, you night want to check out this course I did on Pluralsight. Most importantly, as of early 2023, LWC’s cannot be used to override standard buttons. (NOTE: HOWEVER, in 2024, allowing for the override was added to the Roadmap for LWC, so this limitation is being actively worked on).
Like Salesforce Evangelists, I do think that LWC’s are the better alternative in terms of component performance, but if all you need to build are very simple components, then there is no reason why you cannot start with Aura and transition to LWC’s. To be entirely honest, LWC’s are more challenging to create for developers that are not already familiar with modern web development.
I hope this post helps anyone not sure about which technology to approach first. Feel free to reach out to me if you have additional questions or concerns.
If you are a software developer or architect then the word security should be of prime importance in everything you do. Forrestor just published 2023 predictions for software development. At the top of the list is a prediction that the recent wide spread adoption of low-code solutions will cause headline security breaches in 2023.
Luckily, Salesforce provides a robust and layered security approach, but if not used properly, it could open up several security vulnerabilities. If you are not familiar with how Salesforce security works, this is the time to beef up your knowledge.
If you are not familiar with how Salesforce security works, this is the time to beef up your knowledge.
Last year, I published a series for Pluralsight that I reference here on my blog. If you are a Pluralsight subscriber, I strongly urge you to check it out.
If you are not a Pluralsight subscriber, you can check out my series about it here on my blog. You can also signup for a free 10-day trial here. And, for a limited time, Pluralsight is running a Black Friday, Cyber Monday sale where they are offering 50% off their annual subscriptions.
UPDATE on 11/16/2022 – This post was written several years ago and is still very popular on my blog, so I decided to do an update. If you are working for a non-profit and using the Nonprofit Success Pack (NPSP) and CumulusCI, then you should strongly consider looking into open-source Snowfakery to generate fake data that adheres to relationships.
I am currently designing a course for lynda.com about improving Visualforce performance. I decided that it was necessary to load my Developer org with a bunch of fake Account data in order to demonstrate some of the performance improvement techniques I was suggesting. I am NOT talking about unit test data, but actual data (just randomly generated). I have tried to generate things like this in the past and it always turned into a big pain. So I went ahead and did some general queries to see if anyone had already slayed this dragon.
At first I was excited about an article I found on DeveloperForce about Generating and Loading Representative test Data for Salesforce and Force.com Orgs. Perfect, I thought. That is just what I need. Unfortunately, I needed it fast and this article details a painfully long way of generating a Ruby on Rails app and installing all sorts of things that I really did not have the time for. I have worked with RoR a bit and knew this method would take way too long.
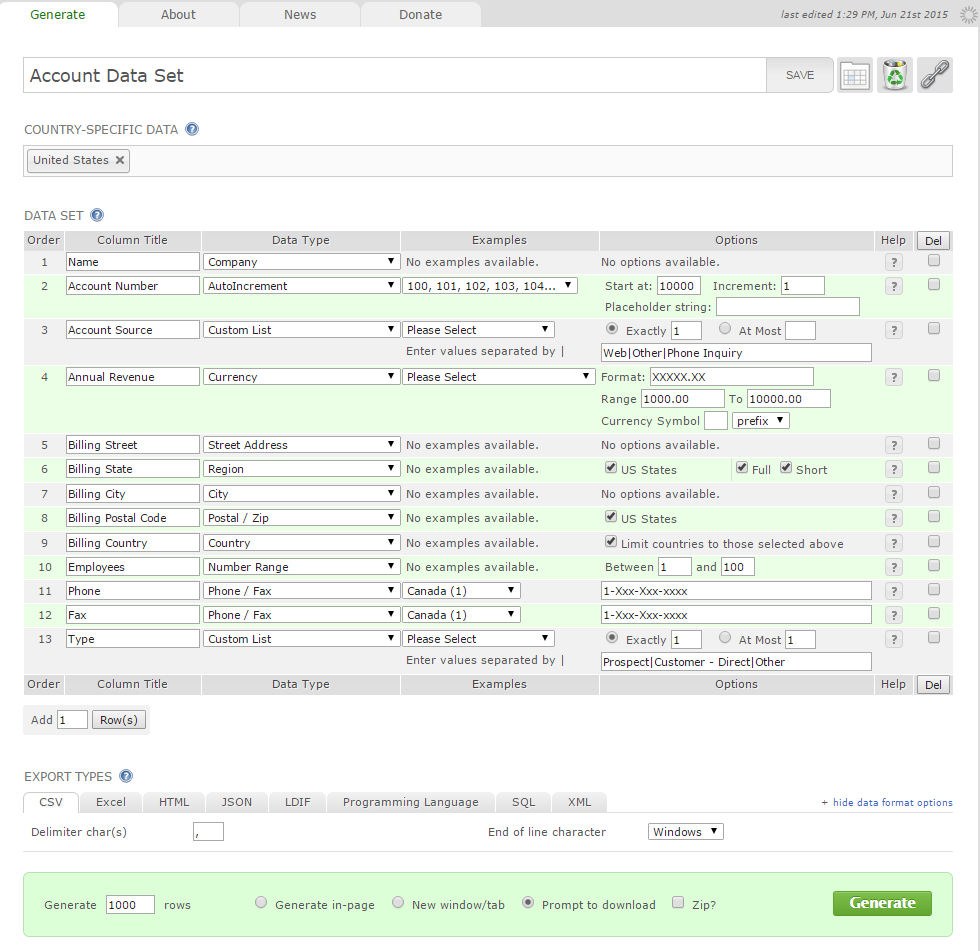
I did not want to create my own custom Apex factory or install some expensive app off the AppExchange. So back to searching and then I came upon the website GenerateData.com. I was a bit skeptical about it working, but in less than 15 minutes, I had generated my first data set for 100 Accounts and loaded it into my Dev org. I had hit the fake data jackpot!!!!
Now in all fairness, it did take me a few more tries before I got the data exactly the way I wanted, but this method was definitely fast and effective. I will also tell you that you are limited to only generating datasets of 100 records at a time using the Free version, but if you are willing to pay a very small fee (which I was, since I think it is a GREAT deal for all the time it saved me), then you can save data sets and generate as many records as you need.
And to save you a little time, I am including a screenshot of what my final Account Data Set looked like.
With my paid account, I generated 1000 Account records and imported them using the Data Import Wizard in Setup | Data Management. It took me less than 2 hours to get all the data loaded exactly as I needed it. I consider that HUGE!!!
I hope you find this tool as useful as I did. I sure do appreciate the developer, Ben Keen who wrote it! GREAT job!!!!
Today my course about Getting Started with Salesforce Lightning Web Components was published on Pluralsight. This is my 14th course for Pluralsight. This not a tutorial. Instead, I tried to to explain why things were done the way they were and provide tips for how you can do the same when building your own solutions.
10 minute preview video
If you do not have a subscription to Pluralsight, you can always sign up for a free 10-day trial here. I have also created a GitHub repo that contains all the code for the course. Here you will find detailed instructions for how to install this in your own scratch org.
UPDATE: As of 2024, LWC.Studio is shutting down and the tool I used in this post is only available in read mode. Salesforce now recommends you use a tool called StackBlitz to Fork the LWC GitHub repo and create your prototypes, such as what you see here.
This post is in preparation for my soon to be released Pluralsight course, Getting Started with Salesforce Lightning Web Components. While creating that course, I realized how super valuable a tool called webcomponents.dev can be for prototyping an app using Lightning web components (LWC’s).
I created a sample app using their free online IDE. This prototype uses the scaffolding provided for a basic LWC app, with nested components. I am using JSON data to render a list of product tiles. My favorite reasons to use this tool:
See preview of app immediately – In VS Code, you have to configure your meta config file to expose the component, push/deploy to an org and then open that org to see the results. Best of all, you can see it on different screen sizes like tablet and phone.
Integration with GitHub – Create a new repo and then create a branch to make changes.
Share results with others – You can share with a URL (as I have done in this post) or by posting right to Twitter. Share as either a simple view or in play mode where the user is not required to fork for tinkering with the code.
This tool was selected by Salesforce to replace the old playground feature, that has been deprecated. In all fairness, this tool is so much better than the playground. You can use it to create more than just LWC apps. It supports JavaScript, TypeScript, React, Vue 3, etc.
All that being said, this is NOT a replacement for the Salesforce CLI or the Salesforce Extensions for VS Code.
All that being said, this is NOT a replacement for the Salesforce CLI or the Salesforce Extensions for VS Code. I would just use this for prototyping an app quickly or testing out a LWC base component.
🤯 This weekend, I discovered an issue trying to debug a Lightning Web Component in the Chrome debugger tools.
UPDATE on 11/13/2022: Salesforce includes a way to automatically disable LWS for your scratch orgs through the security settings in your config/project-scratch-def.json file. You will simply need to add a sessionSetting for lockerServiceNext set to false. Instructions below show you how to do this through Setup. Thanks to Grzegorz Skaruz for pointing this out.
If you try to debug JavaScript in a scratch org using the Chrome Debugger, you will no longer see the components listed in the page hierarchy under the Sources tab (like you may be used to doing).
To still debug your LWC’s, you will need to first disable this feature in your scratch org. You can do this in:
Session Settings -> Uncheck “Use Lightning Web Security for Lightning Web Components”. Click Save.
Unfortunately, it is still hard to see where to go in Chrome Debugger. But, you expand the c subfolder under components (see image below).
Chrome Debugger After LWC Disabled in Scratch Org
Good luck and if you find a better way to do this, please leave a comment below to help others.
Top five best practices for Lightning Web Components (LWC)
👏🏽 The following best practices are in order of importance.
# 1 – Always Cache Data
Lightning web components offer two ways to cache data. The first is to use Lightning Data Service, which automatically handles security for you. The best part is that you do not have to write any Apex classes – especially platform required test classes.
If you must use Apex, then you can simply mark your methods as cacheable using the AuraEnabled annotation. The Winter 23 release introduced the global scope option for this annotation.
@AuraEnabled(scope=global)
public static myCacheableMethod() {}
# 2 – Use Conditional Rendering
Conditional rendering means that portions of a component will not be rendered until a condition is met.
For example, let’s assume you had a component that displayed a list of widget data. You would not want the list to be built unless there was data available. If there was no data, then the user would see a message telling them there are no widgets.
<div if:true{widgets}>
   <template for:each={widgets} for:item="widget">
       <li key={widget.Id}>{widget.Name}</li>
   </template>
</div>
<div if:false{widgets.length}>
   There are no widgets available
</div>
#3 – Use Pagination with Lists
While we are on the topic of lists, rendering a list of data has the potential for causing lots of performance problems. Many Salesforce orgs have custom objects that contain hundreds, thousands, if not millions of records.
The best way to prevent these lists from getting out of control is to introduce a pagination component. You can see an example of this in the eBikes GitHub repository.
There are now 94 base Lightning web components to choose from. They cover everything from a simple input box to a complex record form.
These components not only offer the CSS from the Salesforce Lightning Design System (SLDS), but they offer a performance advantage. These components are already rendered at the client-side, so they do not require additional download processing.
# 5 – Use SLDS Icons and Styling
And since I mentioned the SLDS, let me remind you that the Lightning Design System website offers hundred of optimized icons. Using your own customized icons can result is low render quality and resolution, so be sure to take advantage to these readily available goodies.
Want to learn more about Lightning Web Components?
In this series, I will be sharing highlights from courses that are part of the Salesforce Certified Sharing and Visibility Designer Skill Path on Pluralsight. The skill path is designed to help anyone trying to pursue the Salesforce Sharing and Visibility Designer certification.
Setting Org-wide Defaults
Org-wide defaults (OWD) provide a default level of access for records owned by users. More importantly, they can be used to limit data access for each standard or custom object. You can set different levels for internal versus external users.
Default levels:
Private is the most restrictive and means that only the record owner and users above them in the role hierarchy can view or edit records.
Public read only allows all users to view records, but not edit them.
Public read/write is the least restrictive level and means full access for all users.
Public read/write/transfer is used only for case and lead records, since these types of records can be transferred to another owner.
For each object there is a “Controlled by parent” checkbox. As you might guess, this affects objects that are children. They will inherit the access level of the parent.
Every time that user attempts to access a record from a particular object, Salesforce will first check the OWD. If it is set as private or read/only, the system will look at the object’s sharing table and join the group membership table based on the ID of the user trying to access the record.
Depending on what is found, the least restrictive access will be granted. The access grant, or sharing row cause will be stored as a record in the sharing tables that I told you about in the last post. This is the record access calculation process.
Designing a Role Hierarchy
Role hierarchies provide data access for a group of users. It allows managers access to records owned by their employees. Essentially, record access is opened up vertically to users higher up in the hierarchy. By default, peers or other members assigned to the role will not have access to these records.
…role hierarchy should NOT be a duplicate of your company org chart.
The role hierarchy is just one tool included in the Salesforce Sharing Model. The role hierarchy sits right in the middle. This means that baseline access, implicit sharing or org-wide defaults will override access provided by the role hierarchy.
Salesforce Internal Sharing Model
When designing a role hierarchy, the following things should always be kept in mind:
Your role hierarchy should NOT be a duplicate of your company org chart.
Users should be grouped into access levels. Only users assigned to roles above them will have the same access as the record owner.
Roles should only be created for permanent groups of users and not a group that is considered temporary because changes cause expensive sharing recalculations to take place.
Orgs created prior to the Spring 21 release are limited to 500 roles.
Sharing Rules and Manual Sharing
It is important to realize that the entire Salesforce sharing model is model is built around record ownership. When a user creates a new record, they automatically become the record owner. Records can also be assigned to queues.
…the entire Salesforce sharing model is model is built around record ownership
Sharing rules are created for objects, but you only do this if the OWD for that object is set to private or read-only. Otherwise, there is no need to create a sharing rule since everyone has access to that object. They open up object access for a select group of users.
When thinking about selecting a group of users, they can be assigned to a public group, which is not the same things as a queue. A public group consists of one or more users. These users can be individual users, or they can belong to a role or territory. Users that are part of a group cannot own a record, but they can be part of a sharing rule.
Queues on the other hand are generally used to manage ownership of objects such as leads, cases, and even custom objects. The record is owned by the queue and not any of the users assigned to the queue. However, queues are not used in sharing rules. Sharing rules are configured with public groups or roles.
Manual sharing happens when one user wants to share a record with another user. They can do this by clicking a button in the user interface. But keep in mind that manual sharing is only available for Accounts, Contacts, Cases, opportunities, leads and custom objects.
Only certain users can grant this kind of access. This includes, the:
Record owner
Users above the record owner in the role hierarchy
Any user that has been granted full record access
Administrators
Manual sharing is primarily used for special exceptions. That is why it sits above sharing rules in that upside down triangle you saw earlier.
Welcome back to the second post for this series. In this post you will be introduced to the Salesforce Record Sharing Model for internal users. This will involve sharing Salesforce data across users, groups and roles.
In this series, I will be sharing highlights from courses that are part of the Salesforce Certified Sharing and Visibility Designer Skill Path on Pluralsight. The skill path is designed to help anyone trying to pursue the Salesforce Sharing and Visibility Designer certification.
Diagnosing User Access Issues
Most Salesforce Administrators will eventually be asked why some user cannot access certain data. In situations such as these, it is helpful to refer to a diagram such as the one below.
Salesforce Sharing Model for Internal Users
The Salesforce sharing model can be imagined as an upside down triangle. Tools at the top of the triangle provide the widest level of access to the greatest number of users. Tools located at the bottom can be used more precisely to grant certain kinds of access to the least number of users.
When trying to figure out user access problems, you would start at the bottom. In other words, baseline access should be the first thing you look at, followed by implicit sharing and so on. Keep going up the triangle until you determine what the problem is.
Sharing Tool
Description
Baseline Access
Involves a combination of a profile permissions along with permission sets.
Implicit Sharing
Salesforce’s built-in sharing behavior between account and child records (contacts, cases and opportunities)
Org-wide Defaults (OWD’s)
Determines an objects’ default access level and is the only way to limit record level access.
Role Hierarchy
Expands data access vertically. Allows managers to access records owned by the users they manage.
Sharing Rules
Define criteria for sharing access with specific users or users in public groups/roles
Manual Sharing
Typically used for special circumstances, users can intentionally grant record access to a user that would not normally have access.
Team Access
Used to grant access to teams, which are groups of users that work together on objects like accounts, opportunities or cases.
Territory Hierarchy Access
Used to manage and grant account access to users assigned to sales territories.
Salesforce Record Sharing Tools
I am not going to lie to you, the Salesforce record sharing model is complex. But don’t be overwhelmed because throughout this series, I will be introducing you to all of these tools.
Working with Access Grants
Access grants are what Salesforce uses to determine who sees what data. The process of determining this all starts with an object sharing table. Object Sharing tables are completely separate from the object table itself where all the Salesforce data lives, such as the information about an account lives.
Sharing tables will store information about the grant (or sharing type) such as whether it is explicit or implicit. Implicit grants happen when there are children records associated with a parent.
For instance, accounts and contacts are designed with this kind of relationship. Contacts are considered children of a parent account and understandably users that can access a contact can also access the account.
Implicit grants will override explicit grants, which happen when a record is shared with manual sharing or sharing rules. So it is important to always keep implicit grants, or implicit sharing in the back of your mind. If you ever have a situation where you cannot figure out why a user is accessing a record, consider implicit sharing.
If you ever have a situation where a user is accessing a record you think they should not have access to, consider implicit sharing.
Object sharing tables are created automatically and follow a very specific naming pattern. For example, when the object record table is named Account, the sharing table will be named AccountShare. And the thing that ties these two tables together is the owner of the record. When dealing with a custom object such as one named myCustomObject, the sharing table will have the object name followed by two underscores and the word Share.
Determining what values go into a sharing table occurs when record access is calculated. This is a separate process from when a user attempts to access the actual record in the user interface or with an API. This process only happens during a configuration change, such as creating a new custom object. And you should know that It is a very complicated resource intensive process known as sharing recalculation.
Things are done this way in order to improve record access performance. If all this checking was done in real time, the system would not perform well at all and users would be very unhappy.
Record access calculations can happen when changes are made to:
Group membership
Role hierarchies
Territory hierarchies
Kicked off manually by an Administrator
It is important to realize that record access calculations can act like a ripple effect in a Salesforce org. For this reason, large orgs should be especially careful when kicking this off or making any changes that might trigger it. The process could negatively impact the orgs performance.
Since this is such a HUGE topic, I will not be covering everything in this one post. Stay tuned for the next post where I will be covering more.


 in Salesforce and clicking Developer Console. This brings up a new window. From the Query tab, you can type in your query using the ID’s gathered in the first two steps. Click Execute to run the query.