Introduced in Winter 2013, Force.com Canvas offers a way to host non-native (aka, non-force.com) web applications within Salesforce. Using a signed request, applications developed with your language of choice (including .NET) can connect to Salesforce and access data without requiring the authenticated Salesforce user to also log in to your web application.
I really like this technology because it opens up lots of opportunities for developers and allows shops with little Force.com experience another option. However, that does not mean that using it is all sunshine and butterflies. For one, it is very new and so there is not a lot of documentation out there (especially about .NET). The official developers guide is focused more towards Java developers, yet there are some very specific considerations that need to be made when working in the .NET environment. I recently had the opportunity to convert a Java Canvas app to an MVC Canvas app and this article highlights some of the main considerations you need to make when working in that environment.
MVC Project must use No Authentication
If you are creating a new MVC app, you will need to click “Change Authentication” when creating the project and select “No Authentication” (see 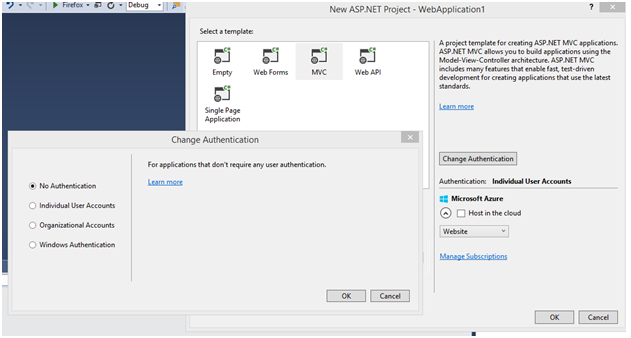 Image). This will mean that the authentication scaffolding that ASP.NET adds to the project will not be included. I was not able to make a canvas app work with this scaffolding included. Perhaps, it can be done, but the only way I could make it work was to create a new project without the authentication (which makes sense since the authentication is being handled by the signed request and Force.com Canvas).
Must set SSL Enabled Property to True
Regardless of whether an ASP.NET Web forms or MVC application is used, you will need to set the site binding as HTTPS by setting the SSL Enabled property to True. You will also need to ensure that the Managed Pipeline Mode is set as Integrated. These properties can be 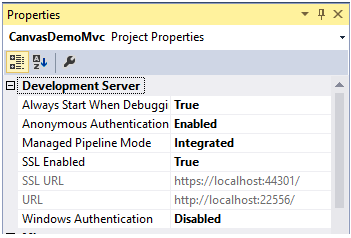 accessed by right-clicking the project in Solution Explorer and looking at the properties in the Properties window(see image). Also, note here that the SSL URL is the one you will want to use as the Canvas App URL when setting up the Connected App in Salesforce.
May want to consider using the following GitHub project to do handle the Server-side Authentication
In my project, I created a couple of class files to handle the server side validation of the signed request token passed in from Salesforce. However, to make your life easier and speed your time to development, you may want to consider downloading and using the following GitHub code to do the verification part. I did not find this code until after I had written mine and I thought mine was more streamlined, so I opted to go with it instead. But, looking at Shawn Blanchard’s code could give you a HUGE head start. If you don’t like that example, then you can check out the code that Paul Short posted here. It shows how to do the verification part for both a web form app and an MVC app.
